How to Create a 4GB/s RAM Disk in Mac OS X

RAM Disks, as the name indicates, are logical storage volumes created using a computer’s memory (RAM) instead of a traditional hard drive or solid state drive. The benefits are easy to understand: RAM operates at speeds far beyond current hard drive technology. But there’s also a major negative: data stored in RAM is not persistent, meaning that it is erased when the RAM loses power due to a reboot, shutdown, or power loss.
Despite this drawback, there are still several situations that can greatly benefit from the speed of a RAM Disk, including using it as a Photoshop scratch area, manipulating large video files, or testing complicated databases. If you’ve got good backups of your data and you’re willing to risk losing the contents of a RAM Disk in the event of a power failure, setting one up is easy and fun. Here’s how.
How Big Should a RAM Disk Be?
The methods for creating RAM Disks, outlined below, will allow you to create a volume of any size. You’ll want to be careful to leave enough RAM available to run your Mac, however; if you use most or all of your RAM for a RAM Disk, the system will begin paging aggressively to the hard drive and overall system performance will plummet.
Therefore, make sure to choose a good ratio between your needs and your overall system memory. In general, it’s wise to keep your RAM Disk at or below 50 percent of your total physical memory. On a Mac with 16 GB of RAM, for example, don’t make your RAM Disk bigger than 8 GB.
Your choice will also depend on what applications you need to run while the RAM Disk is mounted. If you’re doing heavy Photoshop work, for example, you’ll want to leave more memory available for the app. On the other hand, if you’re just muxing video and audio files you can choose a RAM Disk a bit higher than 50 percent of your total memory.
Play around with the tools and techniques below to determine the best choice for your Mac and your needs. Now, it’s time to create the Disk itself. In OS X, there are two primary methods of creating a RAM Disk: the Terminal or an app.
Creating a RAM Disk via Terminal
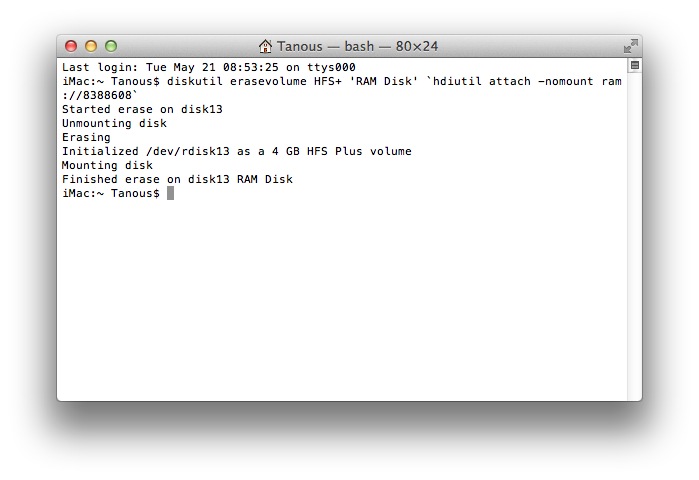
Open the Terminal app from Applications > Utilities and enter the following command:
diskutil erasevolume HFS+ 'RAM Disk' `hdiutil attach -nomount ram://XXXXX`
Replace the X characters with a number that represents the block size for the total capacity of your RAM Disk. Calculate this number by multiplying your desired size of disk in megabytes by 2048. In our example, we’ll create a 4 GB RAM Disk, which requires a number of 8388608 (4096 * 2048). Input this number in place of the X characters in the command above:
diskutil erasevolume HFS+ 'RAM Disk' `hdiutil attach -nomount ram://8388608`

You can also change the “Ram Disk” name inside the double quotes to another name you prefer. Once you’ve configured the command, press Return to launch it. After a brief moment, the system will create and mount your RAM Disk. You can now read and write to it as you would with any other drive, as long as you remember that any data stored on the disk will be lost after a reboot or power loss.
Creating a RAM Disk with a Third Party App
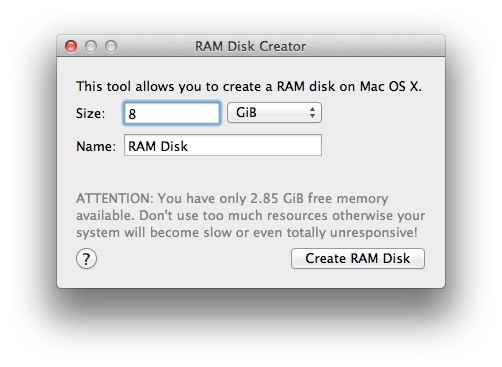
For an even easier method, you can use a third party app to create a RAM Disk. There are several apps that perform this function, but we’ll use RAM Disk Creator from programmer Florian Bogner.
Download the app and launch it on your Mac. It will ask you two questions: the desired size of your RAM Disk (in bytes, kilobytes, megabytes, or gigabytes) and the name you’d like to assign the disk. We’ll use an 8 GB disk with the unimaginative name “RAM Disk.”

Once you’ve made your choices, simply press “Create RAM Disk” and the disk will mount to your desktop.
With both methods, you can get rid of the RAM Disk by ejecting it or rebooting. Again, make sure that all data on the disk is backed up before doing this; the data will be irrevocably lost once you reboot or lose power.
Benchmarks
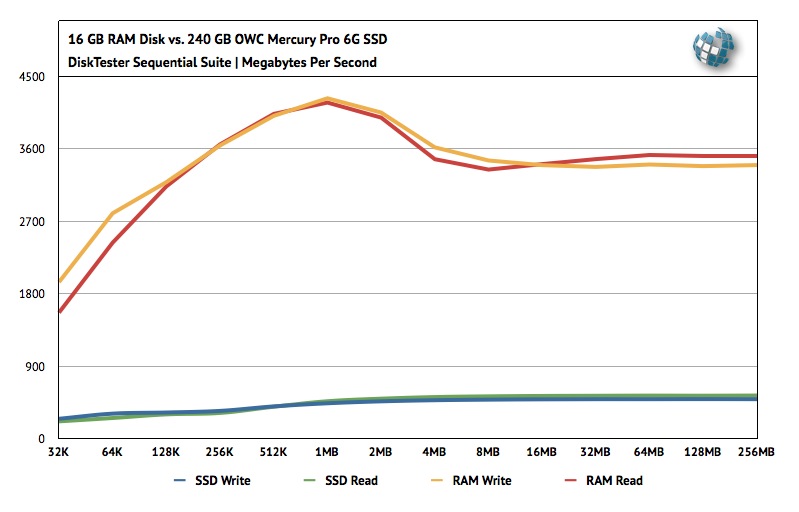
The speed of RAM Disks will vary based on the performance level of your Mac’s RAM, but will still outperform traditional HDDs and SSDs by a wide margin. Here’s a performance comparison using a 16 GB RAM Disk on a 2011 27-inch 3.4GHz i7 iMac with a 240GB OWC Mercury Pro 6G SSD.

The OWC SSD can achieve 490MB/s writes and 540MB/s reads, numbers that by normal standards are exceptional. When compared to the performance of a RAM Disk, however, the SSD’s performance isn’t worth a second look. The RAM Disk peaks at about 4.2 gigabytes per second in both reads and writes, and averages about 3.5GB/s throughout the transfer sizes. For disk-intensive tasks, this performance can be a game changer.
Conclusion
As you can see, RAM Disks can offer power users an amazing level of performance, but it cannot be stressed enough the dangers of using volatile memory for data storage. As long as you keep good backups and save your work to a standard hard drive frequently, however, many users may find that the benefits of RAM Disks far outweigh the risks.


16 thoughts on “How to Create a 4GB/s RAM Disk in Mac OS X”
I want to utilize almost of ram disk. should I copy the app to the ram disk?
Thank you very much, I`m new at this and I have a lot of questions (:
Surely it should by 1024 ?
Time Machine however doesn’t backup the contents of the Ram Disk, neither does if show up in the list of volumes for Time Machine to include/ignore. Ah well.
Back when Photoshop was 32bit and limited to using <4GB RAM for the main app, it was interesting to setup a RAM disk for scratch, then when Photoshop ran out of main app memory, it started paging to scratch disk… but that disk was just more RAM so the paging performance hit was held off for a bit longer.
But now Photoshop is 64bit it'll happily eat up all of your RAM without any help from a RAM disk. I see no value in using a RAM disk for Ps now.