How to Limit Responses in Google Forms
The simple interface of Google Forms makes it perfect for creating surveys and polls. You only need a valid Gmail account to create a form and quiz, and everyone with an account can post a response.
While undoubtedly useful, responses can sometimes also be detrimental, especially when there are too many of them. That’s why knowing how to limit them is quite handy, and we’ll present you with four methods to accomplish this.
Hit the Switch
People love Google Forms for its convenience of use, and part of that convenience is a simple built-in feature that lets you stop accepting responses at any time. Just go to the Responses tab of your form, and you’ll find the “(Not) accepting responses“ switch. Hit it and leave a message explaining why, if you feel like it.
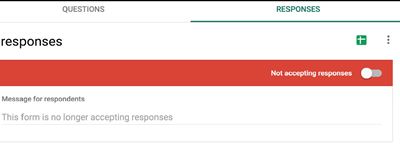
Although it may seem like the end of your troubles, this method is not flawless. The trick is that you need to hit the switch manually every time a form reaches your desired threshold. That means that you need to monitor the number of entries. It’s certainly not a waste of time as going through thousands of responses, but what if you don’t have any time to waste? Then it’s time to move on to the add-on solutions.
Complete Customization
Compared to the above-mentioned humble switch, the FormLimiter add-on seems like the land of plenty. Not only does it limit the number of responses, but it also provides you with three different criteria to do it.
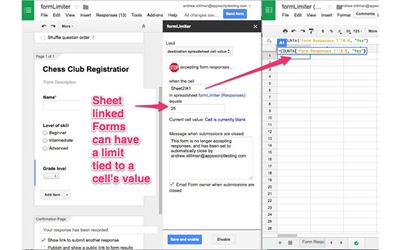
You can base the automatic prevention of responses on a specified number of responses, but also on a specific time or date, even cell value.
Complete customization is excellent when there’s a tight deadline to gather information. If you don’t want responses after a specific time, pick the „time and date“ option. Enter the desired date and time, include a message, and that’s it.
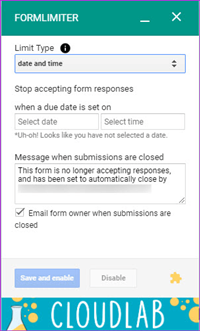
You’ll notice that there’s an email option you can check, which is a quite useful hack. Besides the fact that it will let others know when the submissions period ends, it will also notify you when the limit’s been reached.
This super handy app is easy to use, you can switch it off when not required, and it doesn’t require any separate log-in. To install it, tap on the three-dot button at the upper-right corner of your form and choose Add-ons. Then search for FormLimiter, tap the plus button, give the necessary permissions, and it’s ready to use.
A Step Back
Regardless of the subheading, the next add-on with a quite literal name of Control Accepting Responses is a small leap forward. The advantage it brings to the game is that it allows you to take a step back and schedule the survey or quiz in advance. If you want them to take place after a couple of days, add the start time.
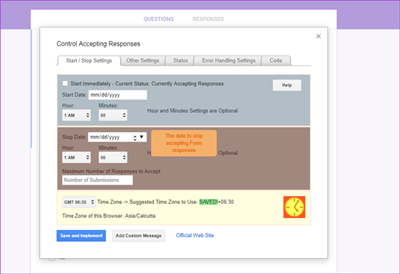
Apart from that, it limits the responses through usual features such as the number of submissions or particular date and time. Activate it through the Add-on icon, uncheck the „start immediately“ checkbox, and pick the time and date you want to start. After you add the Stop criteria, you can create a custom message if you wish. Then hit the “save and implement button, “ and you’re all set.
Tick-Tock, Says the Clock
If you’re not only time-bound but also in desperate need of actual results, Timify.me is a great add-on to motivate recipients. It is like putting a stopwatch on your Google Forms. That’s why it’s mainly used to create and distribute student exams through Google Forms.

After you enable it on a particular form, that same form will become visible on the app’s interface. That’s not an obstacle nor gain, but an option to create customized links for your recipients is undoubtedly an advantage. Since the links can be clicked only once, there won’t be any messy duplicated forms, and you can even customize the start and end screen to make your form look cleaner and more professional.
The app is quite simple to use: select it from the “Add-ons“ button, choose “Configure, “and check the ‘Enable Add-on“ box. After you open the dashboard, you’ll see the form you’ve created on the left panel, so tap on “Create links“ and enter the names of your recipients or you can choose to import them from another form.
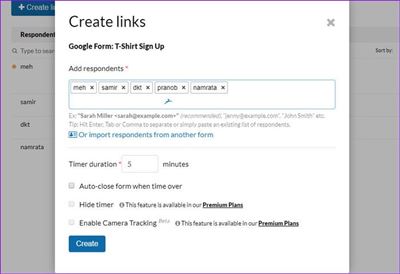
After you hit the “Create“ button, customized links will appear next to all the names. All that’s left to do is share the links with your recipient. The timer at the top of their screen will evoke urgency, and the very nature of this add-on guarantees that the responses will be limited.
No More Responses
As you can see, there are many ways to limit responses in Google Forms. If you’ve just realized you had enough, hit the switch on the built-in feature. If you want to customize everything, prepare in advance, or make sure you’ll get some results before the deadline, use one of the add-ons. There are so many options. We would say that the sky is the limit, but when it comes to responses, it might not be.
How do you limit responses in Google Forms? Do you use the built-in feature, or do you use add-ons? Give us your two cents in the comments section below.


