How To Disable the Keylogger in Windows 10

Windows 10 is many things to many people but what it is to all of us is a privacy risk. It collects, collates and uploads a whole host of data about how you use Windows, browse the internet and generally work with your device on a daily basis. If you want to take back control of your computer, you’re going to want to disable the keylogger in Windows 10. You will also want to tweak a few more settings while you’re at it.
Windows 10 was free for most of us so we can’t really blame Microsoft from wanting its money back. But, even if you bought a retail license you are still being monitored. That seems a little unfair to me. Regardless of that, our privacy is one of the few things we retain a semblance of control over so we should all exercise that control before we lose it completely.
Why is Windows spying on me?
The Microsoft blurb says: ‘We will access, disclose and preserve personal data, including your content (such as the content of your emails, other private communications or files in private folders) when we have a good-faith belief that doing so is necessary to.’
And: ‘When you interact with your Windows device by speaking, writing (handwriting), or typing, Microsoft collects speech, inking, and typing information—including information about your Calendar and People (also known as contacts).’
Windows will then upload this information to Microsoft for them to do with as they will. But why? Two reasons, one is to help make Windows better and the other is to make money.
Microsoft collects typing, writing and speaking data to improve how Windows 10 interprets our input. The more they know, the better they can tweak Windows 10 to work more to how we like it. That makes a kind of sense.
The other reason is to make money to help pay for Windows 10. As we got it for no financial cost, the actual cost is our data. Microsoft collects browsing information, user habits, app purchases and other data to help it market its own products to us and to help third parties market their products to us.
You can read the Windows Privacy Statement here if you have the time and patience.
If you don’t want to be tracked, followed and studied, you need to perform a few tweaks in Windows 10. Starting with the keylogger.

Disable the keylogger in Windows 10
First, let us disable that pesky keylogger. It is designed to study your typing habits so Windows 10 can refine how it works.
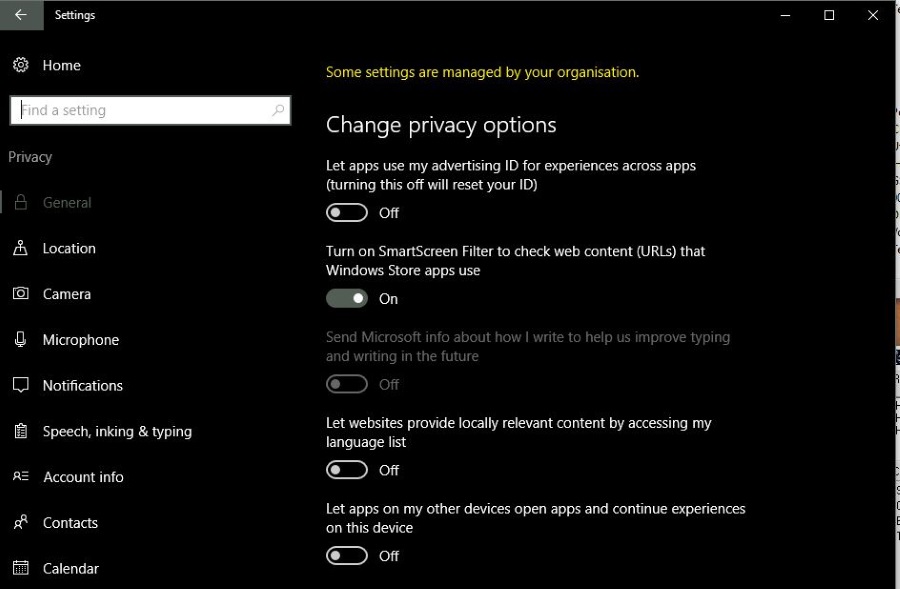
- Navigate to Settings and General.
- Toggle off ‘Send Microsoft info about how I write to help us improve typing…’.
- Navigate to Speech, inking & typing.
- Select ‘Stop getting to know me’ and switch it off. It should change to ‘Get to know me’ once off.
Don’t close Settings yet though as there are a few more privacy tweaks you can make to ensure much less data is captured by Microsoft.
- Select General and toggle off most of the settings in there.
- Do the same for Location, Account info, Call history and Feedback & diagnostics. Essentially, you want to turn off anything that says allow app/Microsoft or whoever to access data.
Some apps need to access your data to work, such as Mail but others like your webcam do not. Use your judgment to decide what permissions you allow.

Improve privacy further in Windows 10
There is more you can do to improve your privacy if you use Windows 10. Perform as few or as many of these as you like.
- Press Windows key + R, type ‘regedit’ and hit Enter.
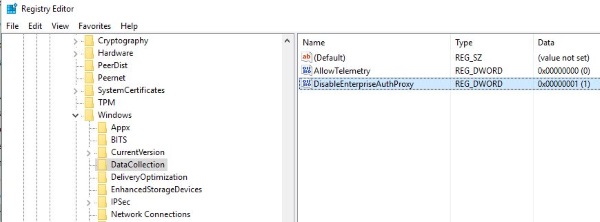
- Navigate to HKEY_LOCAL_MACHINE, SOFTWARE, Policies, Microsoft, Windows, DataCollection.
- Right click in the right pane and create New, DWORD (32-bit) Value.
- Call it AllowTelemetry and give it a value of 0.
You can turn off Cortana to seriously upgrade your privacy.
- Press the Windows key + R, type ‘regedit’ and hit Enter.
- Navigate to HKEY_LOCAL_MACHINE\SOFTWARE\Policies\Microsoft\Windows.
- Right click the Windows folder, select New, Key and call it Windows Search.
- Select New, DWORD (32-bit) Value, call it ‘AllowCortana’ and set it to 0.
Use Spybot Anti-Beacon to stop any telemetry not included in these tweaks. I regularly use Spybot Anti-Spyware and Anti-Beacon and it does what it says on the tin.
- Download and install Spybot Anti-Beacon as an administrator on your Windows 10 computer.
- Check the immunization levels and click Immunize at the bottom.
- Select the Optional tab and select to immunize other elements depending on your needs.
There are other apps available to stop Windows 10 spying and they all do much the same thing. I just prefer Spybot Anti-Beacon because it is low key and I have used Spybot products for over a decade and they haven’t let me down yet.
Finally, turn off open hotspot connection if you use a laptop or mobile device. By default and for some crazy reason Windows 10 defaults to automatically connecting to Wi-Fi hotspots. Even insecure ones. That’s something you are going to want to turn off right away.
- Navigate to Settings and Network & internet.
- Toggle off Connect to suggested open hotspots.
- Toggle on Use random hardware addresses if you have the option to.
That last setting is optional but if you regularly use hotspots, this prevents your being tracked while you do it.
The cost of privacy
Improving the privacy in Windows 10 will stop your data from being shared quite so readily but it will also affect how Windows 10 works. For example, if you turn off Cortana, Windows search doesn’t work properly. Turn off telemetry and Microsoft cannot use your data to help improve Windows 10.
Some of these privacy settings also affect how Windows Store and some apps work too. If you turn off ‘Let apps use my advertising ID…’ you will still see ads but they will be generic ones instead of ones tailored to your interests. In rare instances, Windows services can stop working properly too. Much depends on the system you’re running and how Windows 10 is set up.
Despite popular belief, Windows 10 isn’t designed to take away your identity or steal your personality. It is just there to make itself better and to make money off your data. There is no grand conspiracy and most of your data is anonymized anyway. That said, it is your data so it’s up to you to protect it.
Got any other tips to stop Windows 10 spying on users? Tell us about them below.


3 thoughts on “How To Disable the Keylogger in Windows 10”
Navigate to Settings, Privacy, General