How to Use Your Host Key in Zoom

The Zoom host key is a six-digit password that grants you as the host controls during a meeting. This key is located in your profile, where you can both view and edit it.
The following sections describe how to take full advantage of the key. The guide also covers when to use it and how to trigger the key within any given scenario. The important thing to acknowledge is that you need a Zoom Education, Pro, Enterprise, or Business account for this to work.
Different Scenarios
There are five possible scenarios when you can use the host key to claim host privileges during a meeting. Here’s what they are:
- If you join a meeting before enabling a host and you’re joining via a Zoom client.
- After you join a Zoom Room for a scheduled meeting. That is, when you join with a personal link or meeting ID.
- When in a meeting via an H.323 device or a smartphone.
- After multiple Zoom Rooms access a meeting. By default, the first one becomes a host but you can use the host key to change this.
- In PSTN-only personal audio conference meetings.
Tip: When you have Zoom administrative privileges, you can use Advanced Security Settings to prevent users from changing their host keys. This option is useful when hosting webinars but might not be necessary for in-house purposes.
How to Customize Zoom Host Key
This action is very simple, but you need to do it via the service’s web portal. Check out the necessary steps below.
Step 1
Go to zoom.us and sign into your profile, then select “My Profile” on the top right of the window. This action takes you to the main settings for your account.
Step 2
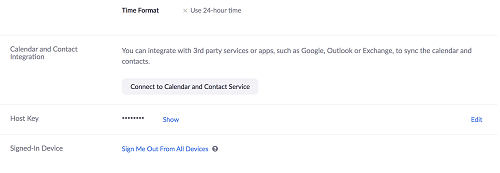
Swipe down to the very bottom of the screen and you’ll be able to see the Host Key option. It should be the penultimate tab, just above “Signed-In Device”.

Step 3
By clicking on Show you can preview the current host key. And if you click on “Edit” you can change the six-digit code to something else.

Ultimately, there’s not much to changing the key. Clicking on “Edit” reveals the numbers, you then need to choose the new ones and click on the “Save” button. A pop-up window might appear to confirm your selection, choose okay and you’re good to go.
How to Claim Host with the Key
Here you have four different options, each with its own quick guide.
Via Desktop Client
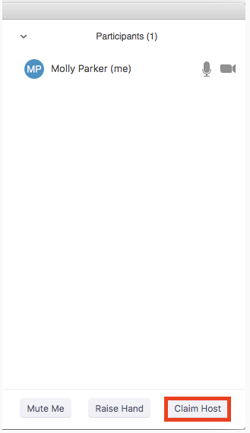
This one allows you to become a host before one is enabled in a meeting. The first thing to do is to join the meeting and select the Participants tab in the app.
![]()
Click on the “Claim Host” button at the bottom left of the Participants window. You’ll now be required to enter your host key. Once the system verifies it, you’ll be in full control of the meeting.

Via Cloud Recording
This scenario is super straightforward. The system automatically asks you for the host key when you want to initiate the Cloud Recording.
In truth, the topic of setting up Cloud recording merits its own article. At this point, it suffices to say that you need to enable Cloud Recording through Account Settings under Account Management.
Via PAC (Personal Audio Conference)
When using PAC meetings any participant that knows the key can start the conference. The only thing they need to do is enter the code when prompted.
At that point, the meeting starts and all other attendees can come along as participants. Of course, the host is in control and can use the dial pad.
Via SIP or H.323 Device
To join a meeting via an H.323 or SIP device, you need to place the host key within the given dial string. This requires a bit of typing as there are some differences if you’re using a password-enabled meeting. Anyway, these are the things you need to know.
SIP
If entering a meeting sans the password, the string follows the template below.
[Meeting ID]…[HostKey]@[IP Address]
For example, it might look something like this: 987654321…654321@techjunkie.com. And if there’s a password, this is the template:
[Meeting ID].[Password]..[HostKey]@[IP Address]
So, the example would look like this: 987654321.54321..654321@techjunkie.com.
Note: The last full-stop after .com is for grammar purposes – you don’t need it in the string.
H.323
For H.323 meetings without the password, the sting template is as follows.
[IP Address]##[Meeting ID]###[Host Key]
The string example might look like this: 192.168.1.25##987654321###654321. And if there is a password, the template is a bit bigger.
[IP Address]##[Meeting ID]#[Password]#[Layout]#[Host Key]
Finally, the example string with a password looks like this: 192.168.1.25##987654321#54321#22#654321.
Zoom Into Your Key
When all’s said and done, the Zoom Host Key is like a special password to gain more control over your meetings. And it’s great that you get to easily change to the six-digit code.
Who usually hosts the Zoom meetings you attend? Have you ever been a host and which host features do you like the best? Give us your two cents in the comments section below.


2 thoughts on “How to Use Your Host Key in Zoom”