How to Add Products to a Page on Shopify

Getting started with Shopify is simple. After you create an account and enter the name of your store, you’re just a few clicks away from making your first sale.
Ultimately, an optimized and neat environment, attractive images, and detailed and accurate product descriptions will make people more likely to buy from you. The first step is to add the products to your virtual shop. But how do you do it? You’ll find all the answers you need in this article.
Add Products to Your Page
You can add new products to your page from a desktop computer or your mobile device.
From Desktop
- Log in to your Shopify account and go to the admin panel.
- From there, click on Products.
- Select All Products.
- From this section, choose Add product.
- Give your product a name and add a description. You can also add an image using this editor.
- Select Save to finish.
From a Mobile Device
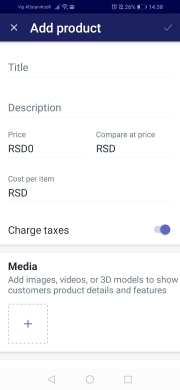
The steps are almost the same for iPhones and Androids – if the option names may slightly differ. Whatever your device is, follow these instructions:
- Open Shopify on your smartphone.
- Tap on Products.

- Tap on All Products.
- On the new screen, select the plus icon in the upper right corner. (If you want to skip a step, from the Products screen tap on the + icon and then select Add product.)
- Type in a name for the desired product and a short description.

- Tap on the Save button in the upper right corner on an iPhone, or the checkmark if you have an Android phone.
Adding a Similar Product
The duplicating option helps save time when you want to add a product similar to an existing one. For a duplicate, you can copy the barcode, an image, SKUs, or inventory quantity. This is how you can duplicate a product:
From Desktop
- Go to the admin dashboard and then open Products.
- From this section, choose All products and then select the desired product.
- Select Duplicate, just below the product title, on the left.
- Type in a new name for the new product.
- Choose what details you’d like to copy.
- Select Duplicate to complete.
From a Mobile Device
- Open the Shopify app and go to Products.
- Tap on All products and find the one you’d like to duplicate.
- Tap on the dots icon in the upper right corner.
- Select Duplicate product.
- Add a new name for the duplicated product. Here you can also allow images to duplicate so you can use them for the new product, too.
- Tap on the checkmark or the Save button to save the new product.
How to Add Products to Collections
Once you’ve added products to your page, you might want to group them together. It will probably make it easier for your customers to find what they want. Collections are the best way to arrange your products. Here’s how to make a manual collection and add products to it:
- Open the admin dashboard and click on Products.
- Under Products, select Collections.
- Click on the Create collection button on the right.
- Give your collection a name and write a short description.
- Choose Manual to be the collection type.
- Click on Save and proceed to the Products section.
- Find the products you want to add to the collection by using the search field or browsing.
- Choose the order by which you want to sort the products.
- Go to the Sales channels section and select Manage to make your collection available on different channels.
- Add a photo for your collection and click on Save. After that, copy the link to this collection to the store navigation so customers can find it.
How to Add Products via Shopify POS
When you add a new product via Shopify POS, you need to make it available on your webpage for your customers to see it. This is what you should do.

If you’re using an iPad:
- Go to the checkout page and tap the plus icon in the upper left corner.
- Select Add product and on the new screen, add a name, price, and inventory status for your new product.
- Select the image icon at the top to add a photo for your product.
- Tap on Save product in the top right corner.
If you’re using an iPhone:
- From the POS checkout page, select the plus icon in the top left corner.
- Tap on Add product and enter details about your new product.
- After you add a photo (this is optional), tap on Save product in the upper right corner.
If you have an Android:
- Go to the POS checkout and tap the plus icon.
- Select Add product to open the Add product screen.
- Type in the name, price, and image for your product.
- Select the checkmark in the upper right corner to save the product.
After you add a new product via Shopify POS, it will appear among the items on the Products page. It will also be visible in Shopify POS, at the checkout.
Make Your Offer Interesting with New Products
Whether you’re just about to create your online store or are just updating an offer, adding new products can be an exciting task. There are several ways to add products, and you can do it both from your computer and mobile device. Regularly updating your offer will make your page more interesting, and your customers will be glad to come back and check what’s new in your shop.
How will you add products to your page? Will you create collections? Let us know in the comments section below.


