Four Ways to Fix Can’t Connect to This Network Error
The “Windows can’t connect to this network” error is one of those modern gems in computing, alongside “Oops! Something happened.” Why can’t you connect to that network in particular? The system doesn’t know, and if it did, it certainly isn’t telling you.
But don’t fret just yet. You can use a few basic fixes that will take a few minutes each.
Fix 1. Forget the Network
In most cases, there’s nothing wrong with your PC. It’s just that the network credentials have changed between your sessions. This usually happens if someone changes the password, but it can also be due to other settings. Forgetting the network allows you to re-enter the new credentials.
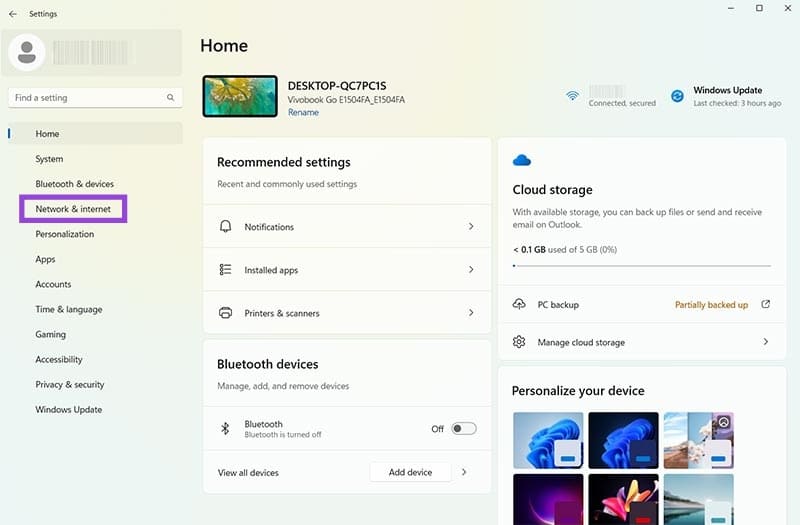
Step 1. Open Settings (“Windows + I”) and go to the “Network & internet” tab on the left.
Step 2. Choose “Wi-Fi” from the list of options (it should be the first one), then select “Manage known networks.”
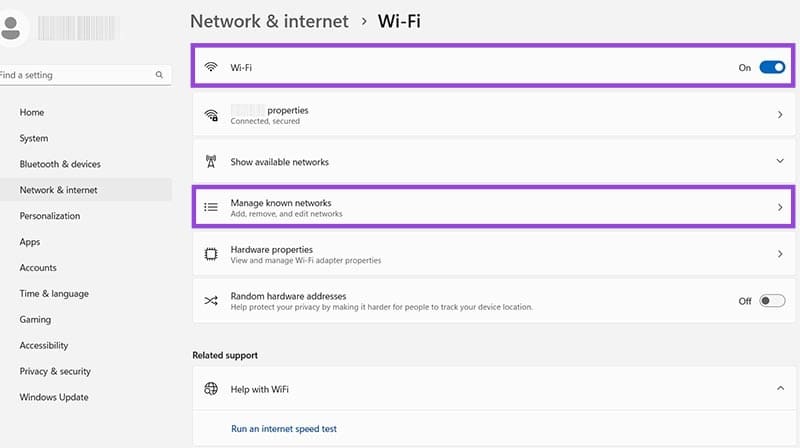
Step 3. Find the network you’re trying to connect to on the list, then click “Forget” on its entry.
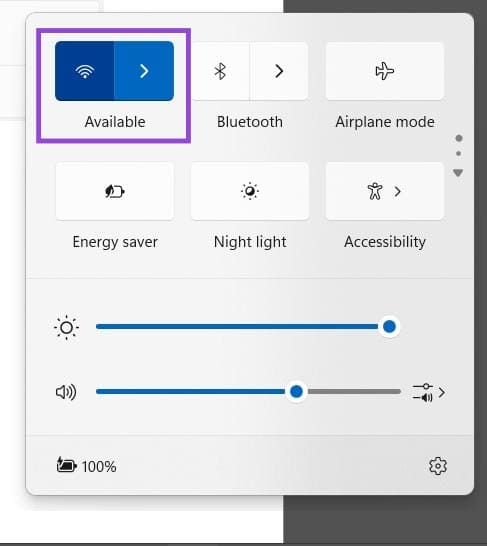
Step 4. Open your Wi-Fi toolbar from the taskbar and try to reconnect to the network. You’ll need to re-enter the password.
Fix 2. Use the Command Prompt to Reset Your Network Settings
In some cases, faulty driver and TCP/IP protocol settings might be causing the “can’t connect to this network” error. These can usually be fixed with a few commands in the Command Prompts.
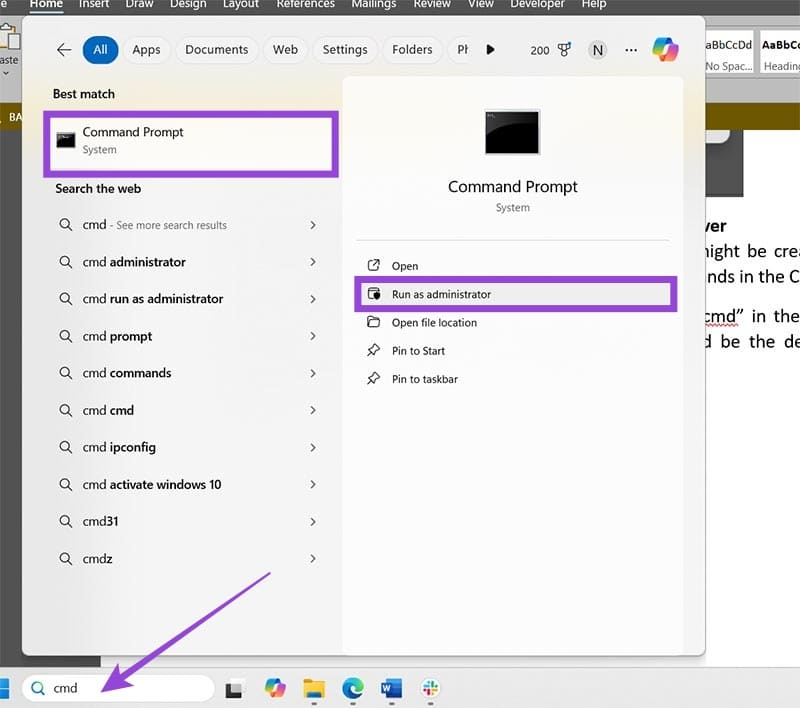
Step 1. Open the Command Prompt. You can search for “cmd” in the search bar and select “Run as administrator” on the Command Prompt option (it should be the default result). You can also use “Windows + R” to go to Run and enter “cmd” there. You’ll need to confirm the User Account Control prompt if you’re trying to run the app as an admin.
Step 2. Enter the following commands and press “Enter” for each to run them sequentially:
netsh winsock reset

netsh int ip reset

ipconfig /release

ipconfig /renew

ipconfig /flushdns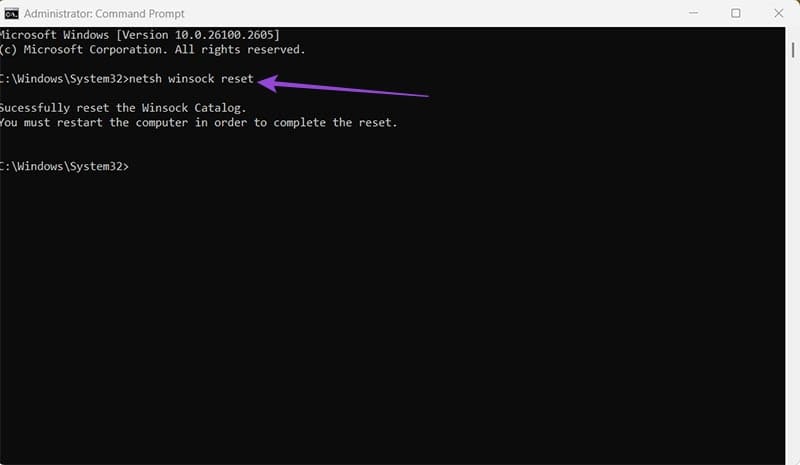
Step 3. Restart your PC and try to connect to the network again.
Fix 3. Reset Your Network Settings
If you have applied custom settings to a network (perhaps while being connected to a network that requires a specific proxy), then you might not be able to connect to networks with “default” settings. Resetting your PC’s settings should help, but it can also mean that it inadvertently forgets the specific network it was once able to connect to. You’ll need to reconfigure that network later.
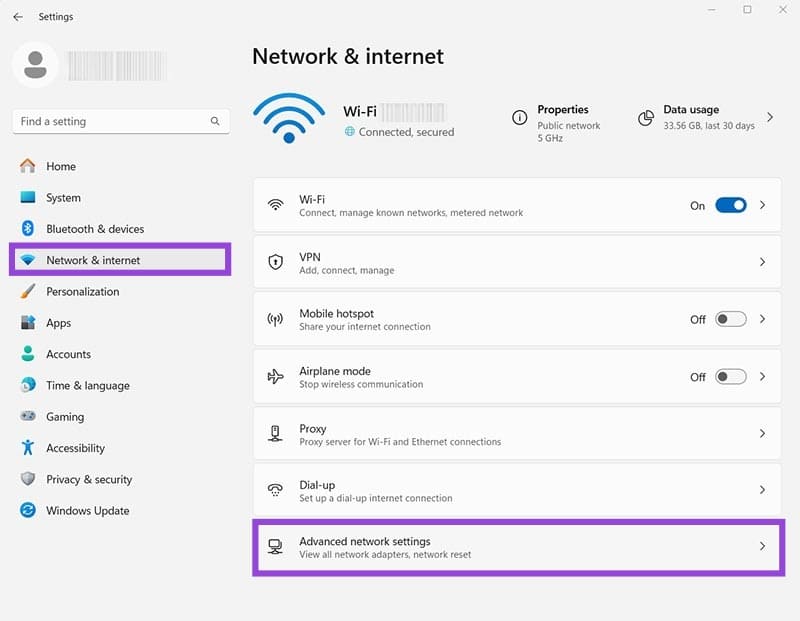
Step 1. Open Settings and go to “Network & internet,” then select “Advanced network settings” at the very bottom (you may need to scroll).
Step 2. Select “Network reset,” then click “Reset now.”
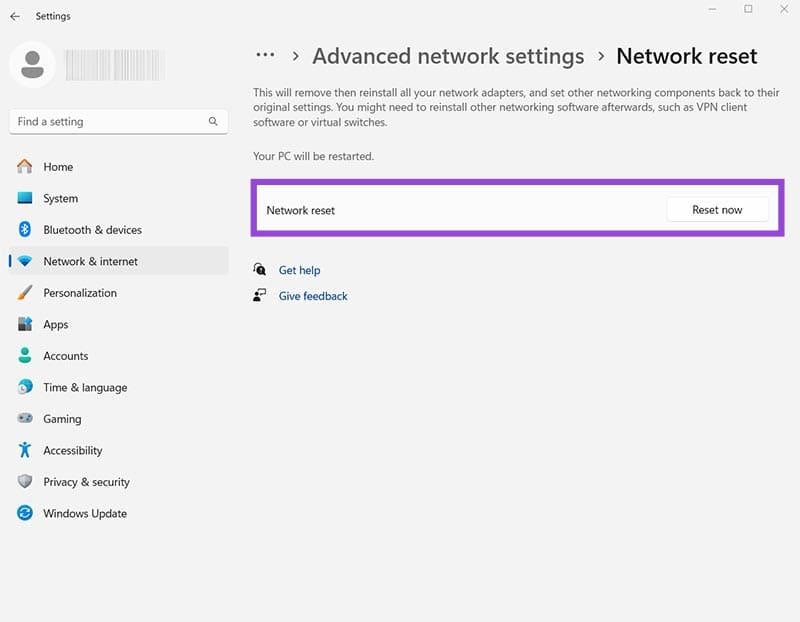
On Windows 10, this option has one more step. You’ll need to go to “Network & internet,” then go to the “Status” tab, then scroll down to “Network reset.” After that, you’ll need to confirm the reset.
Step 3. You may need to reboot your PC.
Fix 4. Use the Troubleshooter
The Troubleshooter is one of those apps that usually doesn’t work, but it does help fix a few errors now and then, with the “can’t connect to this network” error being one of its most frequent successes. The troubleshooter essentially automatically performs the most common fixes for you.
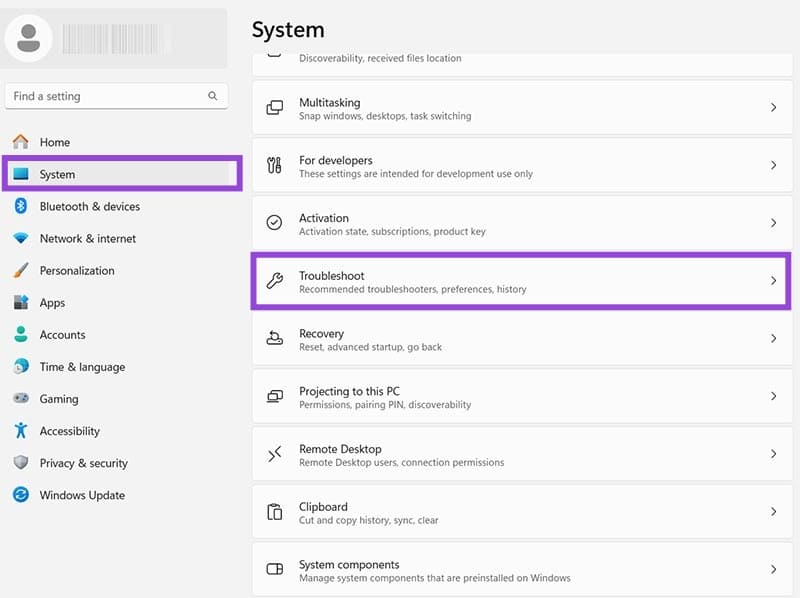
Step 1. Open Settings and click on the “System” tab on the left.
Step 2. Scroll down and select “Troubleshoot.”
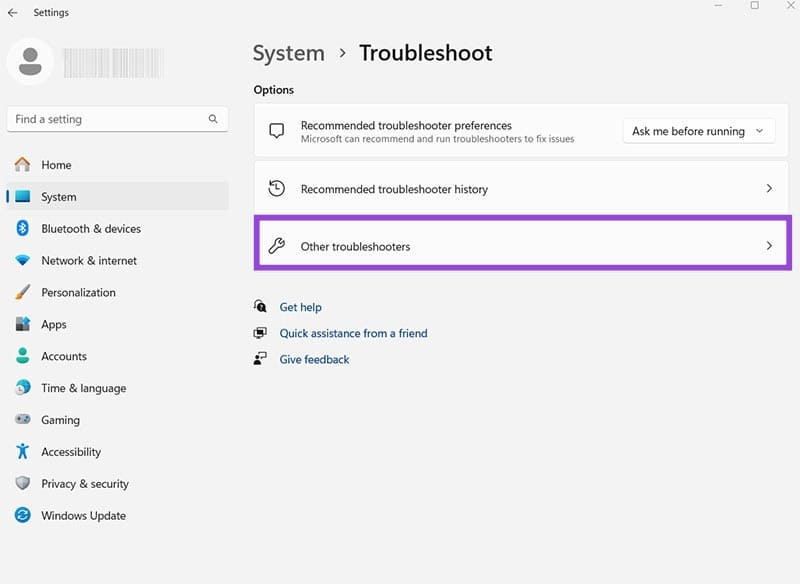
Step 3. Choose “Other Troubleshooters” from the list of options.
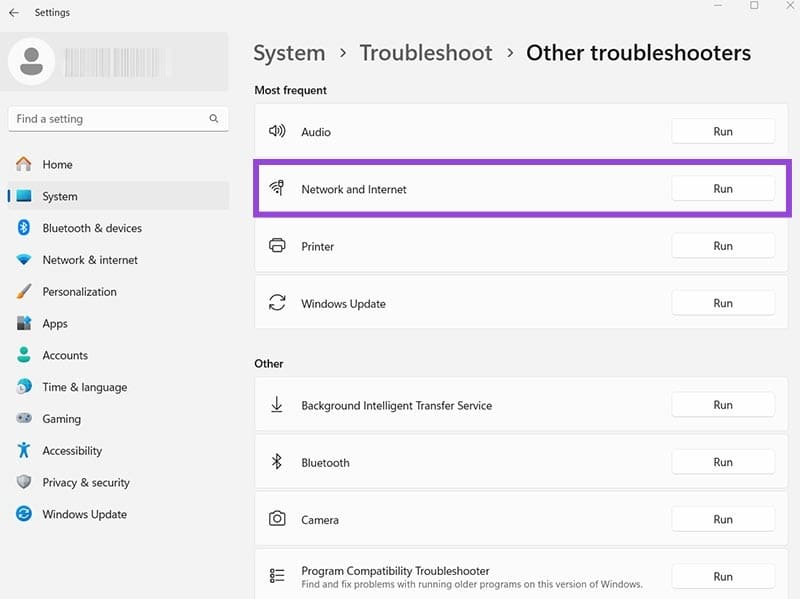
Step 4. In the “Network and Internet” entry click “Run.”
Step 5. The Troubleshooter will run for a few minutes if it detects that you’re not connected to the internet. It will also display what steps it took to rectify the issue. Then, it will provide suggestions for what you might do next.
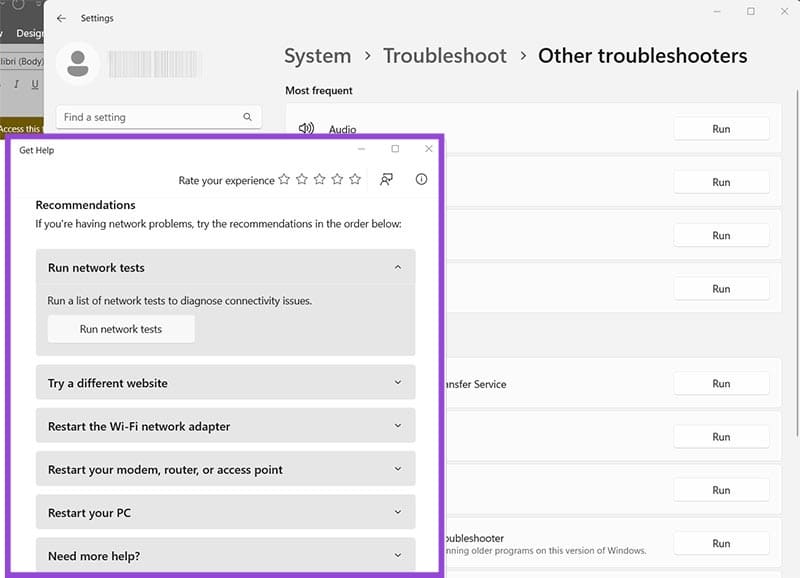
Step 6. If the Troubleshooter doesn’t fix the issue, it will provide specific suggestions. These suggestions can often help you quickly resolve the problem without having to manually navigate through complex menus.


4 thoughts on “Four Ways to Fix Can’t Connect to This Network Error”
Start using VoIP service designed to save costs and improve communication for businesses.
We offer reliable technology and 24/7 support.
Could we schedule a call to discuss how we can assist?
Sincerely,
Seymour England
VoIP 365 LLC
Owned and Managed in the USA
To stop, reply with Eliminate
Start using VoIP service designed to save costs and improve communication for businesses.
We offer reliable technology and 24/7 support.
Could we schedule a call to discuss how we can assist?
Sincerely,
Leland Klass
VoIP 365 LLC
Owned and Managed in the USA
To stop, reply with Eliminate
Start using VoIP service designed to save costs and improve communication for businesses.
We offer reliable technology and 24/7 support.
Could we schedule a call to discuss how we can assist?
Sincerely,
Booker Fogg
VoIP 365 LLC
Owned and Managed in the USA
To stop, reply with Eliminate
– We guarantee to gain you new 700+ subscribers per month
– People subscribe because they are interested in your videos/channel, increasing video likes, comments and interaction.
– All actions are made manually by our team. We do not use any bots.
The price is just $60 (USD) per month, and we can start immediately. If you are interested and would like to see some of our previous work, let me know and we can discuss further.
Kind Regards,
To Unsubscribe, reply with the word unsubscribe in the subject.