Apple iPhone 7 And iPhone 7 Plus: How To Clear Cache

Apple iPhone 7 and iPhone 7 Plus users occasionally have problems with iOS. New software versions roll out all the time, and while they’re typically intended to fix bugs, repair software, and make phones easier to use on a regular basis, some software updates can include bugs and other glitches in their software that make it harder to properly use your phone.
Thankfully, if you’re having issues with your iPhone, you might be able to fix the device yourself. Many issues, from slowdown to crashing apps, can be easily fixed through one of several troubleshooting methods.
The easiest way to fix any bugs or other software problems on your Apple iPhone 7 or iPhone 7 Plus is to either complete a factory reset of your phone or clear the cache.
In this TechJunkie article, we will explain how you can clear the cache on your Apple iPhone 7 or iPhone 7 Plus.
How To Clear The App Cache On The Apple iPhone 7 And iPhone 7 Plus
If the issue you’re having is only happening with one particular application you should first ensure that the app is up-to-date. If it is and the issue is still happening, try clearing the cache.
There are two different places you can clear the cache on your iPhone 7 or iPhone 7 Plus for Safari, the default browser, and iPhone itself.
For clearing the Safari browser cache, you would clear the cache in the Safari setting. This will clear the cache for the browser only.
To clear the cache for your phone’s storage, you would go to iPhone storage settings.
Follow the instructions below to clear the browser cache in Safari. Note that clearing the Safari cache will remove “remove history, cookies, and other browsing data.”
- Tap iPhone Settings
- Scroll down until you find Safari
- Tap on Safari
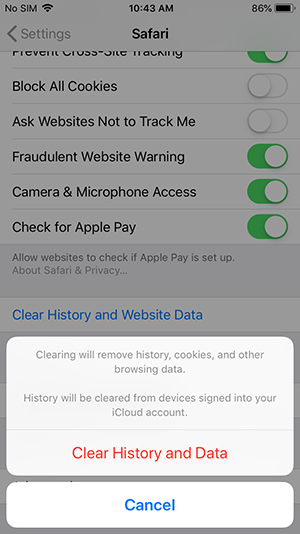
- Scroll to the bottom, then tap Clear History and Website Data
- When the prompt appears confirming your choice to “remove history, cookies, and other browsing data. History will be cleared from devices signed into your iCloud account,” tap Clear History and Data.
To clear the cache for other apps that have a cache, follow the instructions below. Do not delete the app unless you want to lose all the information that app stores, such as your username, passwords, game progress, preferences, and settings.
- Open the Settings app
- Tap General
- Tap iPhone Storage
- Select “Manage Storage.”
- Select an app to view its Documents & Data
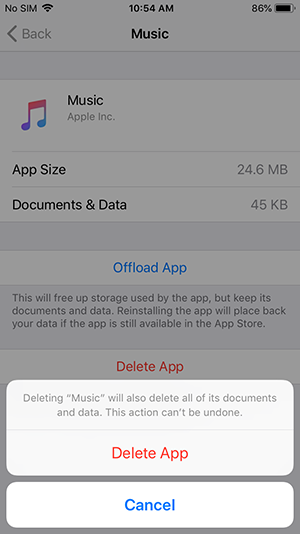
If the Documents & Data for a downloaded app is taking up a large amount of storage (> 500 MB), it may be worth deleting and reinstalling the app.
- Tap “Delete App” from the same menu
- Then, go to the App Store to install a fresh copy of the app
What To Do When Clearing The App Cache Doesn’t Help
If you have cleared the cache of Safari and individual apps but the problem with your Apple iPhone 7 and iPhone 7 Plus is still happening, the next best option is to reset the device. Before you reset the iPhone 7 and iPhone 7 Plus, you should backup all data to prevent anything from being lost during the reset process.
Soft Reset Your iPhone 7
If your phone is slowing down or taking a while to respond, a soft reset should be enough to refresh it. It will close any errant apps and restart all processes without causing you to lose data. It can just as accurately be called ‘rebooting,’ and it is where we would usually start when troubleshooting a phone.
A soft reset differs slightly from a simple restart or ‘power cycle,’ that is “turning your phone off and on again.” To perform the soft reset do this:
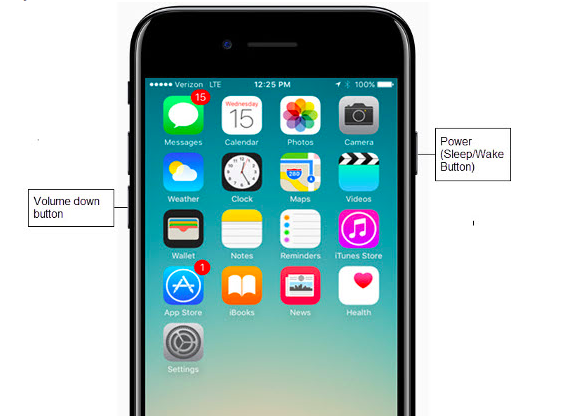
- Press and hold the sleep/off button and the volume down button simultaneously for about 10 seconds.
- You will see the Apple logo appear, release the two buttons.
- Give the phone a few seconds and then press and hold the side button once more to turn it back on.

Performing a soft reset is a great first step because it forces your phone to shut down programs while retaining all of your information.
Factory Reset Your iPhone 7
If that didn’t work and you have tried other steps to address any issues, you can factory reset the iPhone 7. This will delete all your files, settings, preferences, and apps. Essentially it returns the phone back to the settings as they were when you first started using your iPhone.
As a blank slate, odds are any programs that were causing the issue will no longer be present, so you will start over installing one app at a time.

The factory reset will fix most software issues on an iPhone, but will also wipe it of any personal data. I think it is easiest to use iTunes to perform this task.
You need to access it to save any of your files and settings while you backup the phone anyway, so you may as well go for the one-stop-shop approach and let it perform the factory reset while you’re there.
- Connect your phone to your computer and open iTunes.
- Save your files and settings in iTunes as required.
- Select your iPhone in iTunes and select Summary from the left menu.
- Select Restore iPhone in the right pane.
- Select Restore in the pop-up window to confirm your choice.
Once wiped, your iPhone will reboot and load into that initial setup screen you saw when you first got the phone. Set up the basics from there and reconnect it to iTunes once more. You can reload your files and settings direct from iTunes as required.
However, using iTunes to perform a factory reset isn’t actually required, even if it is convenient. If you don’t want to use iTunes, you can factory reset your iPhone 7 from within the phone itself.
- Select Settings
- Tap General
- Tap Reset and Erase All Content and Settings
- Enter your passcode or Apple ID to confirm that you want to go forward with the factory reset.
- Wait for the phone to complete the reset and reboot into the initial setup screen.
When your iPhone resets, you should attempt recreating the issue to see if your device still has the software bug.
If you’re still experiencing problems, go to the Apple Store Genius Bar to get help with your iPhone. The Apple Store will either fix the problem for you or replace the device, assuming it’s still under warranty or Apple Care.
As seen with the iPhone 7 model A1660, a simple ‘No Service’ error was actually an issue with the main logic board. If you’re having hardware issues such as this one, contacting Apple Support or upgrading to a newer model may be your only option.


