How To Set Up an Auto-Responder in Apple Mail for Mac

Do you often find yourself having to type one email several times in a row just so you can send it individually to multiple contacts? If so, an auto-responder can be a great solution. It allows you to set an auto-reply that will be sent as a response to all inbound mail.
There are many situations where this might come in handy. If you’re out of office, whether for a lunch break or a vacation, this can be a great way of responding to mail without actually having to do anything.
How Does It Work?
OS X Mail uses different email rules and criteria in order to generate automatic replies. If you set up all the parameters properly, you can have a very flexible way of responding to inbound mail when you’re away from your devices.
You can set up various criteria that need to be met in order for the message to be sent. You can choose to respond to all mail or just the specific addresses that you enter. In addition, you can also create different messages for different categories of senders, so that everyone receives an appropriate response.
How to Set Up an Auto-Responder
Fortunately, setting up this feature is not a hard thing to do. Sure, it might sound complex at first, but rest assured that you can do this even if you’re not a tech-savvy person. Here are the steps that you need to follow:

- Open the Mail app, then go to the ‘Mail’ menu and select ‘Preferences’.
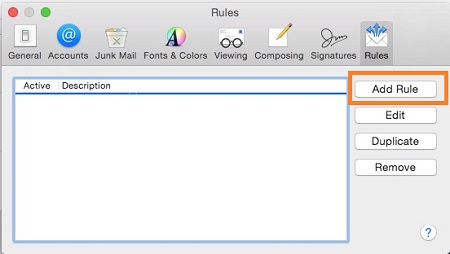
- Once you see the ‘Rules’ tab, click on ‘Add Rule’.
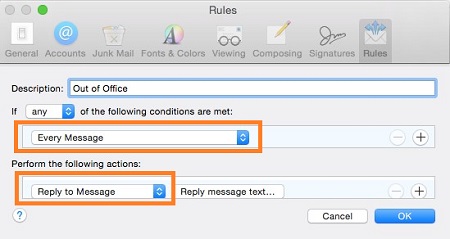
- Under ‘Description’, write the name of the auto-responder in a way that will allow you to easily distinguish it from the others. For example, you can type in ‘Vacation Auto-Reply’.
- Select the criteria that need to be met. You can choose whether all criteria need to be met or just one or more of the ones you set.

The criteria you set will determine the recipients of the auto-reply. For example, you can select ‘Every Message’ to reply to all inbound mail with the same message. You can also set a specific address by typing in the email address to which you want to reply.
On top of this, you can select your contacts, previous senders, or VIPs as the recipients of the auto-reply.
- Under the ‘Perform the following action’ setting, select ‘Reply to Message’ and then click on ‘Reply message text’.
- When typing the message, make sure to include all the necessary information. If you’re on a vacation, let people know when they can expect a call from you. If you don’t set a specific category of recipients, make sure not to reveal too much personal information.
- When you’re satisfied with your message, click ‘OK’. If the app asks you ‘Do you want to apply your rules to messages in selected mailboxes?’ select ‘Don’t Apply’, as this will prevent it from sending possibly hundreds of email replies to your existing conversations.
After you’re done, you can send yourself an email to make sure that the auto-responder works. If you want to, you can also create more complex rules with specific dates, mail from selected domains, and more.
How to Disable an Auto-Responder
If you don’t need the auto-responder anymore, you can disable it in just a few clicks. Here’s what you need to do:
- Within the Mail app, go to ‘Mail’ and then click on ‘Preferences’.
- Go to ‘Rules’ and uncheck the box next to the auto-responder you’ve created.
If you don’t do this, the auto-responder will stay active as long as it’s enabled and the Mail app is open. This can create confusion, so make sure to disable this feature as soon as you’re sure that you don’t need it anymore.
The Final Word
The auto-responder is a great feature that makes handling inbound mail much easier. If you follow the steps described above, you should have no issues enabling it on your Mac. Once you do, you can enjoy being away from your email and let the app do the work.
Even though it’s most widely used for work, this feature can be very handy for personal mail as well. Aside from just the auto-responder, there are many other useful rules and criteria that you can apply. You can choose to automatically delete mail, perform certain actions on specific dates, automatically forward certain messages, and much more.
Feel free to go through all the available rules to find those that will allow you to automate your email in the way that best suits your needs.


