How To Blur the Background in a Photo

When you want the foreground of a photo to stand out, blurring the background is one of the better ways to go. By blurring the background it allows the primary image to draw greater focus and appear more professional. It makes it so that the background is no longer competing for the viewer’s attention.
“But how do I blur the background of a photo?”
There are a few ways in which you can make the background appear faded in order to bring the focus to the forefront. Some techniques will need to be used prior to taking the photo while others can be used after it has already been taken.
Portrait, low-light, and macro-style photos all benefit from having a blurred background. The quality of the background blur is referred to as bokeh. Bokeh is determined by the type of background in the photo.
“What sort of things can affect the background to create a blur?”
Good bokeh is set in a background that enhances and highlights the primary subject of the photo. Something like foliage or trees that produce low-light and can be used to create a rounded and softened background.
A bad, or poor, bokeh possesses background distractions that will usually disrupt the focus of the photo’s subject. Lighting imbalance is one of the more defining traits of a bad bokeh.
There are a few additional aspects that can affect a background’s blurriness in a major way. These aspects are:
- Aperture – Specified by an f-value or f-stops. Larger apertures have smaller f-values and allow more light to reach the camera sensor. When using a large aperture, the shutter speed should be faster, to prevent the photo from being over-exposed. The lower the f-value, the softer the background blur.
- Subject Distance – Moving closer to and focusing tightly on your subject, ensuring the background is far away from your subject, makes it easier to achieve a blurred background.
- Focal Length – A short focal length has a wide angle of view, it keeps details in focus both in the foreground and the background. Zooming in on a subject narrows the angle of view and makes the focal length longer, resulting in more background blur. To blur the background, use a long focal length lens, or a good variable focus length lens and zoom in on your subject.
- Sensor Size – A small sensor has a short focal length and a wide angle of view. Cameras with larger sensors can achieve longer focal lengths and subsequently better background blur.
A blurred background can be achieved through any camera with the proper techniques and settings. We’ll go over these settings as well as provide an alternative for those wanting to add a blurry background post-snap.
Ways In Which To Blur The Background of a Photo
Depth of field is the key to creating a natural blurring effect in your photos. Using a wide aperture, and moving close to or zooming in on your subject, means you have a shallow depth of field also referred to as shallow focus or selective focus.
DSLR lenses allow you to modify settings to achieve the depth of field you want, in manual and semi-automatic modes. Macro and close-up settings on DSLR cameras and the higher end point-and-shoot cameras automatically choose a shallow depth of field.
The macro settings on your digital camera, preselect a wide aperture and fast shutter speed which will automatically render a blurry background result. This is even further achieved when using super macro settings as it will allow you to get within a few millimeters of your subject.
You’ll need to make sure that there is enough light and that you’re able to keep the camera completely still during the shoot. Avoid causing unintended shadows from the camera position and if your camera or lens does not have built-in image stabilization, a tripod could prove useful.
Although possible, It is more difficult to achieve a shallow depth of field with a camera that does not have either a macro setting or the ability to modify the aperture and shutter speed.
dSLR Lenses
With most consumer grade dSLR cameras it’s likely to come bundled with kit lenses containing small apertures of only f4 to f8. So long as you zoom in and keep the focus of the image closer to you while the background remains further away, you can achieve a blurred background.
The blur effect received in this way is passable but not professional. In order to obtain a far better blur effect, you’ll want to consider making a lens purchase that contains a large aperture. The more affordable dSLR models will have a 50mm lens and an aperture of f1.8.
It should go without saying that different lenses will yield different results. Lenses with strong zooming capabilities are best used further from the subject of the image. This will result in a modest background blur effect so long as the subject is further from the background than you are of the subject.
Low f-value, fixed aperture lenses will use the same shutter speeds and ISO settings regardless of the distance. While using a variable aperture lens, you’ll want to decrease the shutter speed while increasing the ISO in order to expose the photo evenly.
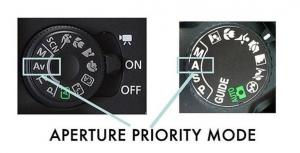
In order to achieve the best-blurred background results, you’ll want to use either the A or AV aperture priority mode.
Aperture Priority Mode
Aperture priority mode is available to most cameras. It is a semi-automatic mode that will select the appropriate shutter speed and ISO setting when changing an aperture’s f-value. To increase the blur of the background in a photo, select the smallest f-value possible, or a wide aperture.
To do this:
- From your camera’s menu, select the aperture priority mode (A or AV).
- Ensure that the focus of your image is closer to you than the background in the photo. This is important to produce the right lighting for the blur.
- Zoom in until you have a fixed position on your subject. The background will blur.
- Snap the photo.
Portrait Photo
Portrait photos are a great use of the aperture priority mode. You can remove distracting elements from your photos by focusing in on the subject. To create a portrait photo with a blurred background:
- From your camera’s menu, select the aperture priority mode (A or AV). In this case, you can also select manual mode (M).
- The difference in mode choice is dependent upon the subject of the photo. For moving elements, aperture priority mode is better as it will adjust the shutter speed and ISO setting automatically for proper exposition.
- Select the smallest f-value that is available.
- Just like with standard photos, ensure that the focus of your image is closer to you than the background in the photo. This is important to produce the right lighting for the blur.
- Zoom in until you have a fixed position on your subject. The background will blur.
- Using manual mode will likely require an increase in the ISO setting and a decrease in the shutter speed.
- Snap the photo.
Use A Post-Process Service Like PicMonkey
Post-processing photo services like PicMonkey have tons of specialized tools that can help you achieve the right amount of blur resulting in a gorgeous image. Blur landscapes or soften up the background to make the subject pop, whichever you desire, PicMonkey is a great resource.
Let’s go over a few ways to achieve your desired results.
One-click Photo Softening
Use PicMonkey’s Soften effect to provide a subtle blur to any one of your images. All it takes is a single click and the entire image will receive a blur effect. You can also target specific areas with the Soften effect by using the Erase & Brush palette. There are also sliders that you can use to take the blur up a few notches or dial it back a little.
To achieve targeted blurriness using the Soten effect so as not to create an entire image of fuzz:
- Open your image in the PicMonkey editor and highlight the layer you wish to soften.
- Head into the “Effects” tab, click Basic, select Soften, and click the Paintbrush icon.
- You can choose a different blurring effect aside from Soften if preferred as there are a few to choose from.
- Once you can see the Erase & Brush palette, you can click the paintbrush tab at the top.
- You can now choose to blur small portions of the image, the focus of the image (for whatever reason), or the entire background. The choice is up to you.
- The Reverse effect tool can come in really handy if you’re looking to blur out the entire background. You’ll want to blur out the focus of the image and NOT the background. Once achieved, click the Reverse effect and watch as the background fades as the primary image now stands out.
- Blurred out a bit too much or just want to backtrack? Click Original and your paintbrush is swapped out for an eraser. Erase the parts of blur where you went a bit overboard and then switch back to the paintbrush to continue where you left off.
- When all of your blurry editings are complete, click Apply.
Bokeh Effects
We’ve already covered the ins and outs of what bokeh is a bit earlier in the article. PiicMonkey allows you to apply those effects directly to your photo. It also provides tons of ways to customize using the bokeh effect textures to create stunning images.
To use the Bokeh Textures:
- Go the “Textures” tab where you’ll find the Bokeh category.
- This category will contain six different blur options from which to choose.
- There is even an abundance of adjustment options you can use including a size slider (make the effect either larger or smaller), saturation slider (adjust the color richness), and fade slider (alter the transparency). You can also specify certain parts of the image for a bokeh texture in the same way as you use the Soften effect. Through the Erase & Brush palette.
- Remember to hit Apply once finished.
Artsy Effect With Orton
Orton is a famous photography technique that achieves a saturated color and dreamy softness by layering two exposures of the same photo, a sharp original, and a slightly out-of-focus copy. PicMonkey’s digital version does all of this in a single click.
Orton has a few sliders of its own that you’ll want to get acquainted with in order to make your photos as glamorous as necessary. There’s the Bloom slider which allows you to adjust the level of blurriness you want in the photo, a Brightness slider to adjust the lighting, and finally, the Fade slider which will adjust the transparency creating a more defined image.
As is the case with the Soften and Bokeh texture effects, you can also paint Orton into your image using the Erase & Brush palette.
Focus Tools
If what you really want the blur to do is sharpen the focus of the subject, PicMonkey’s focus tools can assist.
There’s Focal B&W, which can turn a part of your image inside the focal point black and white while keeping everything outside in their original colors. To swap the B&W to the outside while the primary focus keeps its colors intact, try using the Reverse effect.
Next, we have Focal Soften. This effect will blur everything situated outside of the focal size. Using the Reverse effect will switch things up if that’s what you’re looking for.
Fancy Focus will focus in on a specified part of the picture but turn up the “fanciness” of the image while also rendering the background blurry.
Lastly, we have Focal Zoom. The purpose of this effect is to deliver an action, on-the-go style blur as opposed to the hold still, softened photo version.
PicMonkey ‘Blur On-the-Go’
Speaking of on-the-go, PicMonkey offers users a free mobile app for capturing a blurry photo in the wild.
To use the app for its blur effects:
- Launch the app from your mobile device.
- Tap on Edit, Adjust, and finally Blur.
Using this effect will add a bit of softness to your image. You can move the focal target around and adjust the slider until you feel the picture is perfect. The Soften effect, aptly located in Effects, will enable the same blurring that it does on the browser version. Either a full-on blur-fest or targeted points in the image. Apply it wisely.


