How to Change Default Font in Outlook

Microsoft first introduced Windows Users to Outlook in 1997. Since then, Outlook has been a part of every Microsoft Office suite. You can find it in recent Microsoft Office packs, including 2013, 2016, and Office 365 Home.
Outlook can sync your data with your phone or tablet, and other devices, as long as you’re logged in with your Microsoft account. And if you want to change the default font in Outlook or any other settings, you can do that easily.
Changing the Font
Regardless of why you would want to change the default font of your Microsoft Outlook, let’s see how to make that happen. Open your Microsoft Outlook and do the following:
- Go to “File” (top left corner of the app) and then select “Options.”
- Select “Mail” from the list and under “Compose messages” select “Stationery and Fonts.”
- Switch to the “Personal Stationery” tab.
- Under “New mail messages,” select “Font.” Proceed to choose the font, style, color, and size. Click “Set as Default,” then click “OK.”
- Under “Replying or forwarding messages,” also select “Font” and repeat the steps.
- Click “OK” to confirm
These are the steps to changing your default Outlook font. After you’ve done picked the font, you also get to see a “Sample Text” to make sure that you’ve made the right choice. In case you don’t like it, you can go back and try another.
You can also tick the box that says, “Pick a new color when replying or forwarding.” Additionally, you can change the font when composing and reading plain text messages.

Themes & Signature
While you’re still in the “Signatures and Stationery” settings section, you can opt for an entirely different theme for your Outlook email and calendar service. Just click “Theme” and scroll through the available options. Any of these themes will drastically change the appearance of your Outlook. And that includes the default Font. It can be a fun way to keep your Outlook looking fresh.
Switching from the “Personal Stationery” tab to “E-mail Signature” will reveal more customization options. That’s where you get to come up with a signature and edit it. What’s great about Outlook is that you can change the default font of your signature to be different from the default font you use to write emails. Just use the space under “Edit signature” to write it and select the size and style of the font of your choosing.

Outlook Calendar
One of the best features of Outlook is that it comes with a calendar feature that you can customize and set up to your preference. There is quite a lot you can do with it, but for now, let’s focus on changing the default color and other display options. Here is how you do that:
- Open Microsoft Outlook and go to “File,” then select “Options.”
- From the list, select “Calendar” and scroll down a little bit.
- Under “Display options,” select “Default calendar color.” You have nine available options.
- Click the “OK” button
- Switch from the Mail icon to the Calendar icon at the left bottom corner and check if the settings are applied.
You can also check the “Use this color on all calendars” box and make sure the change applies across all platforms where you use Microsoft Outlook. You can additionally customize display options by selecting if you want to show the week number in the month view and other things regarding scheduling appointments. You can also set working hours and reminders.
Outlook Webmail
Many people see Outlook strictly as a webmail service. It has been around for a long time, and it used to be called Hotmail. Everyone who has a Microsoft account also has an Outlook email address and can access webmail services free of charge.
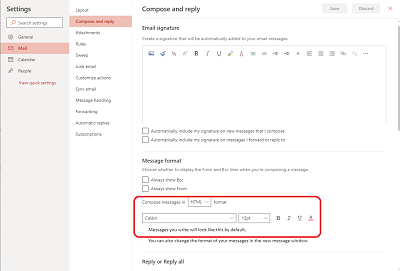
If you plan on sending emails via Outlook webmail, you should know that you can also change the default font there. It’s a piece of cake. Just sign in to your Outlook webmail and follow these steps:
- Click on Settings (cogwheel icon).
- Scroll to the bottom and click on “View all Outlook settings.”
- Select “Compose and reply” from the list.
- Go to “Message format” and select the font you like, including the size and style.
- Click “Save” at the top of the screen.
Now you’ve chosen the default font you will be using to write the messages. You can go back and change it anytime. You can also set the Email signature and save the settings.

When Calibri Doesn’t Fit
Calibri is the default font across all Microsoft Office apps. It’s inconspicuous, simple, and doesn’t overwhelm the reader. Microsoft probably picked it after many user tests to see which one is the most neutral font out there. But for some people, that isn’t enough, and they prefer something different.
What’s your favorite font for Microsoft Outlook? What’s your take on Calibri? Let us know in the comments below.


One thought on “How to Change Default Font in Outlook”