How to Change Your Windows 10 Username

Changing the username is not a difficult task. Neither is creating a new user or even changing the name of your Administrator account. This article will show you the steps you need to take to finish each of these actions.
Changing the Windows 10 Username
To reach the menu where you can make the change, you can take various routes. Using the Control Panel is the oldest and perhaps still the most used method.
From Control Panel
- Bring up Windows search by pressing the Win key.
- Type in Control Panel and hit Enter.

- Change to view by Small Icons from the upper right selection tool.
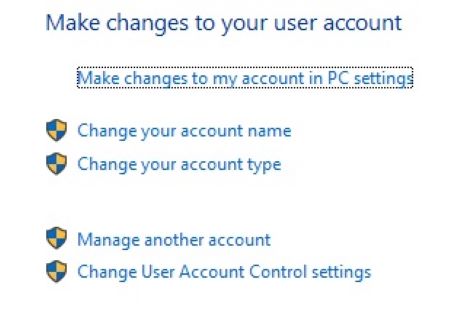
- Click on User Accounts.

- Click on the Change Your Account Name Option.

- Type in a new account name.

- Click the Change Name button.

- Type in a password if prompted.
If you have administrator rights on your account, you can also change the names of other users. Follow these steps.
- Go to the User Accounts section of the Control Panel, as described in the previous section.

- Click on the manage Another Account option.

- Select the account you want to edit.

- Follow steps 5 through 8 from the above guide.
Creating a New User
If you can’t change your username, you might have a corrupted copy of Windows 10. However, you can still create a new user account and give it a name of your choosing. Sometimes having multiple user accounts is a good idea when two or more people share a computer.
- Hit the Windows 10 start button.
- Click on the Settings icon.

- Click on the Accounts button.

- Click on the Family & Other Users option (or similar).

- Click on the Add Someone Else to This PC option.

- Instruct that you don’t have personal sign-in information for the new account.
- Now select the Add A User Without a Microsoft Account option.
- Enter the requested credentials.
- Click Next.
Windows 10 will ask you to input a username, a password, and either a password hint or security questions. Of course, you can put in the desired username and skip the password protection.
Granting Administrator Access to Another User Account
You can do this from an account with administrator rights. You can also do that from an account that is allowed to manage other accounts if you know the administrator password.
- Click on the Win Key.
- Go to Settings.
- Select Accounts.

- Go under Family & Other Users.
- Select the username you want to grant privileges.
- Use the option Change Account Type.
- Select the Administrator from the list.
- Click on the OK button.
- Type in the Administrator password when prompted.
That will grant administrator privilege to that specific username, but its name or password will remain unchanged. This way, only the status changes.
Changing the Administrator Account Name
You can do it via your Microsoft account. Run cmd tool or Control Panel. Since not everyone uses a Microsoft account, here’s the method that will work every time.
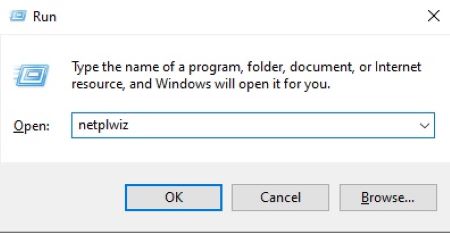
- Bring up the Run cmd tool by pressing Win Key and R.
- Type “netplwiz” and press Enter.

- Choose the Administrator account.
- Click Properties to make desired changes.
- Stay on the General tab.
- Type a new username.
- Click OK, and OK again on the other panel.
Ultimately, you can arrive at the same destination via the Microsoft account interface, the User Accounts tab under Control Panel, and the Run cmd tool.
Note that to make any of these changes, you need to be logged in to an account with Administrator privileges. Other accounts can do this too, but before any changes can take place, you’ll still need to type in the Administrator account password.
Why Have Multiple User Accounts?
Whether you’re trying to limit access to some people or you want everyone to have a personalized user experience, having multiple user accounts is a good idea.
Let us know in the comments section below if you’ve had any issues when trying to modify your account name.


2 thoughts on “How to Change Your Windows 10 Username”
I’ve been scouring the Internet for the means to change my User Name for over 2 hours.
Win+R; netplwiz
Worked like magic.