How to Change Your WiFi Name
When you get a new router, the technicians might ask you if you want to change the network name. But if they don’t, chances are you were left with a generic Wi-Fi network name that’s hard to identify among many other similar names. Fortunately, no matter if you’re using Windows or Mac, you can change your wireless network name without much trouble. Stay with us to see how you can do this.
Finding Your Router’s Address on Windows
Changing your network name is no big deal if you know your router’s address. If not, you need to do that first, but it’s not very hard to do:
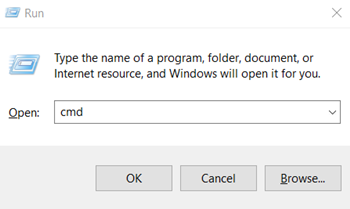
- You first need to open the Windows Run application. You can do this on any version of Windows by pressing the Windows and R keys at the same time.
- This application asks you what you want to open. What you need is the Command Prompt, so all you need to type is “cmd.”

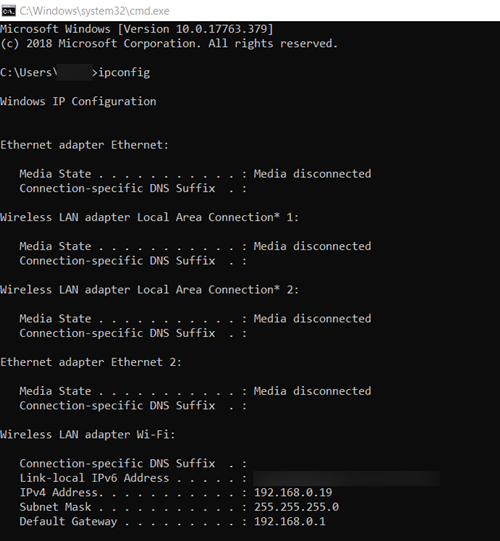
- Inside the Command Prompt, type “ipconfig” and press Enter.

- This command opens the Windows IP configuration. The router address is also known as “Default Gateway” in Windows, so that’s what you should look for. This will be located at the very end, so you might need to scroll down a bit.
Note: Some of the most common addresses are “192.168.0.1” and “10.0.0.1”. Yours should be similar, if not the same.
Finding Your Router’s Address on Mac
Changing the Wi-Fi name is the same on Windows and Mac, but finding the router address isn’t. Here’s how to do this in Mac:
- Click the Apple button in the top-left corner of the screen to open the Apple menu.
- In the dropdown menu that follows, click on “System Preferences…”
- While in the System Preferences, select “Network.”
- A window with your network information will appear. Click on the “Advanced…” button in the lower-right corner.
- In the pop-up menu that follows, you’ll see the tabs at the top. Enter the “TCP/IP” tab.
- Check the “Router” value. This is your router address.
Note: Your router address will most likely look something like “192.168.0.1” or “10.0.0.1”.
Changing the Wi-Fi Name and Password on a Cisco Router
You need your router’s address in order to open your router’s settings, which is the next step:
- Open any web browser.
- In the address bar, type the router address that you’ve acquired through the Command Prompt. Hit Enter.
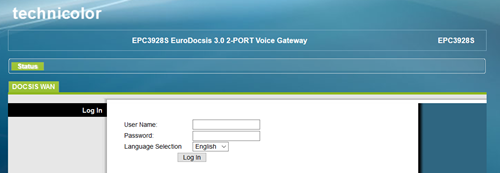
- You’ll be taken to your router’s settings site.
 Note: In this article, you’ll see how to do this on a Cisco router. If you don’t have a Cisco router, the process may go somewhat differently for you.
 - The site requires you to enter the login credentials. If you haven’t changed these, they are most likely set to their factory defaults. To proceed, find your login credentials, enter them, and click on the “Log In” button.
Note: These login credentials depend on your Cisco router model. It often so happens that there is no username or password, and all you need to do is just click on the “Log In” button. If that doesn’t help here are some of the most common ones that you should try:Username: “cisco,” Password: “cisco”Username: “admin,” Password: “admin”Username: “admin,” Password: “password”
Username: “cusadmin,” Password: “password”
If all of these fail, consider contacting your internet service provider.
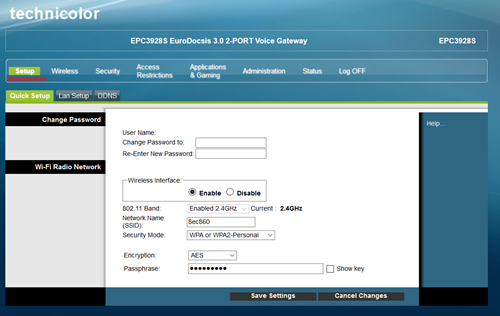
- Having logged in, you will see menus at the top, such as Setup, Wireless, Security, etc. You will also be inside of the Administration menu. Here is where you can change the router site login credentials for increased security. To change the wireless network’s name and password, enter the Setup menu by clicking the corresponding button.
- In the Setup menu, there is a Change Password section inside of the Quick Setup tab. Here is where you can change your password. A few options below that, there is an option called “Network Name (SSID):” followed by a text box. To change the name of the Wi-Fi network, enter the new one here.

- Don’t forget to click on the “Save Settings” button when you’re finished.
Changing the Wi-Fi Name and Password on a Netgear Router
Each router manufacturer usually has its own way to change these credentials. Netgear’s way, for example, is quite different:
- Open a web browser.
- In the address bar, type or paste routerlogin.net.
- A pop-up window will appear and request your login credentials right away. The default values for Netgear devices are “admin” for the username and “password” for the password.
- Click on the “Log In” button when you’re done.
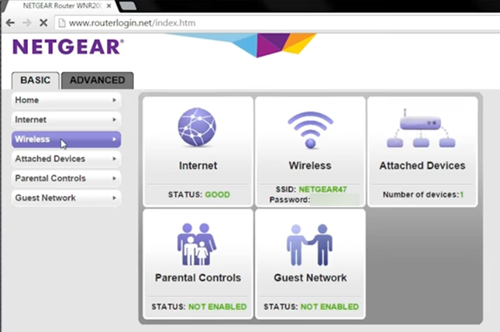
- After entering the right login credentials, you’ll be taken to a site that has a sidebar on the left side of the screen with several tabs. Click on the Wireless tab.

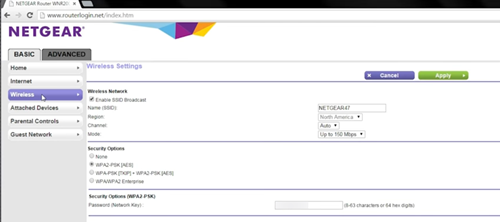
- In the Wireless Settings menu, you’ll notice the option to set the “Name (SSID):” at the very beginning, as well as the “Password (Network Key):” at the end of the list in the center of the screen. Their text boxes are where you should type your desired Wi-Fi network name and its password. Don’t forget to click on the “Apply” button when you’re done.

Identifying the Network
It’s easy to change the Wi-Fi network username and password. However, make sure that you know what username and password you’re going to go for.
Keep in mind that going for an attractive username might attract more people, which tends to slow down your wireless connection. Additionally, some passwords, such as “password” and “1234567890” are very easy to figure out, so make sure yours is strong enough to avoid any possible issues.
Do you prefer funny or more serious Wi-Fi network names and passwords? Why do you wish to change the current ones? Let us know in the comments below.


 Note: In this article, you’ll see how to do this on a Cisco router. If you don’t have a Cisco router, the process may go somewhat differently for you.