How to Delete Todoist from Outlook

In this article, you’ll discover how to delete, disable, and/or uninstall the Todoist add-in from your Microsoft Outlook platform. The methods work for Mac and Windows, if there may be very small differences in how the methods are implemented. This article covers both disabling and removing the add-in because many times it’s more prudent to disable (turn off) the app rather than remove it from Outlook altogether.
Uninstalling via Microsoft Office
Open up Outlook on your desktop, and go to the “File” tab. Go down to “Options” and click it. There’s an “Add-ins” section on the left where you can choose “COM Add-Ins.” Select it and press the “Go” button.
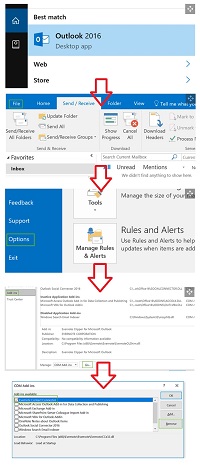
Take a look at the list you’re presented with to see if the Todoist add-in is among them. If so, you can remove it by ticking the box next to the add-in, and then pressing the “Remove” button. Note that ticking a box and then pressing the “OK” button doesn’t do anything.
Uninstall Separately from Outlook
If you were looking to remove a plugin from WordPress, or an extension from Firefox, then you’d open up the respective program, find the plugin, and remove it. However, that isn’t the most prudent method for uninstalling Todoist from Outlook. Due to the way your Todoist is set up, it may be easier to go the traditional route.
The traditional route is where you turn off your Outlook program, go to “Start” and “Control Panel” and “Programs and Features” and “Uninstall Program.” Or, you can use the Windows search bar and search for “Add and Remove program.”
Find Todoist in the list, uninstall it, and then restart your computer. With any luck, Todoist will be deleted from your Outlook and there will be no further action required. This is the official method given by the producers of Todoist. Perhaps setting up a system restore point before uninstalling would be a good idea.
You Could Always Disable Todoist on Mac or Windows
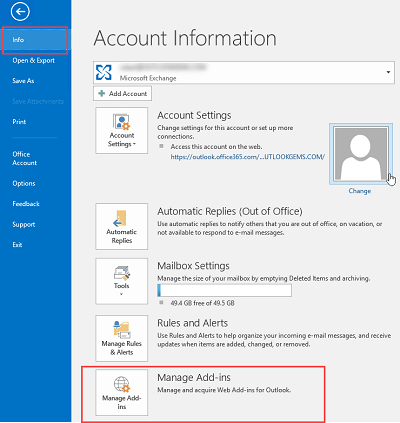
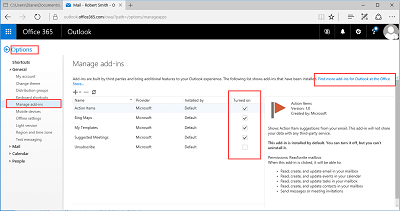
In Outlook, go to “File” and then “Manage Add-Ins.” This will open up Outlook on the Internet, usually through one of your web browsers. Go to “Manage Add-Ins” and look for the “Turned On” column. You’ll see a tick next to Todoist. Untick the box, and Todoist isn’t deleted, but it is effectively disabled until you decide to reactivate it.
When you untick the boxes, you’re disabling the add-ins in the same way you can disable apps on your phone. If you can’t find Todoist, then click on the “Find more add-ins for Outlook at the Office” link.
Add-ins may appear missing if you have Microsoft Office and you installed the add-in from the Microsoft Office platform. However, it may also be a sign that your version of Todoist isn’t installed correctly, or even that you downloaded and installed a pirate/phony/malware version (although that isn’t very likely).
You Do Not Need an Uninstaller
As you scour the Internet for a solution on how to delete Todoist from Outlook, you’ll come across articles that give you very complex solutions where you need to edit registry files, unhide files, and so forth. Such solutions are often offered so that you can’t understand them. And such articles offer these complex solutions to justify downloading their uninstaller. However, you don’t need an uninstaller to delete Todoist from Outlook.
Uninstalling is done through the default uninstaller on your device, or through the Microsoft Office platform. If your default uninstaller isn’t working, then it’s something you need to fix with the publisher of your operating system. Here’s a link to the Windows installer troubleshooter, and here’s a link to Apple support for Mac problems.
Why Wasn’t Todoist Working Properly?
If you’ve just deleted Todoist in order to reinstall, then consider the reasons why it stopped working. It will stop working if your registry entries are corrupted, but this is very unlikely unless you’ve been fiddling with the registry yourself.
Perhaps it wasn’t installed correctly the first time, or Outlook/Todoist has been updated and it has caused a problem. Perhaps Outlook or Todoist has a corrupted file, which is rare, but possible. Maybe the program, or part of it, was deleted by accident. Or, perhaps you have a virus or infectious malware.
Uninstalling and reinstalling may offer a solution, but if you’re really having a hard time, then using Windows system restore may be used as a last measure. Alternatively, find another way of using Todoist, or maybe using something like Evernote. Before taking such drastic methods, check out the Todoist troubleshooting section to see if your problem is easily fixable.
Can I Reinstall Todoist After Deletion?
Yes, you can reinstall Todoist after deleting it from Outlook, but do your research before you do. This is because Todoist’s Head of Windows, Jan Kratochvíl has made is clear that Outlook compatibility is a work in progress as they, in his words, “Search for better ways of supporting Outlook in the future.” Before you reinstall, look online to see if a better Outlook solution has been created.
The Easiest Solution Is Often the Best
Always look for the easiest solution to your problem before you attempt things like disabling, deleting, or even a system restore. For example, restarting your device often fixes most problems because most problems are caused by conflicting software. For example, if you’re still having trouble deleting Todoist from Outlook, then restart your device. That way, if the problem is being caused by programs running in the background, or by something still being open in Todoist, then restarting your device will fix this problem.
Have our solutions fixed your problem? Are you still having trouble removing or disabling Todoist from your device? If so, let us know in the comments section below.





2 thoughts on “How to Delete Todoist from Outlook”
I was having problems with the add-in showing up outside of the Outlook screen. I then realized it is only supposed to work correctly for 32-bit, not 64-bit Outlook. Hopefully, they get something together soon. I love Todoist overall.