How to Disable Superfetch and Prefetch in Windows 8

Prefetch and, since Windows Vista, Superfetch, are technologies in Microsoft Windows that can significantly improve system resposiveness by predicting which applications a user is likely to launch and preemptively loading the necessary data into memory. While essential to ensuring a smooth user experience in systems with traditional hard drives, some systems with solid state drives may not see much benefit thanks to the SSDs’ inherent performance advantage, and Prefetch/Superfetch services may actually be detrimental to SSDs in the long run due to the unnecessary writes they generate.
In Windows 7, Microsoft attempted to address this issue by automatically disabling Superfetch and Prefetch when a fast SSD was detected. In Windows 8, however, the operating system tries to analyze the performance characteristics of the system’s storage and intelligently enable or disable Superfetch/Prefetch as needed.
While most users will be fine letting Windows decide how to use Superfetch and Prefetch on its own, there are situations in which Windows may make the wrong decision, and power users will want to manually disable or enable the services. This most often occurs with non-standard configurations such as fast RAID arrays of HDDs, or mixed use of both SSDs and HDDs.
Manually Disable Superfetch
To manually disable Superfetch in Windows 8, launch the Windows Services manager by right-clicking on the Desktop Start Button, choosing Run, and typing services.msc. Alternatively, you can search for services.msc from the Start Screen.
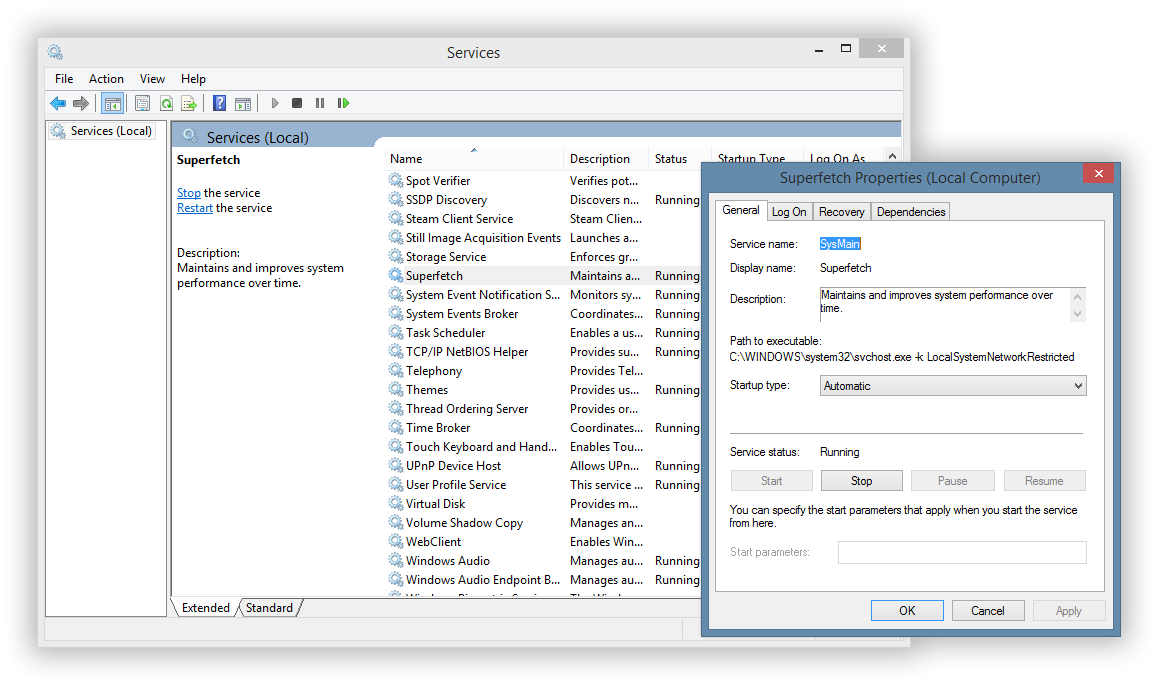
In the Services Manager, scroll down to find Superfetch, which is controlled by the Windows service called SysMain. Double-click Superfetch to launch its Properties window and click on Stop to stop it.

This will kill the service for now, but it will restart automatically at next boot unless we tell it not to. Under the “Startup Type” drop down menu, select Disabled. Click Apply and then OK to save your changes. Close the Services Manager and reboot to have the change take effect.
Manually Disable Prefetch
After you disable Superfetch, you can disable Prefetch from the Windows Registry. Launch the Registry Editor by right-clicking on the Desktop Start Button, choosing Run, and typing regedit. Just as before, you can also launch the Registry Editor by searching for regedit on the Start Screen.
From the Registry Editor, navigate to the following location:
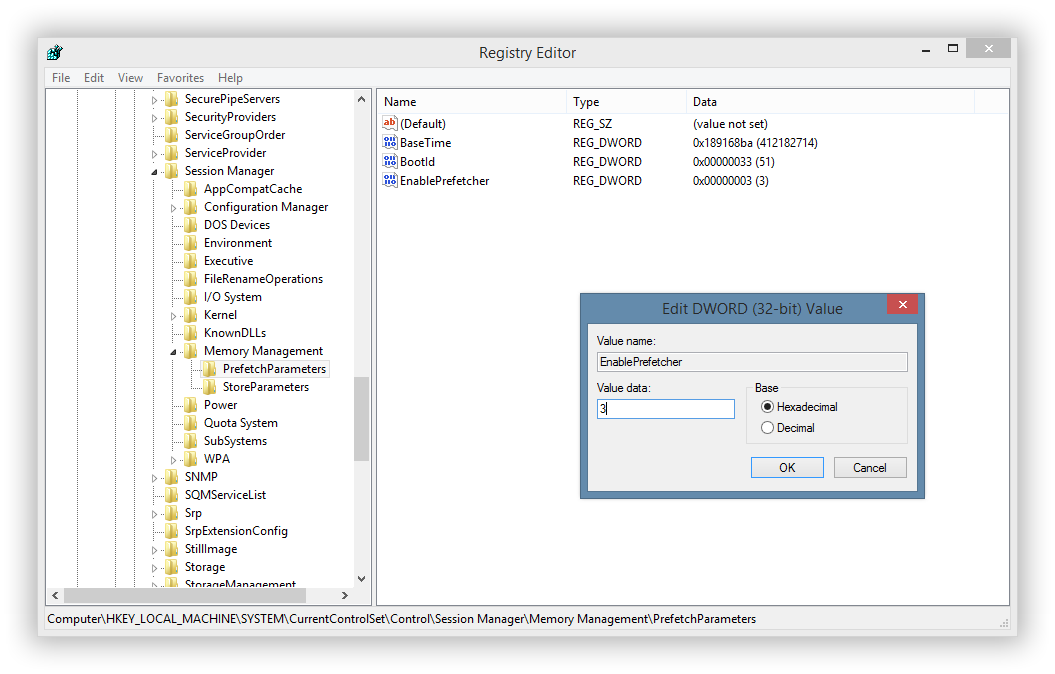
HKEY_LOCAL_MACHINESYSTEMCurrentControlSetControlSession ManagerMemory ManagementPrefetchParameters

On the right side of the window, double-click on EnablePrefetcher. You can configure Prefetch in one of four ways by entering the corresponding number in the Value Data box:
0 – Disables Prefetcher
1 – Enables Prefetch for Applications only
2 – Enables Prefetch for Boot files only
3 – Enables Prefetch for Boot and Application files
The default value is 3; setting it to 0 will disable Prefetching.
As mentioned, most users do not need to adjust Prefetch/Superfetch settings, and setting incorrect values can increase boot and application launch times significantly. But advanced users with non-standard drive configurations, or those running Windows in virtual machines, may want to exercise manual control over these important services.


10 thoughts on “How to Disable Superfetch and Prefetch in Windows 8”
Also, thanks for the explanation! :D
If it doesn’t make a moderna computer much better, and not really helping on an old computer, it is useless, right?
Sometimes my new computer used alot of HD too, so if that happens again I will do it.
Otherwise I will try to do it on my old computers aswell if I feel it take alot of HD.
Thanks again for the reply! :D