Five Fixes When You’re Locked out of Bios on Windows
Normally, the way to enter your PC’s BIOS (or UEFI) is to press the F2 or DEL key repeatedly while booting up. You should see a prompt, and a few seconds after pressing the key, the BIOS screen should appear on your screen.
But what if BIOS doesn’t open this way?
This article presents five methods you can try to restore BIOS access.
Method 1: Use a Wired Keyboard
If you’re using a Bluetooth or wireless keyboard, it’s likely to be the culprit. Often, these devices only become available when the boot-up process reaches Windows, so your system is simply not registering your keystrokes in time to load BIOS.
Try plugging a wired keyboard into one of your PC’s USB ports to see if that resolves the issue:
Step 1. Shut down your PC.
Step 2. Remove the Bluetooth or wireless keyboard.
Step 3. Plug in a wired keyboard.
Step 4. Reboot while pressing the F2 or DEL key.
Method 2: Boot to BIOS using Windows Advanced Startup
If switching to a wired keyboard doesn’t work, try letting Windows boot up into BIOS automatically – with no keystrokes required. You can do this easily from Windows 10 or 11’s “Advanced Startup” options.
On Windows 11:
Step 1. Go to Settings > System > Recovery.
Step 2. Next to Advanced Startup, click Restart Now.
On Windows 10:
Step 1. Go to Settings > Update & Security > Recovery.
Step 2. Under Advanced Startup, click Restart Now.
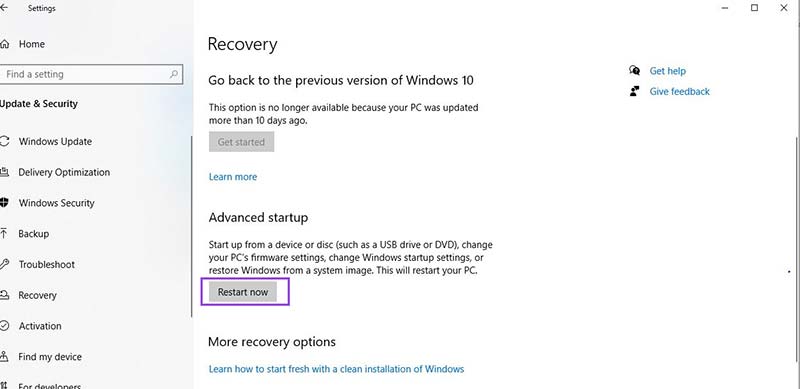
Your PC will restart, and open onto the blue Windows Advanced Options screen.
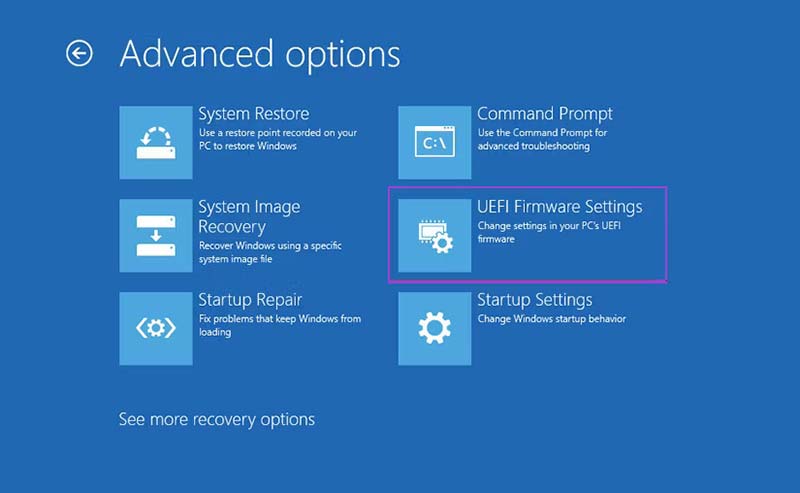
Step 3. Select the UEFI Firmware Settings option.
Your PC should now boot directly into your BIOS or UEFI menu.
Method 3: Turn Off Windows FastStart
If you never see the BIOS prompt and your PC boots up straight into Windows, the issue may be the Windows FastStart feature, which is enabled by default on both Windows 10 and 11.
Although this convenient feature speeds up Windows’ load time by booting up out of “Hibernation” mode, it can bypass the BIOS splash screen completely as a result.
To disable Windows FastStart:
In Windows 11:
Step 1. Open the Control Panel and select Power Options > System Settings.
In Windows 10:
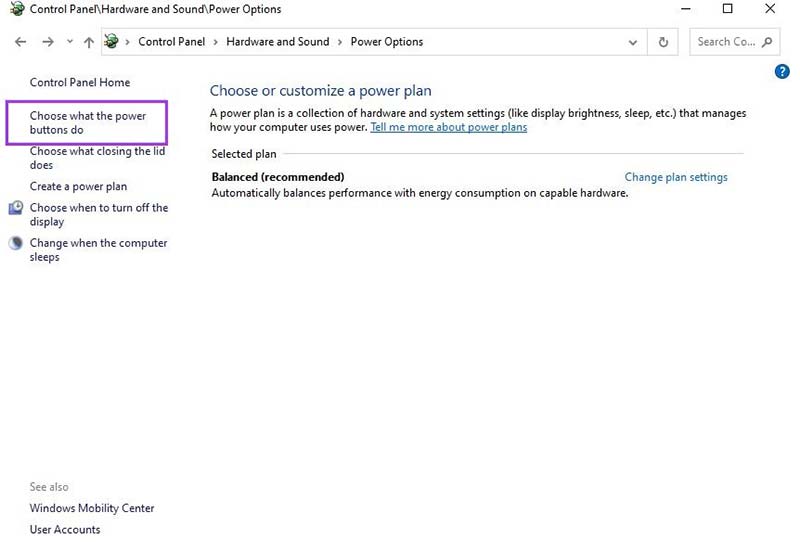
Step 1. Open the Control Panel and select Hardware and Sound > Power Options.
Step 2. Click on Choose what the power buttons do.
Then, in both Windows 10 and 11:
Step 3. Under Shutdown settings, if Turn on fast startup (recommended) is selected but greyed out, click on Change settings that are currently unavailable.
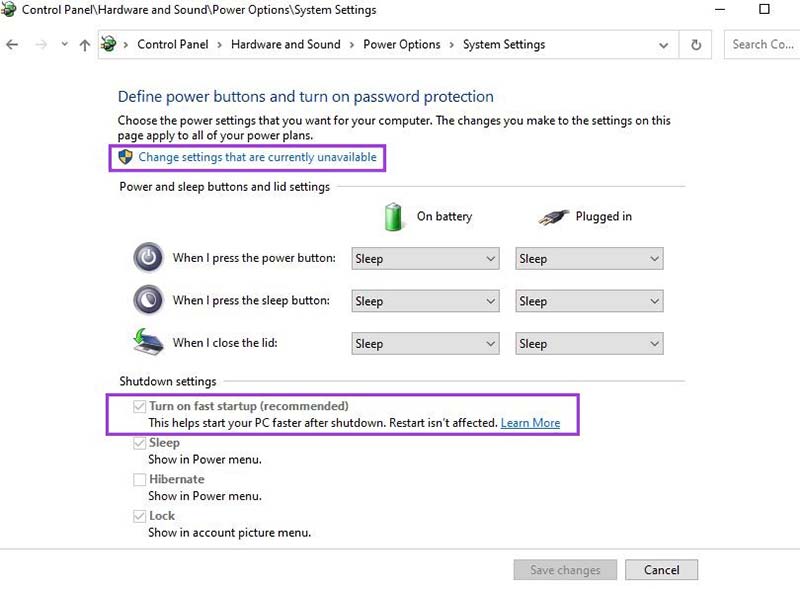
Step 4. Uncheck the Turn on fast startup box.
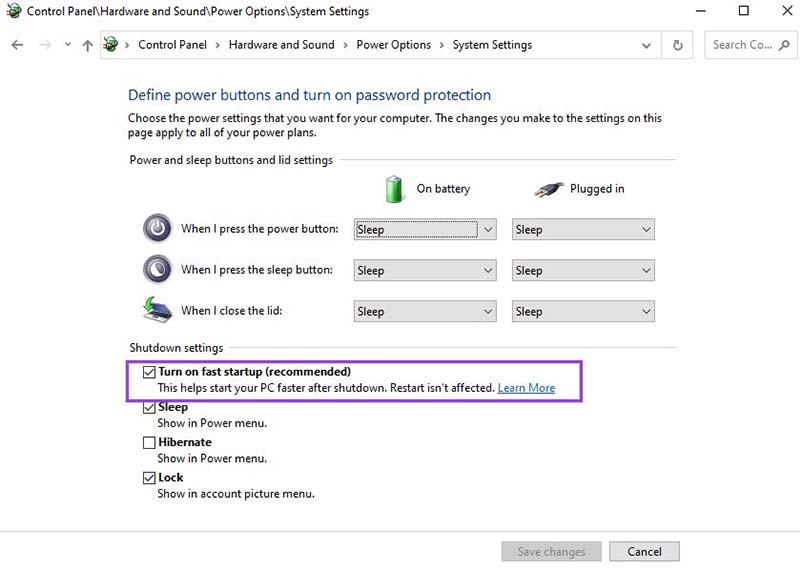
Step 5. Restart your machine, tapping the F2 or DEL key, and you should now be able to access BIOS.
Method 4: Switch Your Monitor Port
If you have a GPU installed, some newer motherboards will bypass BIOS and boot directly into Windows in some cases.
If you have integrated graphics on either your motherboard or CPU, but you’ve connected your monitor to one of the GPU HDMI slots instead, try connecting it to the built-in HDMI port instead. On a standard PC case, the built-in port will usually be higher up than the GPU ports.
Step 1. Power down your PC.
Step 2. Connect the monitor’s HDMI cable to the built-in port.
Step 3. Restart your PC while tapping on the F2 or DEL key, as in the previous methods.
The problem could also result from having “fast boot” enabled in your BIOS while your monitor is not plugged into the first GPU HDMI port. If “fast boot” is enabled, your system might only check the first port before bypassing BIOS and booting straight into Windows.
The solution is to connect your monitor to the first GPU port. The first GPU port is normally the leftmost, but is sometimes the rightmost, port on your GPU.
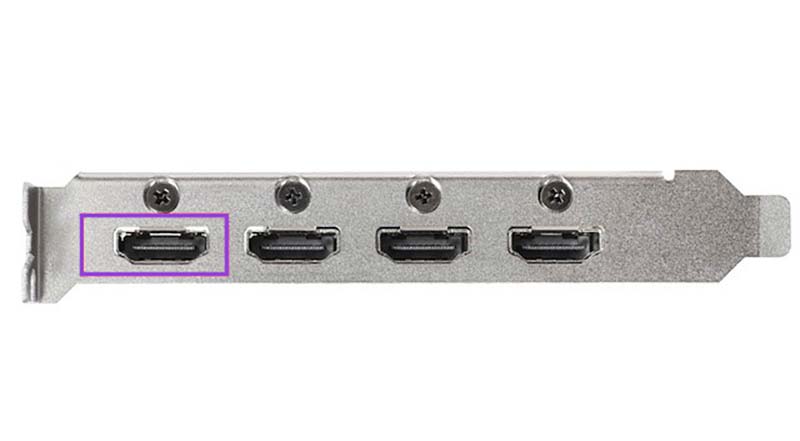
Step 1. Power down your PC.
Step 2. Switch the monitor’s HDMI cable to the first GPU port.
Step 3. Restart your PC while tapping on the F2 or DEL keys, as in the previous methods.
A related “fast boot” / GPU issue may also be the problem.
Specifically, the “fast boot” feature can sometimes skip BIOS and boot directly into Windows when your GPU has not been installed into your PC’s primary PCIe slot (usually the one mounted highest in a PC tower).
Changing the GPU’s PCIe port can often bring back BIOS access, while retaining the convenience and speed of the “fast boot” feature. You’ll have to open up your PC to make the change.
Method 5: Reset BIOS to Factory Defaults
If all the above methods fail, you may have to resort to restoring BIOS to its factory defaults.
This is absolutely not recommended unless you’re a professional or very experienced. You can very easily damage your motherboard or brick your PC if you make a mistake.
If you’re lucky, your motherboard will have a “Clear CMOS” button, which will do the job without you having to open your PC.

Step 1. Power down your PC and disconnect the power cable.
Step 2. Press and hold down the CLEAR CMOS button for ten seconds.
Step 3. Reconnect the power cable and restart your PC (while tapping on the F2 or DEL keys).
Your BIOS should now be reset and accessible.
There are other methods, such as removing the CMOS battery and using jumper pins, but these fixes are best left to an expert.
Work through these troubleshooting techniques in order, and you should be back in BIOS in no time.


