How and Why to Use Private Browsing in iOS

Note: We have updated instructions for using Private Browsing in iOS 7. The instructions below still apply to iOS 5 and 6.
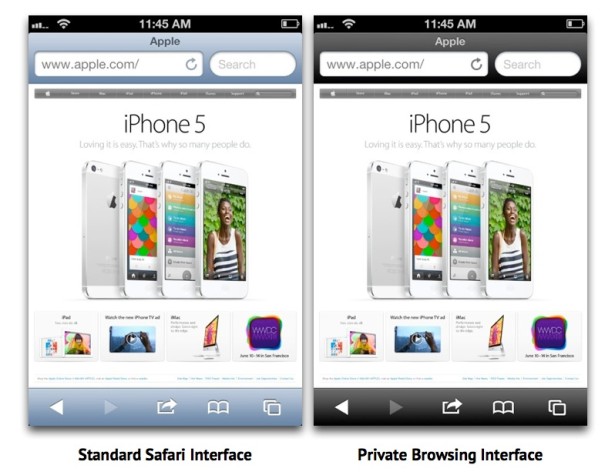
A reader recently asked for help with their iPad: Safari’s navigation bars had turned black, and the reader didn’t know why or how to fix it. The short answer is that the reader had inadvertently enabled Private Browsing in Safari, but it got us thinking that perhaps a more detailed look at this useful, but little-known, iOS feature was in order.
What is Private Browsing?

Private Browsing, introduced by Apple as part of iOS 5 in October 2011, is a setting for the mobile Safari browser that disables several standard tracking and data collection features that are common to most browsers.
Enabling Private Browsing blocks websites from placing cookies on your iOS device. While cookies can be used by sites to track visitors for advertising purposes, they also enable sites to remember user information that can be used to automatically log a user back in when they revisit the site, or auto-fill certain information. As an example, if you visit Amazon.com and log in with your account information, the website will remember who you are when you revisit the site later. Without cookies, you’d have to log-in every time you visited Amazon. Depending on your preferences for security, this can be either a positive or negative result of blocking cookies.
On the user’s side of the equation, enabling Private Browsing also prevents Safari from tracking your page and search history or auto-fill information. Just as above, this can be good or bad, depending on your usage and preferences.
In summary, Private Browsing disables the recording of information about what sites you visit with Safari, but it should not be mistaken as a replacement for good security practices. Private Browsing won’t protect you from viruses (as far as they exist in terms of iOS), data phishing or hacking attempts, or financial or identity theft. What you do while using Private Browsing can still be seen by the server or website you’re connected to, it just won’t be recorded on your iOS device.
When to Use Private Browsing
Some users may never need to enable Private Browsing, and cookies can often enhance a user’s experience on the Web as much as they help websites measure traffic. But for users who want no trace of their browsing session, Private Browsing can serve a useful purpose.
Examples of when Private Browsing may be appropriate include online banking from a friend’s iDevice, online shopping from a shared family iDevice, and, let’s be honest here, viewing content that you don’t want stored in the device’s history or cache, such as adult websites.
How to Enable Private Browsing
As mentioned above, Private Browsing was introduced in iOS 5, so you’ll need an iPhone, iPad, or iPod touch running iOS 5 or higher.
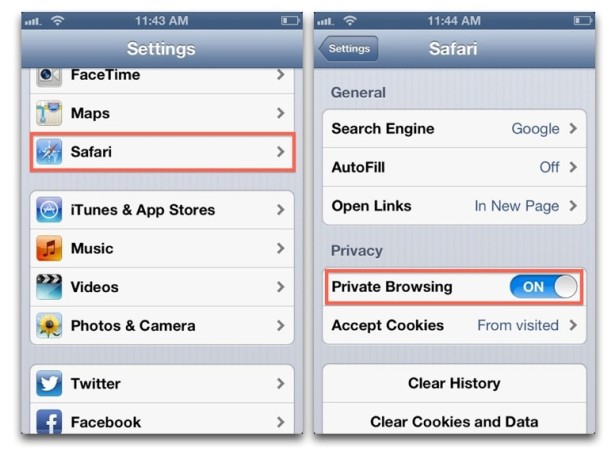
To enable it, unlock your device and go to Settings > Safari > Privacy and turn “Private Browsing” to “ON.”

Whenever you turn Private Browsing on or off, you’ll be asked if you’d like to close all of your currently open tabs. If you’ve just completed a Private Browsing session and you left the tabs in Safari open, you’ll likely want to choose “Close All.”

Now head to Safari and you’ll notice that the navigation bars are black instead of their usual blue-gray color. As long as you see these black navigation bars, you’re free to browse the Web with no local trace of your actions or history. Reiterating our caution above, remember that Private Browsing is not a replacement for good security; always behave carefully while online, and don’t give out information to unknown parties or click on links of unknown origin.


4 thoughts on “How and Why to Use Private Browsing in iOS”
https://itunes.apple.com/au/app/free-full-screen-private-browsing/id368483462?mt=8
As noted at the top of the page, these instructions are for iOS 5 and 6. If you’re running a newer version of iOS you’ll want to follow the instructions here: https://www.tekrevue.com/tip/use-private-browsing-ios-7/