How to Find the MAC Address of Your iPhone or iPad

Your iPhone or iPad, like virtually all networkable devices, has a MAC (media access control) address, which is an assigned ID that makes your device uniquely identifiable on a network. Typical network functions that involve a device’s MAC address are usually handled automatically, and most users will never have to see or worry about it on their home or personal networks. But some advanced network configurations require you to find and submit your device’s MAC address, even for mobile devices like the iPhone and iPad. So whether you’re trying to connect to a secure network at work or school, limit access to your home network, or simply troubleshooting, here’s how to find the MAC address on your iPhone or iPad.
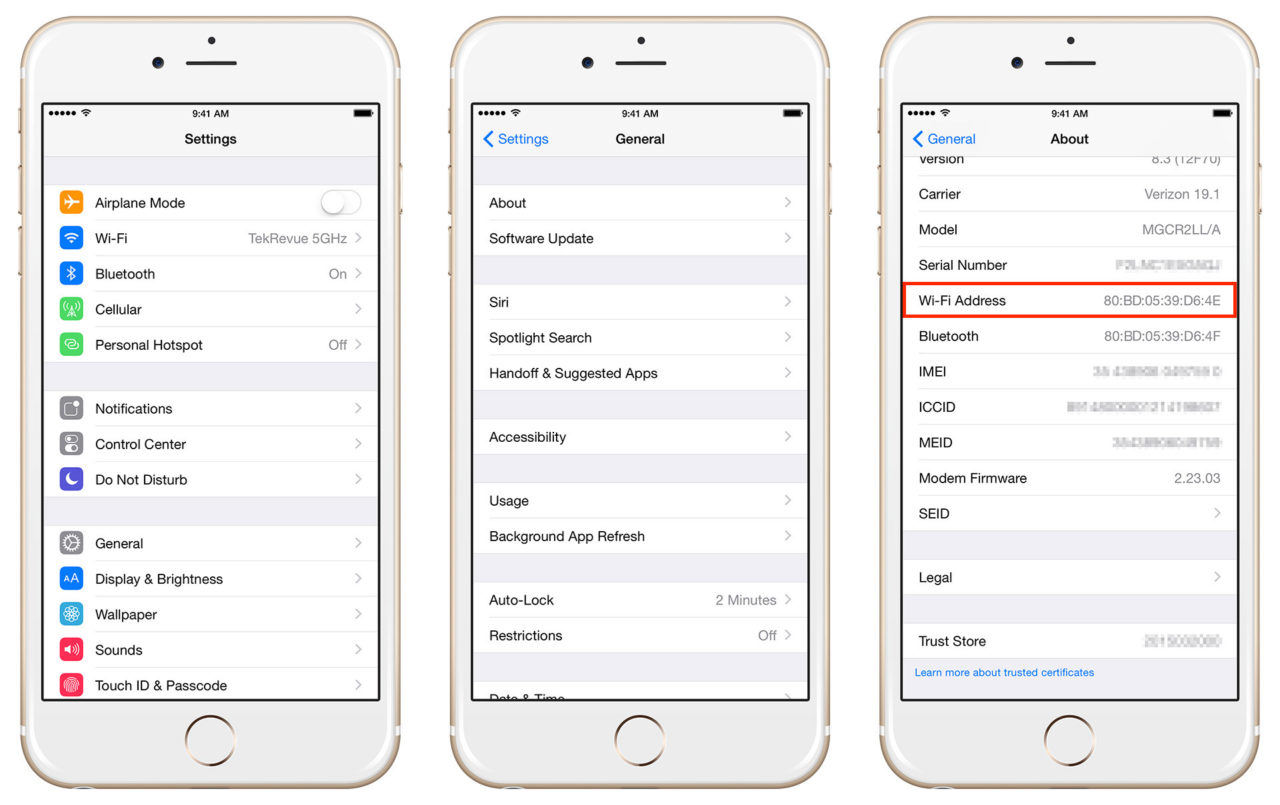
To find the MAC address of your iPhone or iPad, head to Settings > General > About. This page displays a wealth of information about your iOS device, such as serial number, capacity, and your device model number.
Note, however, that the MAC address of your iPhone or iPad isn’t labeled as such. Instead, look for the entry labeled Wi-Fi Address. The series of colon-separated numbers and letters in this field is your device’s MAC address.

It’s also important to remember that a MAC address is not technically unique to a device. Rather, the MAC address is unique to a device’s network interface. For example, the iMac has both Wi-Fi and Ethernet network connections, and so there are separate MAC addresses assigned to each interface, and you’ll need to make sure you choose the appropriate one based on your connection configuration when necessary.
Related: How to Find Your MAC Address in Windows & OS X
This same rule applies to iOS devices like the iPhone and iPad, which have Bluetooth interfaces in addition to Wi-Fi, meaning that you’ll also see a MAC address listed under Bluetooth in Settings. In general, however, you’ll most likely need the Wi-Fi MAC address when configuring your device on a network.
With your iPhone or iPad MAC address now identified, you can make a note of it several ways, depending on your needs. The most obvious, of course, is to simply write it down for later reference or to submit to an IT administrator. You can also take a screenshot to quickly save the address. The best option, however, is to copy the address from within iOS. To do this, just tap and hold on the Wi-Fi address field until you see the “Copy” option appear. Tap “Copy,” then navigate to any app that accepts text, such as a new email, a note, or an entry in a third party app like OneNote. Tap anywhere that text can be entered and select “Paste.” You’ll see your MAC address appear instantly without having to remember it or manually write it down.


