How to Fix Microsoft Teams Crashing When Sharing Screen

Fix 1 for Microsoft Teams Crashing When Sharing Screen: Check for Updates
A common reason for many Microsoft-related issues, like MS Teams crashes, is because your device is simply not updated. Regular updates include crucial files and bug fixes. So, the first way to respond if Microsoft Teams crashes when sharing screen is to check for updates, and install them, if available.
Step 1: Navigate to “Settings” by either pressing “Windows + I” together or typing “Settings” into your search bar.

Step 2: Head to the “Windows Update” page (it’s at the bottom of the side menu) and click the “Check for updates” button.
Step 3: If any available updates appear, just download and install them. Wait for your device to finalize the process (it may need a restart) and launch Teams again once it’s done.

Fix 2: Clear the Teams Cache
Clearing application caches is a common troubleshooting step that may also work with MS Teams, too. Even a minor corruption to the cache could trigger crashes and freezes when attempting to share screens.
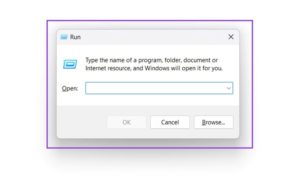
Step 1: Either press “Windows + R” or just type “Run” into your search bar and click on the “Best Match.”

Step 2: Type the following into the box: “%appdata%MicrosoftTeams” and press “Enter.” This’ll open a new menu with a bunch of temporary files for MS Teams.

Step 3: Select all of the files and delete them to empty the cache.
Fix 3: Repair, Reset, or Reinstall Teams
Often, if you’ve got an issue with an app, like MS Teams, you may need to repair it, reset it, or even do a full reinstallation to resolve that issue. You can do all three of these processes without needing to install any third-party apps.
Step 1: Navigate to your “Settings” by either typing “Settings” into the search bar and clicking it or pressing “Windows + I” together.
Step 2: Look down the left-hand menu and find “Apps.”

Step 3: Click that, then click “Installed apps” to see a list of all the apps on your system.

Step 4: Scroll down the list to find MS Teams or just type “Teams” into the search bar at the top.

Step 5: Click the three little dots beside Microsoft Teams and click “Advanced Options.”
Step 6: Scroll down until you see the “Repair,” “Reset,” and “Uninstall” buttons.

Step 7: To save yourself time, it’s best to start with the “Repair” button and follow the on-screen instructions to see if that resolves your issues. If it doesn’t, return to this menu and try “Reset” instead. If that still doesn’t work, you can use the “Uninstall” button to get rid of Teams and then install it again to see if that fixes the issue.
Fix 4: Adjust Your Display Settings
Many users have found that their displays are actually to blame when Teams crashes when sharing screen. The display settings might not be configured quite right to work with screen sharing, and reducing or disabling some settings could make all the difference.
Step 1: Head to your “Settings” using the “Windows + I” keyboard shortcut or by searching for “Settings” in the search bar.
Step 2: Click “System” and go to “Display” to see your display settings.

Step 3: Click “HDR” and disable it, if it’s switched on for you. Note: Some machines aren’t able to support HDR – if this is the case for you, then ignore this step.


Step 4: Go back to the “Display” menu, scroll down, and click “Advanced display.”
Step 5: Find the “Choose a refresh rate” section, click the drop-down, and put your refresh rate as low as it can go (usually 50 or 60Hz).

Step 6: Try Teams again with the new display settings.


