How To Fix No Service On Samsung Galaxy J3
Smartphones might be revolutionary tools, but they aren’t perfect. Like any computer, smartphones—like your Samsung Galaxy J3—often run into bugs or other issues that can cause problems with your day-to-day usage. One of the most inconvenient problems: a lack of service from your phone to your carrier. Without service, you won’t be able to connect to the internet, send text messages, make phone calls, or use the phone to its fullest extent. For obvious reasons, this is a problem—what good is a phone without service?
The good news: it’s pretty easy to determine the cause of a lack of service on your Galaxy J3 if you know what you’re looking for, and the solutions are easy to implement and test. With our guide, you’ll have your phone back up and running. So, without further ado, let’s take a look at how to fix your connection issues on your Galaxy J3.
Remove the SIM card and Reboot the Phone
It’s a cliché, but the first step when you’re experiencing problems with your phone should always be the same: reboot the device. Though it’s a bit of a joke among the tech community—”Did you try turning it off and on again?”—rebooting any device experiencing issues or interruptions with day-to-day usage can help fix a number of issues. When you reboot your device, your RAM cache is cleared, and a misbehaving app might return to its normal function. So if your device is ever having problems with usability or connectivity, rebooting the device is one of the simplest and quickest fixes for your device.
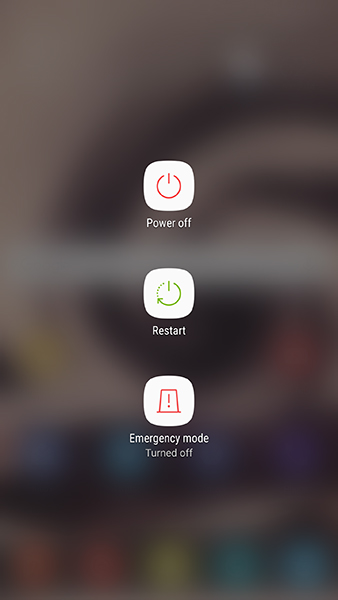
Though you could normally use the reboot function included on your Galaxy J3, to help fix your service problems, you should fully power the phone down. After the phone is powered off, use your SIM tool (or a small paperclip) to get inside the SIM slot of your phone. Once you’ve open the SIM slot, remove your SIM card. Make sure there’s no noticeable damage or dust on the SIM card, and reinsert the card properly. Close the SIM tray, and power your phone back on. In some cases, this might be all that’s needed to reconnect your phone to your carrier. Of course, if you’re still experiencing interruptions in your service, keep going through the guide below.
Check Your Coverage Map
One more quick step: if you’re in an unfamiliar area, or you’ve recently moved to a new address or new apartment building, check your carrier’s coverage map on their website, or by searching for your carrier’s name and the term “coverage map.” Make sure you aren’t in an area that is poorly or not covered by your carrier. Your carrier’s map should show several different zones, including 4G (or LTE) service, 3G (GSM or CDMA, depending on carrier) service, or even 2G (sometimes called 1X, on Verizon) coverage areas. Also, if you’ve moved into an apartment building, some building layouts or walls can cause reception issues with certain phones, including your Galaxy J3. If you’re only having reception problems inside your apartment, check with your carrier to see if they offer signal boosters for your building.
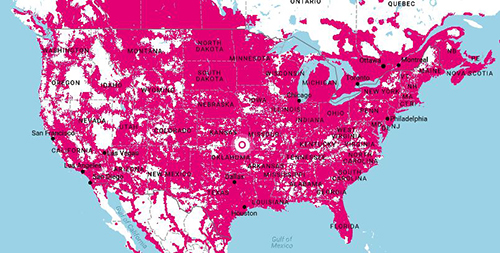
Also check to see if your carrier is currently experience an outage in service in your area. Though rare, these do happen from time to time. While a small number of outage reports are common, if hundreds of outage reports are spiking in your area, your network may be offline for the time being. You can check carrier outages for each of the four big carriers here:
Check Your Network Settings
Okay, with some prerequisite steps out of the way, let’s dive into your J3’s settings menu. We’ll start by checking some of your network settings, just to make sure everything looks okay. Like with most steps in this guide, the correct settings for your device will depend on your carrier, so if you aren’t sure the proper settings for your network’s service, a quick Google search should clear things up.
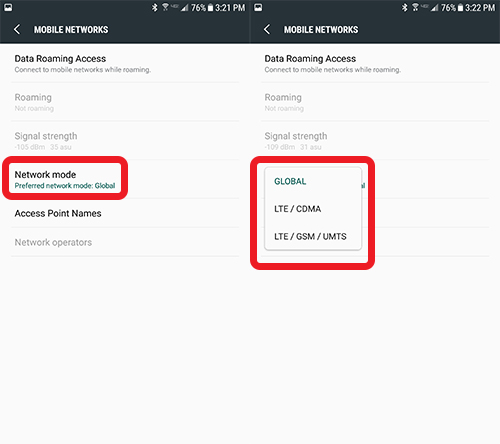
Start by opening your settings menu. In the standard settings view, select “Mobile Networks” under “Wireless and Networks.” If you’re using the simplified view, selection “Connections,” followed by “Mobile Networks.” Once you’re on the “Mobile Networks” menu, tap on your “Network mode” setting. This will display a list of different network modes your phone to which your phone can be set. The available options will largely depend on your network, but I’ve tried my best to gather the following options for the four major US carriers below:
- Verizon: Global (preferred), LTE/CDMA (alternate), LTE/GSM/UMTS (backup)
- T-Mobile: LTE/3G/2G (preferred), 3G/2G (alternate), 3G only, 2G only
- Sprint: Automatic (preferred), LTE/CDMA (alternate), GSM/UMTS (backup)
- AT&T: (option disabled by default)
So yes, if your phone is on AT&T and isn’t an unlocked model of the J3, you won’t be able to change your network settings. For Verizon and Sprint, you’ll want to leave the setting on Global or Automatic, but it’s worth checking the other two modes to see if you can get a signal on a separate band. The GSM settings for these phones may cause roaming charges to apply. Finally, for T-Mobile, you’ll want to leave the setting on LTE/3G/2G by default, but again, it’s worth trying all four options to see if you can get a variant to work on your device.

There is one more option you’ll want to check out inside the “Mobile Networks” settings menu: Access Point Names. Your APN settings should be preset by your carrier, but if you’re on T-Mobile or AT&T and you’ve brought your Galaxy J3 from a different carrier, or you’re using an unlocked model, you’ll want to make sure you can input the correct APN settings into your device; you can find these settings on your carrier’s support site. Verizon and Sprint do not allow their devices to edit the APN, so you’ll have to skip this step if your phone is on those carriers.
Check Your WiFi Calling Settings
Here’s an important solution you might want to check, especially if you’re on T-Mobile. Newer phones like the J3 allow users to place calls over WiFi networks as opposed to over their carriers. This can help when your network experiences slowdown or is overloaded, or, as we wrote above, you reside in an apartment building with poor reception. Unfortunately, some Galaxy J3s have experienced a loss of service when WiFi calling is enabled.
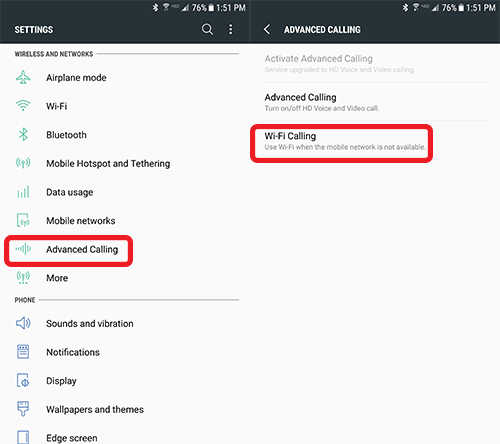
So, dive back into your settings menu. Unfortunately, finding your WiFi calling settings is going to depend on where your carrier has hidden the menu. On some devices, the setting is found in “Advanced Calling,” under the “Wireless and Networks” category. For a carrier like T-Mobile—where most users have reported experiencing service issues related to WiFi calling—you’ll find the setting under “Connections,” followed by “More connection settings.” If you’re having difficulty finding the WiFi calling setting, check your carrier’s support website, or use Settings’ search-function to find “WiFi calling.”
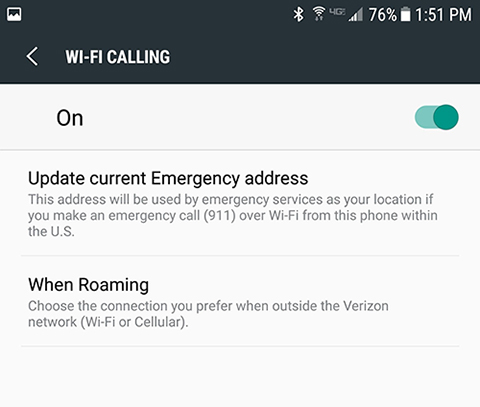
Once you’ve found the option, your next step depends on your carrier. Some carriers, like Verizon, keep their settings to on-or-off, and only use WiFi for their calls when a mobile network isn’t available. Some carriers—specifically T-Mobile—have multiple settings for their WiFi calling. If you’re using T-Mobile, or you have multiple settings for your WiFi calling, you’ll want to make sure you haven’t enabled “Never Use Cellular Networks” for your calls. If you have, you may be experiencing cellular outages when not connected to WiFi. You’ll want to either select “Cellular Network Preferred” or “WiFi Preferred.”
If you don’t have these options, but you do have WiFi calling enabled, try disabling the functionality on your phone entirely to see if your mobile service returns.
Reset Your Network Settings
Once you’ve tried the above options, it’s time to start resetting and clearing settings and functions of your device. The first reset is an easy one: open your settings menu and find the “Backup and Reset” option near the bottom of your settings list. If you’re viewing your settings in simplified mode, you’ll find this option by selecting “General management,” followed by “Reset.” You’ll find three reset options in this menu: “Reset Settings,” “Reset Network Settings,” and “Factory Data Reset.” You probably already guessed, but we’ll be using the second option: “Reset Network Settings.” This will reset your WiFi, Bluetooth, and mobile data connections back to their carrier-enabled defaults. If your network settings have been changed, either by user error or a rogue application, this option will reset your phone’s network capabilities to stock. Do note that your WiFi and Bluetooth settings and devices will be lost, so you will have to reenter your passwords and repair your devices back to your phone once the reset is done.
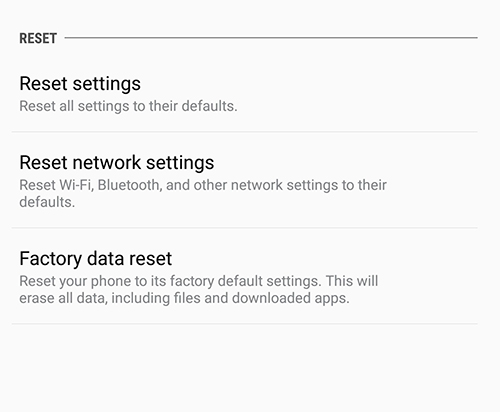
After the reset is complete, check to see if your device has regained a connection to your mobile network. If not, continue down our list of resets below.
Clear Your Cache Partition
Next up on our list of resets: clearing your J3’s cache partition. All in all, this is a fairly-technical procedure. If you’ve never wiped your phone’s cache partition, do proceed with caution and follow this guide closely. Wiping the cache partition of your J3 won’t wipe any user data or applications from your device. Instead, your cache partition holds any temporary data saved by the applications and software on your phone, allowing your phone to load app data faster. Unfortunately, this information can sometimes lead to problems or issues with your phone if something goes wrong with your cache. Clearing the cache partition should fix any minor issues with your device’s usability or connection.
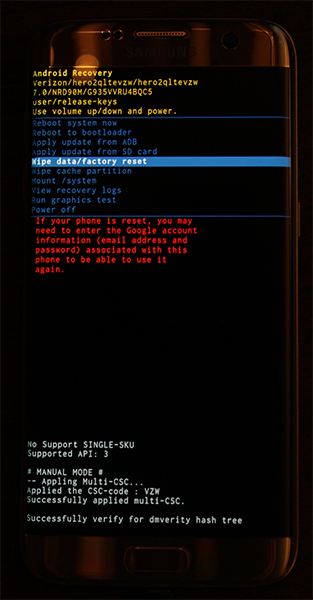
Start by powering your phone completely off. Once the device is off, press and hold the Home key, the Power key, and the Volume Up key. Once the words “Recovery Booting” appear at the top of your screen, you can let go of these buttons. A blue screen reading “Installing System Update” for up to thirty seconds; the display will then alert you that the system update has failed. This is normal, so don’t stress. Let the phone sit for another few seconds, and the display will switch to a black background with yellow, blue, and white text on it. At the top of your screen, the words “Android Recovery” will appear; you’ve successfully booted into recovery mode in Android. Using the volume keys to move your selector up and down, move down to “Wipe Cache Partition” on the menu.
In the picture above (taken on a Galaxy S7), it’s below the highlighted blue line—don’t select that option unless you want to wipe your entire phone. Once you’ve highlighted “Wipe Cache Partition,” press the Power key to select the option, then use the Volume keys to highlight “Yes” and the Power key once more to confirm. Your phone will begin wiping the cache partition, which will take a few moments. Hold tight while the process continues. Once it’s complete, select “Reboot device now” if it isn’t already selected and press your Power key to confirm. Once your phone reboots, check your device to see if you’ve reestablished a connection to your mobile network. If not, it’s time to move on to our final, most drastic step.
Factory Reset Your Phone
As with most troubleshooting, the final step to fixing your device often involves a full factory data reset of your phone. While this isn’t a fun process by any means, it’s also a common method for fixing software-based issues with your Galaxy J3.
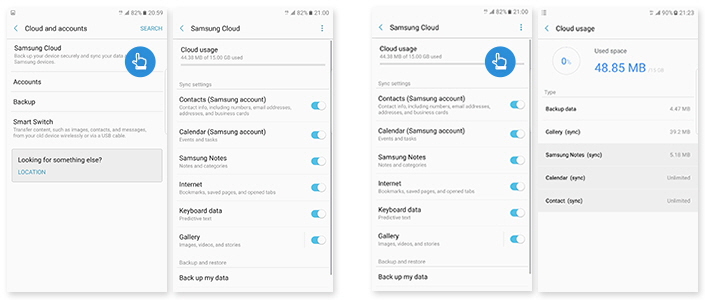
Before completely resetting your device, however, you’ll want to back your phone up to the cloud, using a backup service of your choice. Some recommendations: Samsung Cloud and Google Drive work best with your device. You can also use apps like SMS Backup and Restore and Google Photos to backup your SMS messages, call log, and photos to the cloud. You can also transfer important files or information to an SD card installed in your device; factory resets don’t clear your SD cards unless you check a specific setting.

Once you’ve backed your files up, open your settings menu and select “Backup and Reset,” found under the “Personal” category in the standard settings menu and under “General management” on the simplified layout. This time, select the third reset option, “Factory data reset.” This will open a menu that shows every account you’ve signed into on your phone, along with a warning that everything on your device will be wiped. As mentioned above, your SD card will not be reset unless you choose to select the “Format SD card” option at the bottom of your menu; whether you want to do so is up to you, but it isn’t necessary for this process. Before selecting “Reset phone” at the bottom of this menu, make sure your phone is either plugged-in or fully charged. A factory reset can use a large amount of power and can take upwards of half an hour, so you don’t want your phone dying during the process.
Once you’ve confirmed your device is either charging or charged, select “Reset phone” at the bottom of your scree, and enter your PIN or password for security verification. After this, your phone will begin to reset. Let the device sit and complete the process; don’t mess with your J3 during this time. Once the reset is complete—which, again, can take thirty minutes or more—you’ll be booted to the Android setup display. If the factory reset has restored a connection between your phone and your carrier, you should see a data connection in the status bar on the top of your display.

Contact Your Service Provider
If you’ve tried everything on this list and you’re still experiencing connection problems with your network, you’ll want to reach out to your respective carrier, either through their support centers or, preferably, with an in-person meeting at a retail location near you. You may require a new SIM card, or an entire replacement device (assuming your J3 is still under warranty). There may also be something wrong with your specific account through your carrier, so reach out to their support lines to make sure your account is in good standing and hasn’t had a hold placed on your device. Since you’ve tested every possible solution on your end, there’s a good chance the problem lies in their hands, not in yours.
***
Phones aren’t perfect, but they are important tools in your everyday life. Obviously, losing a cellular connection between your device and your network is inconvenient or even dangerous, but luckily, these problems are usually fixed through your settings menu or with simple patience. Typically, a network connection problem spawns on your carrier’s end, not with your phone, so make sure you check your carrier’s status and support lines if your having problems placing calls or using your data. Even if the problem is hardware-based, your network can usually repair or replace your device—or the SIM card—and get you back up and running in no time.


