How To Print From Your Chromebook

Printing from a Chromebook doesn’t work in the traditional sense. Such as the way you’d print pages from a Mac or Windows computer.
On Windows and Mac machines, you go to the settings or system preferences, find your wireless printer on the network and set it up. Then, once it’s added to your Printers you’re done and ready to print whenever you want, assuming the printer is on and you’ve loaded in enough printer paper.
If you want to print from your Chromebook first, you will need to add your printer to Google Cloud Print.
To add your printer to Google Cloud Print, you will need a Windows or Mac computer, using the Google Chrome browser settings to get it done.
This all sounds complicated, right? Well, it’s not that complicated to add a printer and print to it, trust us. If you follow the instructions here, you’ll be printing from your Chromebook in no time!
Let’s go through the steps and get you printing from your Chromebook device.
Google Cloud Print Set Up
Boot up your Mac or Windows computer then open the Google Chrome browser. Also, make sure that your printer is on and is detectable on your wireless or wired network or directly to the printer. As I mentioned above, you have to add the printer to Google Cloud Print with a Mac or Windows machine but then you can print from a Chromebook any time you want after that.
We used a Brother wireless printer for our testing for this article and it works flawlessly.
- In the Chrome browser, go to the upper right-hand side and click the three vertical dots.
- Next, you’ll scroll down to settings for your Chrome browser and click it.
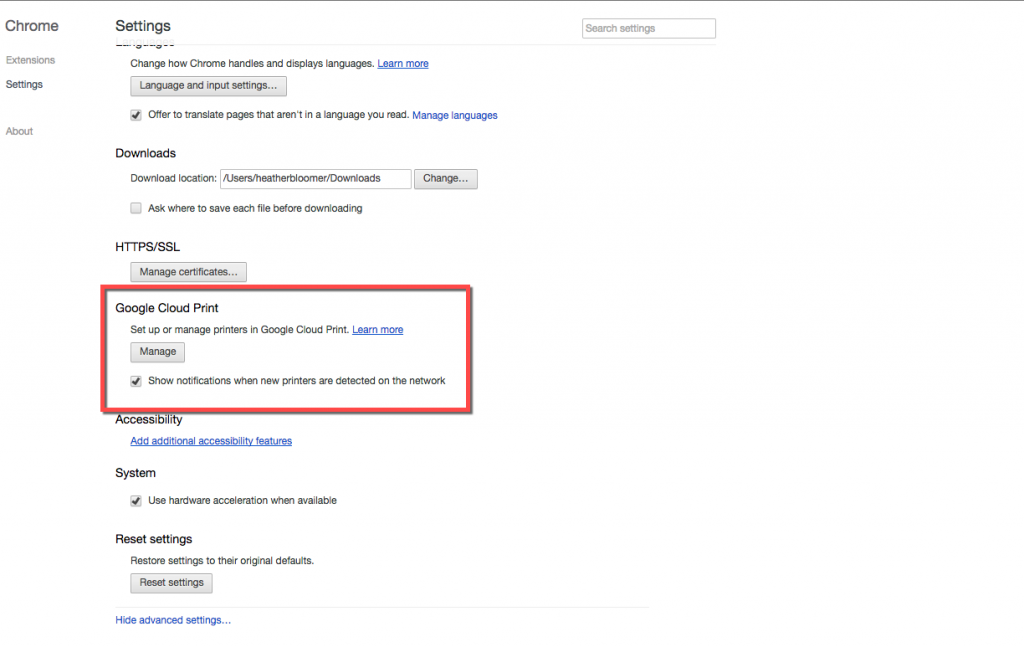
- In the next Chrome browser window, scroll down and click on the blue link that says show advanced settings.
- Go down to Google Cloud Print. Then, click on the Manage button.

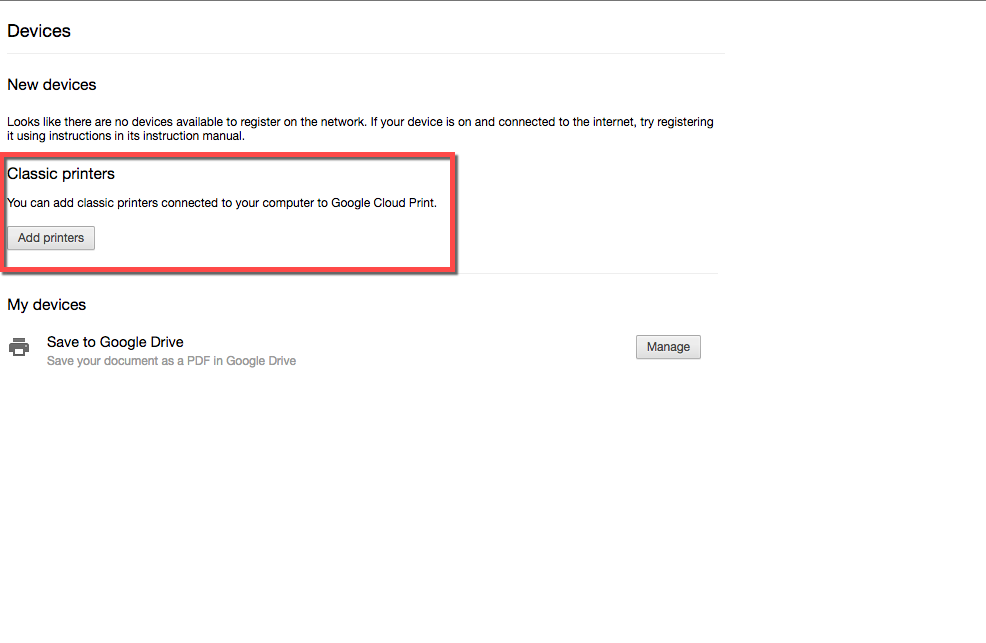
- Then, under Classic printers, click the add printers button.

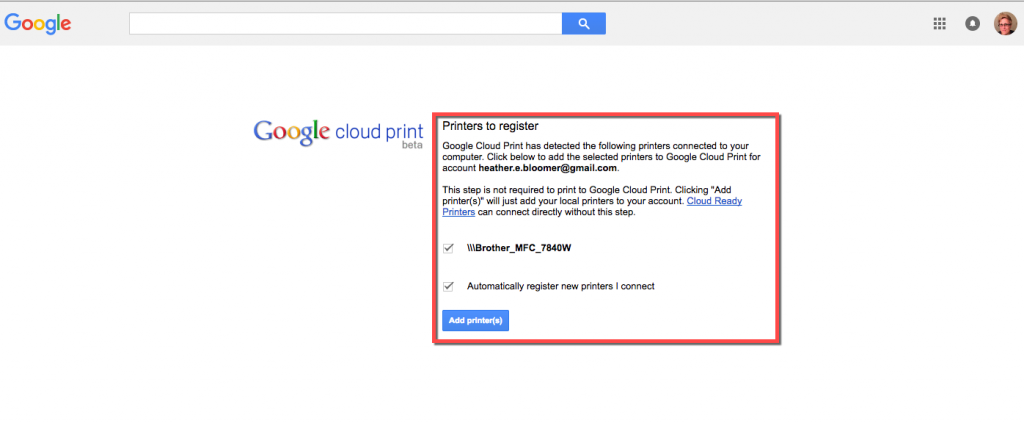
- Now you should be on the Google Cloud print page and your printer should’ve gotten detected. It’ll get listed on the page. Just click on the add printer button. Your printer is now accessible from your Chromebook.

Remember, this setup can get established from a Mac or Windows computer. It’s not recommended to do it on both. As that may mess up a setting that makes printing from the Chromebook possible, after following these steps first.
The printer or printers you add here become associated with your Google account. Not only will you be able to print from your Chromebook device, but you’ll also have the capability of printing from wherever you’re signed in with your Google account.
Print from your Chromebook
If you haven’t already powered on and signed into your Chromebook, do so now. Once you’ve found something you need to print, you should be ready to go. Let’s do a test print from our Chromebook to see how it goes.
- Navigate to a printable page in your Google Chrome browser on your Google Chromebook device.
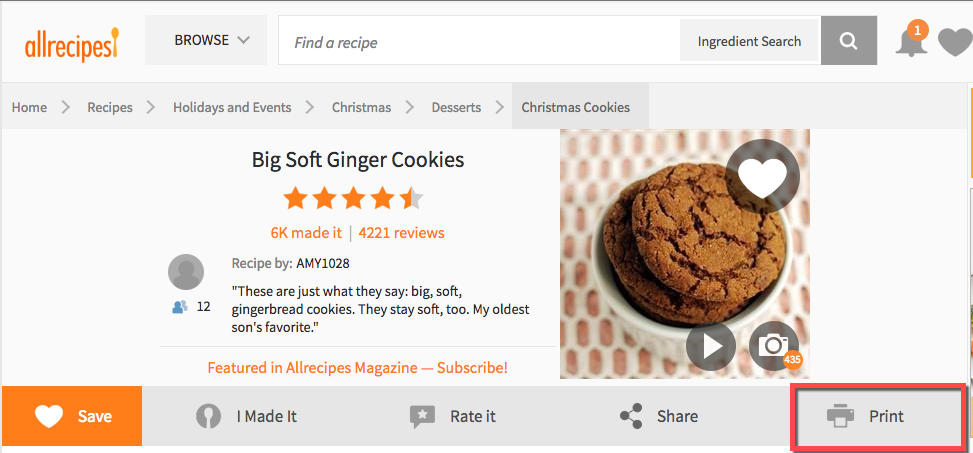
- In our example, we’ll print a recipe from Allrecipes.com for Big Soft Ginger Cookies. Click on our link to the recipe from your Chromebook and print it.
- Then, go to the Printer icon and click it. You’ll see the printable version of the recipe page. Next, click on the print icon again to do a test print on your Chromebook.

- In the Google Print window that opens, change the destination to your printer. The one you’ve associated with your Google account. Then, click the print button and walla, you should’ve successfully printed from your Chromebook device.
You can also print a page from your Google Chrome browser on your Chromebook by clicking on the three verticle dots in the upper right of your Chrome browser. Then, go to and choose the Print option. Now you’re all set to print anything you need directly from your Google Chromebook. Sweet!
The printing working perfectly in our tests and, hopefully, your test prints are working perfectly, too!
See Your Printer from Chromebook Settings
On your Google Chromebook device, you can also check to make sure you see your printer is listed after you go through the Google Cloud Print set up. Just click where your Google Account profile picture’s shown in the lower right-hand side of your Chromebook.
- Next, click on the gear icon which is where your Chromebooks settings are.
- Then, scroll down and click on the blue link that says show advanced settings.
- Go down to Google Cloud Print. Then, click on the Manage button.
- Where it says My devices your printers name and Save to Google Drive are listed.
That’s a wrap. You’ve learned how to set up Google Cloud print from your Mac or Windows computer and also can now print directly from your Google Chromebook.
We hope we’ve removed the confusion on how to print from your Chromebook and that you’re successfully able to do so after following the instructions in this TechJunkie how-to article.
Here are some relevant tutorials you might find useful:
- Chromebook Won’t Connect to Printer – How to Fix
- How to Install Epson Printer on Chromebook
- How to Force Chrome to Use the Standard macOS Print Window
Do you have any tips or tricks for getting a printer to work on a Chromebook or other Chrome OS device? If so, please tell us what you know in a comment below!


