How to Take A Screenshot on Mac OS X Yosemite

How to take a Mac screenshot on Yosemite is something Apple users who have switched from Windows want to know how to do, since it’s different to screen capture mac. The following is a Mac screenshot tutorial on OS X Lion, OS X Mountain Lion OS X Mavericks, and the new OS X Yosemite. There are several different ways to take a screenshot on OS X Yosemite. You can either take a print screen MacBook of a specific area or take a screenshot of the entire window on your Mac. Both options will create an image of the desired area for a Mac screenshot. The following steps will help you learn how to take a Mac screenshot on OS X Yosemite.
Follow other Mac helpful tips here:
- How AirDrop between Mac & iPhone
- How to show hidden files on Mac
- How to uninstall a program on a Mac
How to Take Screenshot of Entire Desktop in Mac OS X Yosemite
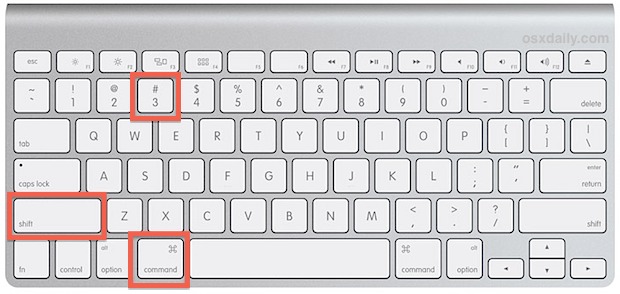
With this option you can take a screenshot of your entire desktop. This will allow to take a general image of your computer screen. This is how to take a screenshot of the entire screen on.
- Press the the combination of Command + Shift + 3 on your keyboard, and release them.
- Next, on your Mac desktop, you’ll notice a new file with .PNG extension and this is the screenshot you just took.
- To confirm it is the file, you can look for the word Screen Shot in the file name.
- Alternatively, you can double click the file to open it and see a preview of it.
How to Take a Screenshot of a specific Area of Desktop in Mac OS X Yosemite
In case you just want to show a specific area of your screen, you should go for this option. You can use it for capturing a part of your chat, or images on the web or anything else you like (because ultimately it’s your choice).
- Set up the screen and make sure you know what you want to capture.
- On your keyboard, press Command + Shift + 4.
- As soon as you release the keys, your mouse cursor will turn into movable crosshairs.
- Now drag the cursor anywhere (and this will be one of the corners of the screenshot) and then hold and drag the mouse over the area you’d like to make a screenshot of.
- After you’re done, you can release the mouse button to get the screenshot in the form of a .PNG file.
How to Take a Screenshot of a Single Windows in Mac OS X Yosemite
There are several windows open on your screen, so you can not capture the full screen and you even don’t want to take the pain to capture a specific area. So why not snip a single window?
- To take a single window snip, first make sure you open the right window.
- Now press and release Command + Shift + 4 on your keyboard.
- Hit the spacebar.
- Now make a single mouse click on the window you want to capture.
- You can even select something else by moving your mouse around.
- As soon as you do it, you’ll have the right .PNG file on your desktop.


