How to Turn Off Auto-Backup in Google Photos

Auto backup is a really convenient way to keep all your photos in a Cloud whilst freeing up storage space on your smartphone. However, there’s a limit on how much you can upload for free. Admittedly, the 15GB is more than generous, but this doesn’t mean you won’t quickly use up all the free space.
If you snap more than a few photos a day and have the auto backup on, it might take a couple of weeks to hit the limit. But by keeping the auto backup off, you can pick and choose which images deserve to be backed up.
Google Photos Setup Wizard
When you install Google Photos, the app connects to your Camera Roll or Gallery and asks you to turn on auto backup. It’s advisable not to do this because this action backs up all your photos to Google.
Chances are you have more than 15GB of photos on your smartphone and naturally, the backup will stop the moment it hits the limit. Plus, you’ll keep getting pop-ups and notifications that you need to upgrade the storage to keep the backup running.
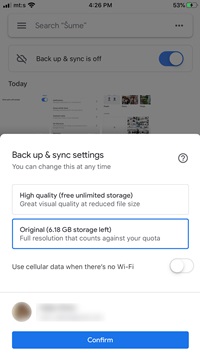
Thankfully, turning off the auto backup is super-simple. Launch the app and tap on the Cloud icon on the right to reveal the backup button. Tap on the button to toggle it off and confirm your choice in the pop-up window.

It’s worth noting that Google Photos gives you two backup and image storage options.
- High quality – reduces file size without jeopardizing the image quality and there’s no upload limit.
- Original – keeps the full image resolution, but you can only upload 15GB.
There’s no right or wrong way here and it all depends on your needs. However, retaining the original resolution gives you better options to edit or print the image afterwards.
Note: Make sure the button next to “Use cellular data when there’s no Wi-Fi” is off. This will prevent additional charges if you decide to go for auto backup, after all.
Can You Do it from the Browser?
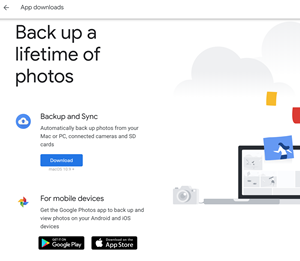
The quick answer is no. Browser Google Photos doesn’t offer any kind of backup option. This seems logical since the photos in the browser are already within the Cloud. But there is a macOS and Windows app that syncs and backs up photos from the computer, SD card, or camera.
In browser Google Photos, open the More menu (hamburger icon on the left), scroll down, and click App Downloads. The following window features clickable buttons to download the desktop version as well as Google Photos for Android or iOS.

The bottom line is, you need an additional piece of software to enable backups from your computer. And the desktop app features auto backup that you can easily turn on and off.
Manual Backups
Disabling auto backups doesn’t mean you can’t save your favorite images to Google Photos. Open the app, click on a photo and tap the Cloud icon. After the image uploads, you can refresh the Google Photos feed on your desktop to make sure it’s done.

There’s also an option to bulk-select the images and then back up, but the actions aren’t exactly intuitive. Tap on the three horizontal dots in the Search bar, choose “Select photos” and tap on each image you want to upload. Hit the dots again and choose “Back up” from the pop-up window.
Removing Backed-up Photos
For both manual and auto backup, removing backed-up photos from Google Photos can be tricky. For starters, the backup-and-sync makes two copies of your photo: one on your smartphone/tablet, the other online. Both of which you can manipulate at the same time.
The Google Photos app features a delete button. When you hit it, the action deletes the backed-up image from all accounts and devices. If you’re using an iPhone, the photo is gone from Camera Roll, Google Photos app, Google Photos backup, as well as iCloud.

To make things clear, Google Photos doesn’t allow you to pick which image you’d like to keep but deletes each copy. The workaround is to go into Camera Roll and delete the image there since the action doesn’t affect Google Photos. But what happens if you want to remove the image from the backup and keep it on your device?
You’ve guessed it: the same thing happens. Google deletes the image from all accounts and, most importantly, from your Camera Roll/Gallery. If you wish to remove the backed-up image from the Cloud you can archive it.
Select the image, hit the three vertical dots, and choose “Archive,” or, alternatively, press Shift+A after you open the image. However, archiving photos isn’t the same as permanently deleting them from the Cloud.

Keep the Photos Stashed
Despite its limitations, Google Photos is still a great Cloud service for safekeeping images. Granted, there’s a lot of room for improvement in the file management department, but this isn’t a deal-breaker. When browsing backed-up files you might even stumble upon some images you thought were long gone.
How often do you back up your photos? Do you use services/apps other than Google Photos? Tell us about your preferences in the comments section below.


