How To Zoom in on Mac

Need to see something up close on your Mac desktop? Want to zoom in on a Mac and don’t know how? Want some other useful keyboard shortcuts that will make living with your Mac easier? You’re in the right place!
A TechJunkie reader emailed us last week asking how to enable zoom on Mac. She couldn’t find the setting herself and wondered if we knew how. Fortunately, as an inveterate fettler in all things computer, I had previously stumbled on the zoom function when exploring the Mac desktop.
Once enabled, you zoom in and out on a Mac with keyboard shortcuts, which led me to wonder if new Mac users could benefit from knowing those too. Hence this post.

Zoom in on a Mac
If you’re using a new Mac or haven’t set up zoom before, you will need to enable it from the Accessibility settings window.
- Select the Apple menu and then System Preferences.
- Select Accessibility and then Zoom in the left menu.
- Check the box next to ‘Use keyboard shortcuts to zoom’.
- You can also check the box next to ‘Use scroll gesture with modifier keys to zoom’ if you like.
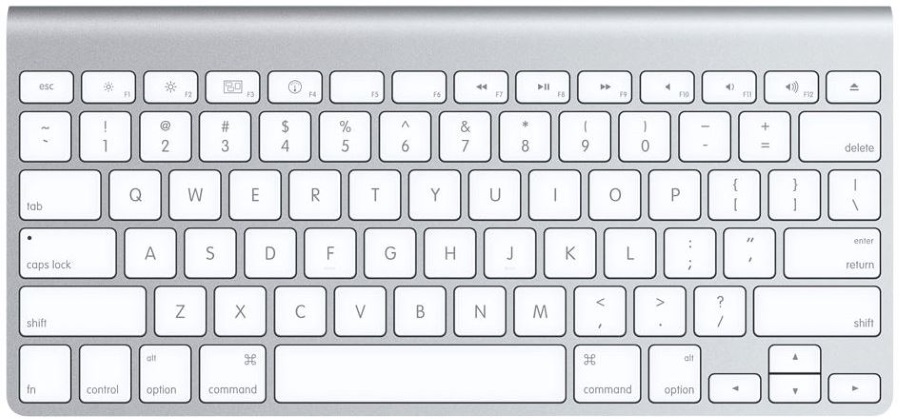
The keyboard shortcut you will need to zoom in is Command + Option and ‘+’ to zoom in. To zoom out, use Command + Option and ‘-‘. Zoom works incrementally so press the combination repeatedly until you reach the screen magnification you require or until the desktop returns to normal.
If you selected ‘Use scroll gesture with modifier keys to zoom’ you will be asked to specify a key to use, Control, Command or Option. Hold down that key and then scroll up with your mouse scroll wheel to zoom in and down on the mouse wheel to scroll out. You can also use two finger swipe on touchscreens.
In the Zoom tab within Accessibility you will also a Zoom Style setting. You can select this to initiate full screen zoom or an isolated section that you can move around to highlight the object you want to zoom, like picture-in-picture.

Time-saving keyboard shortcuts for new Mac users
If you’re new to Mac, you may not know the full extent of the keyboard shortcuts on offer. Some you are never likely to use but some will make daily life much faster and much more convenient. Here are just a few.
The Command key is the CMD key either side of the space bar where the Alt key would be on a Windows computer. Some Apple users still call it the Apple key but for the sake of this article, I refer to it as Command.
- Control-Alt-Command-Power button – Close all open applications
- Option-Command-Escape – Force quit the application
- Command-Tab – Scroll through open applications
- Alt-Shift-Command-Q – Log out of your Mac
- Command–Space bar – Use Spotlight
- Command-F – Find
- Alt-Command-T – Show the toolbar
- Alt-Command-D – Show or hide the Dock
- Alt-F3 – Open Mission Control
- Command-L – Automatically select the URL bar in Safari
- Command-Left arrow – Go back a page in Safari
- Command-Right arrow – Scroll forward in Safari
- Option-Shift-Volume – Incrementally increase or decrease system volume
- Shift-Command-I – Open iCloud Drive
- Shift-Command-R – Open the AirDrop window
- Shift-Command-K – Open the Network window
- Option-Command-L – Open the Downloads folder
- Shift-Command-O – Open the Documents folder
- Shift-Command-U – Open the Utilities folder
Document shortcuts
As someone who writes for a living, I use lots of document shortcuts to keep things moving. Here are just a few of them.
- Command-B – Bold selected text
- Command-I – Italicize selected text
- Command-U – Underline selected text
- Command-T – Show or hide the Fonts window
- Command-A – Select all
- Command-C – Copy
- Command-X – Cut
- Command-V – Paste
- Command-Semicolon – Spellcheck
- Fn–Up arrow – Scroll up one page
- Fn–Down arrow – Scroll down one page
- Fn–Left arrow – Scroll to the beginning of a document
- Fn–Right arrow – Scroll to the end of a document
- Control-A – Move to the beginning of the line
- Control-E – Move to the end of a line
- Command-P – Print
- Shift-Command-P – Print preview
- Command-S – Save
- Shift-Command-S – Save as
Many functions familiar to a Windows users are also available on a Mac, they just use different keys. One aspect of Mac OS that most newcomers quickly appreciate is Spotlight and Finder. You will likely spend a lot of time using those search apps as you learn to navigate Mac OS and find out where all the settings are stored.
If you want to see the whole range of Mac keyboard shortcuts, check out this page on the Apple website. There are literally hundreds of them.


