How, Why, and Why Not to Use the iPhone Medical ID

Apple’s Health app lets users and third party apps collect and track health related data, but it also contains an important feature called Medical ID. Many of us are already familiar with the recommended “In Case of Emergency” (ICE) practice of including important contact information on your phone that can be used to contact family in the event of an emergency. Apple’s iPhone Medical ID is an enhanced version of ICE that not only provides emergency contact information, but can also inform first responders and medical personnel of important health information such as your medications, medical conditions, and allergies. Here’s how to set up Medical ID on your iPhone.
The iPhone Medical ID is configured via the Health app, which was introduced as part of iOS 8, so you’ll need to be running at least iOS 8 to take advantage of this feature. To get started, launch the Health app and tap the Medical ID icon located at the bottom-right of screen.
The app automatically detects and populates your own information based on your “Me” contact card in iOS contacts, but it will likely be empty by default, with just your name and birthdate, if you’ve already provided that information in the Contacts app. To add additional information, tap Edit in the top-right corner.
Here, you can change or update your name, photo, and birthdate (if necessary) and start adding important medical information. Fields are available to list any medical conditions, allergies, and current medications, along with a blank field for general medical notes, such as your preferred hospital or doctor, or any religious requests.
Further down, you can add multiple emergency contacts. One limitation of the iPhone Medical ID is that emergency contacts can only be drawn from your existing iPhone contacts, so you’ll need to add or update contact information for your parents, spouse, siblings, and physicians ahead of time. There’s currently no way to add an emergency contact only without also having that contact in your standard iPhone Contacts list. As you select contacts, the iPhone Medical ID app will ask you to identify their relationship to you. If you’d rather not classify a contact as parent, friend, partner, etc., you can choose either “other” or simply “emergency” as the relationship field.
Below the emergency contacts section, you’ll also find fields for blood type, height, weight, and your organ donor preference. When you’re done adding information, just tap Done at the top of the screen to save your changes.
How to Access the iPhone Medical ID
So you’ve got your important medical information and emergency contacts stored in your iPhone’s Medical ID. Now, how does someone access it in the event of an emergency?
If your iPhone doesn’t have a lock passcode (not recommended), a first responder or good samaritan can access your Medical ID from the Health app. For the rest of us who wisely use passcodes or Touch ID to secure our iPhones, the Medical ID can be accessed from the lock screen.
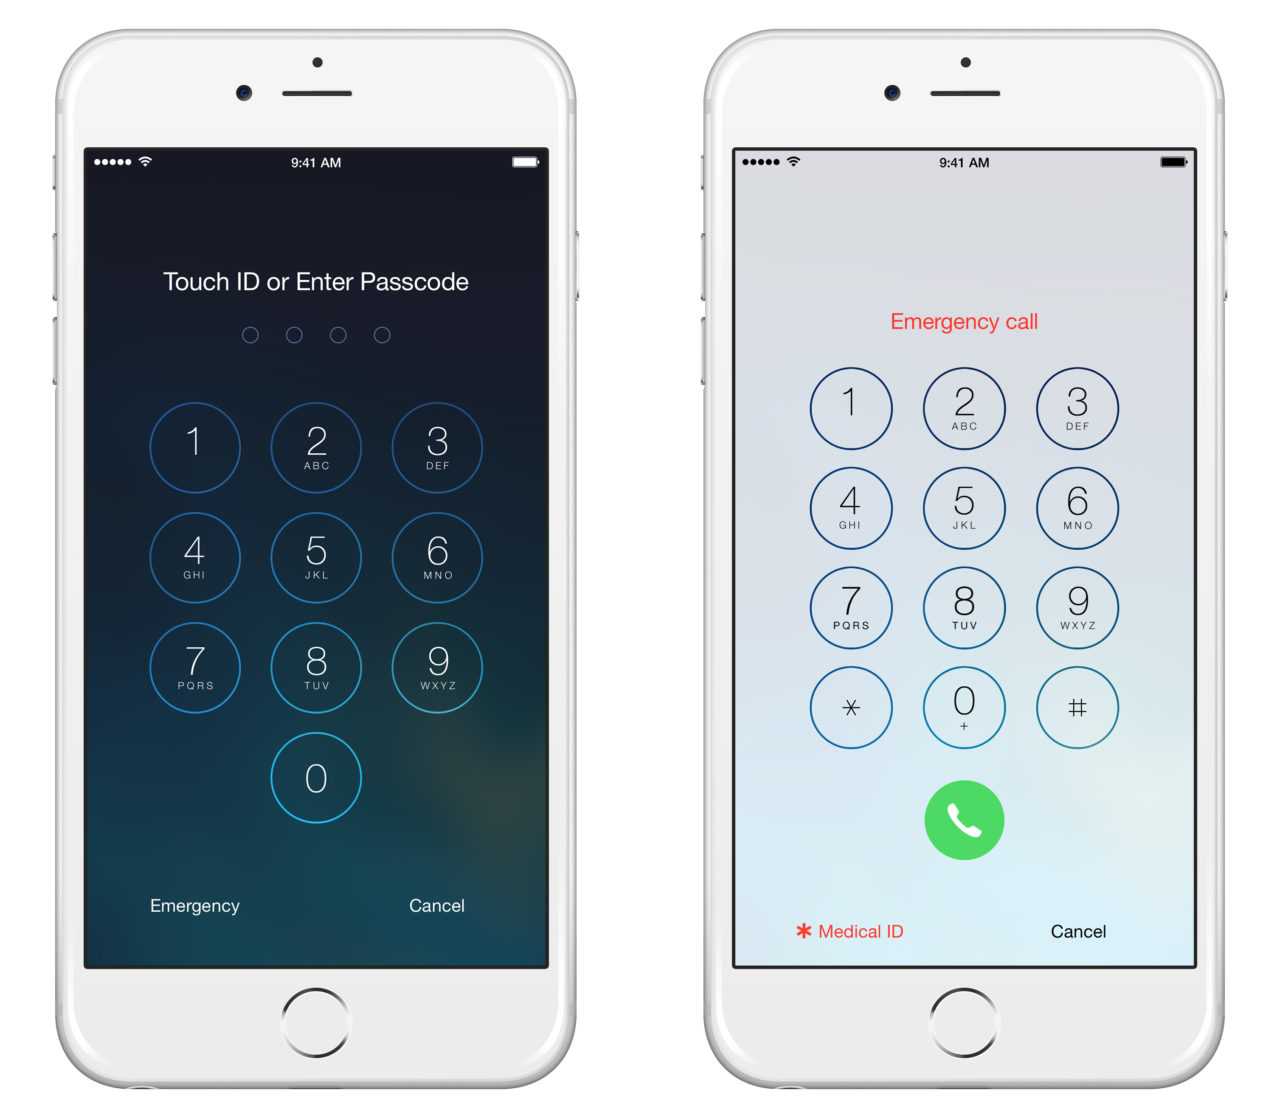
Just tap Emergency on the bottom-left of the iPhone lock screen, which allows those without your passcode to make an emergency phone call. Then, tap Medical ID to bring up a screen showing the information you entered previously. Those accessing your Medical ID can tap on any of your emergency contacts to call them directly.
Privacy Concerns & Efficacy
The iPhone Medical ID is a great idea for many iPhone owners, and it may even save your life, but there are some important privacy concerns to consider before using it. While Apple doesn’t share any information you enter into the Medical ID profile with third party apps, anyone who has physical access to your iPhone can easily see it. The whole idea of Medical ID is to make the information quick and easy to find for those helping you in an emergency, but that means it’s also quick and easy to find for those with less honorable intent.
Personal and sensitive medical information, such as medical conditions and medications, will be wide open to nosy coworkers, prying family members, or just about anyone who gets physical access to your iPhone for 15 seconds. In addition, the phone numbers and names of your emergency contacts, and their relationship to you, will also be viewable, which introduces identity theft or phishing concerns.
You’ll therefore need to weigh the risks and benefits of having this information easily accessible via your iPhone. If you know you’ll be in a situation where it’s likely that someone else could access your iPhone, you can always temporarily disable the Medical ID by navigating back to the Health app, tapping Edit and then disabling the Show When Locked option. Note, however, that you need to quit the Health app after making this change in order to hide the Medical ID button from the Emergency Call lock screen. And if you ever want to remove your iPhone Medical ID entirely, you’ll find a Delete Medical ID button at the bottom of the Edit screen.
Beyond privacy concerns, there’s also the question of efficacy. Although it’s one of the most popular smart phones in the world, not everyone has an iPhone and not all first responders, doctors, or good samaritans will know how to find your Medical ID. Therefore, while having an iPhone Medical ID is a good backup, you may also want to also use other more traditional methods to alert first responders to critical medical information, such as a bracelet, or card in your wallet or purse.
If your iPhone isn’t able to run iOS 8, or if you have another brand of smartphone, consider adding ICE contacts to your phone’s “favorites” list, or use a lock screen wallpaper image to display your important medical info.








10 thoughts on “How, Why, and Why Not to Use the iPhone Medical ID”
I would like this one to be accessible with lock screen on