Quick Tip: Copy Mac Screenshots Directly to the Clipboard

Mac OS X includes some very useful and powerful screenshot capabilities. By default, using the Mac screenshot tools places the captured image on your desktop or in another user-defined directory. Sometimes, however, you want to immediately use that screenshot in another application, such as editing it in Photoshop or sharing it via Mail. In these cases, the creation of the screenshot file is simply an unnecessary step in the process of getting the screenshot to its ultimate destination.
A solution to this middleman file is the Mac’s ability to save a captured screenshot to your clipboard, where it can be directly pasted into the desired application without needing to create and place the file on your desktop. The good news is that this extra functionality is also built right into the Mac OS and uses a simple modification of the already familiar Mac screenshot shortcuts. Here’s how it works.
Copying a Mac Screenshot to the Clipboard
To save your Mac screenshot to the clipboard instead of to a file on your desktop, the magic key is Control (displayed on some older Mac keyboards as ⌃). You simply take an existing screenshot keyboard shortcut and add Control to the mix.
For example, the keyboard shortcut to capture then entire screen is Shift (⇧) + Command (⌘) + 3. Pressing that key combination will capture your entire screen and place the image as a new PNG file on your desktop. However, if you use Control (⌃) + Shift (⇧) + Command (⌘) + 3, nothing will appear on your desktop and, well, nothing will seem to happen at all. But if you open an app which can accept a pasted image, such as Pages, and try to paste the contents of your clipboard (Command + V), you’ll see your screenshot appear.
This clipboard trick also works with other screenshot types, including Selection (Control (⌃) + Shift (⇧) + Command (⌘) + 4) and Window (Control (⌃) + Shift (⇧) + Command (⌘) + 4 + Spacebar). While adjusting to this new shortcut, just remember to add the Control key to the mix.
Pressing the Control key along with the other common shortcut keys is admittedly a bit awkward from a finger positioning standpoint, but we’ve found that it’s easy to adjust with a little bit of practice. The benefit of learning this approach is that you can more quickly take your screenshot into the correct application, saving you time, especially if you take lots of screenshots throughout the day. As a bonus, this method also keeps your desktop clutter-free! If you need to save your Mac screenshot to a file, of course, you can always forgo the Control key as necessary.
Customize Your Mac Screenshot Shortcuts
If you love the idea of saving a screenshot directly to the clipboard, but hate having to contort your fingers to reach the necessary keys, you can take advantage of the Mac’s excellent keyboard mapping function to create your own screenshot shortcuts.
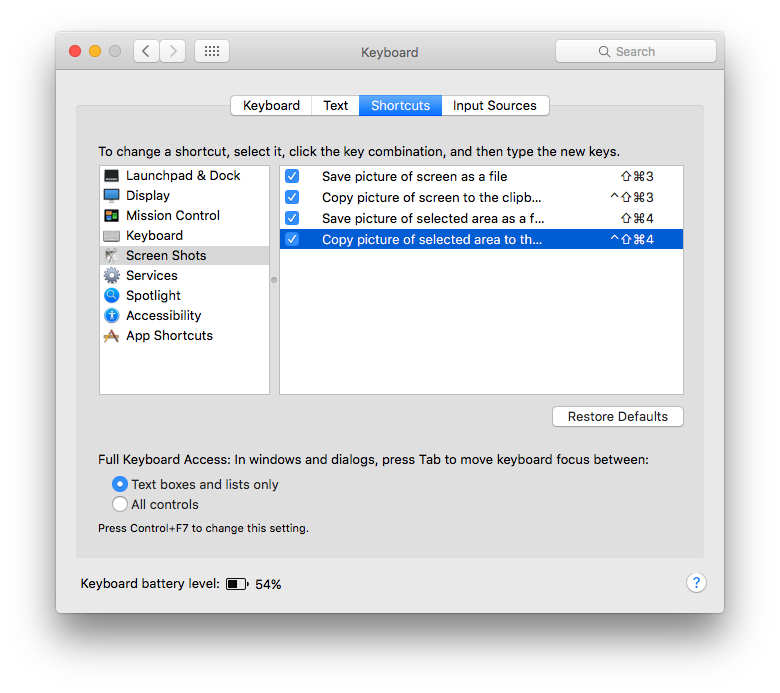
Just head to System Preferences > Keyboard > Shortcuts. Select Screen Shots from the list on the left side of the window and you’ll see the Mac’s screenshot options and their default keyboard shortcut combinations on the right side.

Find the screenshot command shortcut you’d like to modify and double-click the shortcut listed to the right. Now, press the new key combination you’d like to associate with the command. For example, you could leave the normal shortcuts alone, but change the “save to clipboard” ones to Control + Shift + 3/4. Alternatively, if you think you’ll use the clipboard method more often than the file method, you can switch the combinations, making the Control modifier applicable to the file method only. Just be sure to verify that your desired shortcut combination isn’t used by another application. OS X will warn you with a yellow alert triangle if the shortcut you enter is already in use, but the operating system can’t account for all third party applications.
Once you’ve made your changes, just close the System Preferences window and carry on with your screenshots! If you’d like to know more about taking Mac screenshots, check out our full guide for tips on how to change the file format, naming, and more.


8 thoughts on “Quick Tip: Copy Mac Screenshots Directly to the Clipboard”
Do anyone know how to change the filetype the from .tiff to .png OR .jpeg when capturing the screen ?
Kind regards,
JJ
Just do the normal shortcut for capturing an area (Command + Shift + 4) and let go, you will see your crosshair, start dragging the area you want to capture.
Then at any point if you decide you want to send to clipboard rather than file, start pressing Control. As long as Control is down when you release the mouse it will go to clipboard.
You can also start the normal shortcut for capturing an area (Command + Shift + 4) and let go, before you click if you hover the crosshair over a window and then tap Space the crosshair mode changes to select the whole window, you can move the mouse over other windows and it will select whatever window is below the cursor. Click the mouse to save the shot, click the mouse with Control held down to save the shot to clipboard.
Another tip is if you have already started selecting an area but wanted to adjust the start point, you can hold Space and you will move the position of the area rather than the size (similar to moving the selection area in Photoshop).
thanks a lot