How to Make Mixer Stream Quality Better

Many have said, “Hey, I should start streaming soon, what does Ninja have that I don’t?” and went through with it. However, after checking out the recording, some have found the stream’s quality to be not quite as perfect as they hoped it’d be.
Therefore, here are a few simple steps you can take to make sure you’re getting the best out of your setup. After all, if you got that insane ray-tracing capable card, why not make sure your viewers can see it in its full glory?
Hardware
The first two things to consider are your hardware and the encoding software you will use. Is your rig beefy enough to run most of the newest titles on high, ultra, or otherwise max settings? Or are you running a slightly less powerful machine that you can’t quite describe as GLaDOS?
Whichever option describes you best, getting to know your PC’s capabilities is essential when embarking on a streaming adventure.
Encoding Software
Those in the know have already heard the names, OBS Studio, Streamlabs OBS, Nvidia’s Shadowplay, vMix – these are all potential avenues of approach when it comes to streaming on platforms such as Mixer. Picking one is imperative if you intend to have viewers on the same page as you.
As the purpose of this guide isn’t the software itself; you’re free to choose whichever you fancy. All have strengths and weaknesses, and it’s best to try multiple options to see which suits you best. The most popular options are OBS Studio or Xsplit, due to ease of use and availability. For this guide, we’re going to use OBS Studio as an example.
General Tips
Make sure Automatically Record when Streaming is unchecked in your OBS settings. That might seem simple, but recording everything all the time will hinder your computer’s performance.
Go into the Advanced Tab and set process priority to Above Normal. Again, a simple setting, but it will ensure your machine focuses on the stream.
Avoid running too many programs in the background when you stream. The more resources the system can use to ensure your stream is ready for the camera, the better!
Don’t sacrifice everything for picture quality, however. It is preferable to have a steady, smooth stream, rather than go all out when it comes to resolution and framerate and cause your stream to buffer continually.
The Big Four: Resolution, Bitrate, Framerate, Keyframe
Resolution
Understandably, the higher it is, the more it strains your internet connection. While higher values like 1080p are entirely possible, pulling off a 1080p stream at 60 FPS isn’t so easy, depending on the capabilities of your internet connection and your hardware.
Generally, you might want to go for 720p, as the drop in quality from 1080p is not massive and some streamers think it even looks better.
It’s the sweet spot to use as it will also help viewers with slower internet speeds. Beauty is in the eye of the beholder, though, so feel free to play around with the resolution settings as you see fit.
Pro Tip: Streamers who use an ultrawide aspect ratio such as 21:9 (which usually means the X or horizontal resolution is greater than 1920 pixels) should note that some viewers may encounter difficulties when loading the video.

Bitrate
Your stream’s bitrate and your resolution directly impact the quality of the video. What is bitrate anyway? In practical terms, bitrate is the amount of data used to encode a single second of your video.
As such, the bitrate setting will determine how much of your upload speed the stream will use. Mixer supports bitrate settings up to 10,000. However, this is highly dependent on your internet speed. Otherwise, your viewers may encounter pixelating, robotic audio, stutters, stream freezes, etc.
Here are a few concrete examples. Try them out and see if you’ve reached a good compromise between quality and performance! As usual, we’d suggest you opt for a middle-of-the-road deal, and orbit around 3,000 to 4,000.
1080p, 60fps = 4500-6000 kbps
1080p, 30fps = 3500-5000 kbps
720p, 60fps = 3500-5000 kbps
720p, 30 FPS = 2500-4000 kbps
Pro Tip: If you are running a wireless setup on your PC, it may cause the quality to fluctuate. Consider moving to a wired connection to ensure as much stability as possible.

Framerate
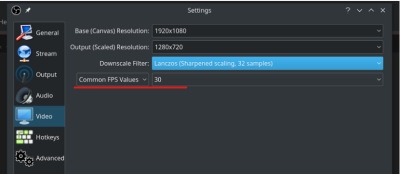
For those who aren’t familiar with the term, the “frames per second” determine how smooth your game/video is. Framerate needs vary greatly, as they largely depend on the streamer, their audience, and the game.
Usually, FPS (first-person shooter) games require higher settings. But much like the bitrate, a stream going at 60 frames per second will put additional strain on your system. As such, we recommend that you go for a steadier experience at 30 fps. While not as silky smooth as the coveted 60, it would be the go-to setting to ensure your viewers can have an uninterrupted experience.
Pro Tip: If you’re playing a game that’s not action-heavy, such as a turn-based strategy or a party game that flows slowly, you may want to set a lower bitrate and FPS to save yourself some bandwidth, without compromising too much when it comes to quality.

Keyframe
An oft-overlooked setting, but some would say the most important, you can think of the keyframe as your stream’s latency or ping. It determines the interval at which the changes on your screen will reflect on the stream itself.
Much like your framerate setting, you should change this in accordance to the game you are currently streaming. Playing something slow and steady? Feel free to change it to 2 or 3. Are you shooting enemies in a fast-paced environment? Set it to 1, and don’t worry about a thing.
Do What You Think Is Best for Your Stream
In short, these are our recommendations if you’re running into issues with the quality of your stream, or if your viewers often talk about problems on their end. Keep an open mind, and never forget to experiment with these settings, as each streamer is different!
Do you know some other tips and tricks for streaming through Mixer? If so, don’t be shy and post them in the comments section below.


