How to Create a Table in Notion

Notion offers a wide variety of features in the form of content blocks. These content blocks enable you to create a productive, efficient workspace, with all the required information in one place. Undoubtedly, tables are an irreplaceable and crucial part of the platform.
If you’ve ever worked with tables outside of Notion, you won’t have a hard time getting used to them here. However, knowing certain basics will help streamline the process. Here’s how to create and use tables in Notion.
Creating a Table
There are two ways to create tables on the Notion platform. The first one is creating inline tables. And you can also create full-page tables. Both table types work in a similar way, but each has its own perks and benefits. Here’s how to get started.

Inline Tables
This table type is created in an existing page. It’s excellent for creating references and elements inside a page that isn’t a table in itself. Inline tables are easy to create and don’t require too much attention.
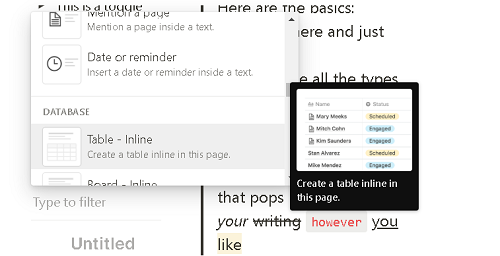
First, select the content box that you want to turn into a table. Then, click the + icon that appears towards the left margin. Scroll to the Database section in the menu that pops up and select Table – Inline. This will automatically create the table.

Alternatively, you can hit the / button to open the same menu from above. If you don’t want to scroll through the list, you can type “table: inline,” and the entry will appear.
Full-Page Tables
Sometimes, an inline table won’t do the trick. For some purposes, there’s simply too much information to input. If you were to use an inline table in these instances, it would make your Notion page look unseemly, cluttered, and confusing. Instead, you can create a completely new page that’s dedicated to one thing –a table page. Then, you can link the table page on the primary page.
Creating a full-page table isn’t a whole lot different than creating an inline table. Either click the + icon or type the / command and search for the Table: Full Page entry on the list. This will automatically create a new page and add a link towards it on the parent page. The full-page table won’t allow you to add anything outside the page and is much clearer than an inline page.
Use inline and full-page tables creatively and according to your needs. Each type has its own benefits and downsides.
Adding Blocks and Rows
The beauty of Notion tables is that they work on the same principle. If you know how to work with one type, you won’t have any trouble making sense of the other. Adding blocks and rows works in the exact same way for Notion tables, whether they’re inline or full-page.
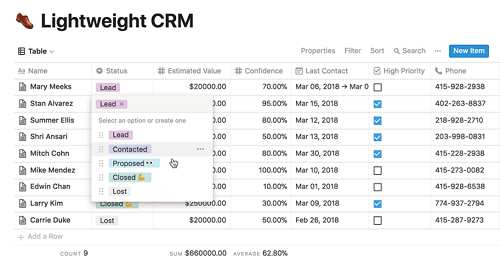
By default, every newly created page has three columns: Name, Tags, and Files. You can add as many more columns as you please, rearrange them, edit them, and delete them altogether. To add a new column, click the + icon to the table’s left. By default, it’s going to be a Text column, However, by navigating to Property Type and hovering below it, you’ll get to choose between a variety of different column types.
You can create various column types, dedicated to files and media, dates, persons, checkboxes, etc.
Adding rows to a table is even simpler. Down in the bottom-left part of a table, you’ll see a + New entry. Click it to automatically add a row. There’s nothing more to it.
Creating and Using Tables in Notion
Notion tables are definitely not the best table feature on the market, but Notion isn’t a table-centric platform to begin with. If your needs transcend Notion table capabilities (which isn’t likely), look for integrative third-party table apps to do it for you. Otherwise, make the most out of Notion tables, both inline and full-page.
How do you work tables in Notion? What do you use the full-page tables for and when do you incorporate inline tables? Feel free to join the discussion in the comments section below and add any questions, thoughts, or tips regarding tables on the Notion platform.


