How to Perform a Hard Drive Health Check
Hard drives are some of the most critical parts of your computer. Without them, you won’t be able to run an operating system or store any information. It’s also possible that a hard drive suddenly stops working for no apparent reason, leaving you with a massive data loss. You need to keep an eye on the health of your computer’s hard drive (or drives) to ensure that it doesn’t become corrupted.
Luckily, there are a variety of ways to keep tabs on your hardware’s performance, ranging from tools built into your operating system to standalone applications. In this article, we’ll walk you through the different ways that you can check your hard drive’s health.
BIOS
Checking on your hard drive in your BIOS without having to worry about any interference from the operating system is simple if you have a relatively new motherboard on your laptop.
To reach your BIOS screen, you need to restart your PC. When it is restarting, you should repeatedly press the BIOS key. You can access your BIOS by pressing the BIOS key after repeatedly turning your computer off and on. The BIOS key depends on the model of your motherboard. If you are not sure which key to press, you can google what BIOS key is for your motherboard.
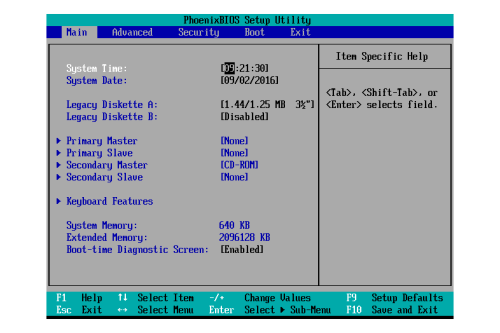
Once you’ve entered the BIOS, the specific steps you need to take will depend on the motherboard’s maker. While you’re still in the BIOS screen, you have the chance to verify if your PC/motherboard recognizes the hard drive that you wish to optimize. On most laptops, there should be a “Diagnostics” option in the BIOS to check the hard drive’s health.
Optimize and Defrag
Many people still prefer to store non-essential file types like photos and videos on SATA hard drives, which have been overtaken by more efficient solid-state drives (SSDs). Unlike traditional hard drives, SSDs don’t need defragmentation, but they do need to be optimized from time to time.
If you notice that a non-SSD hard drive is sluggish, you may want to check its fragmentation. Defragmentation can be done using the built-in defragmentation tool in newer Windows versions. Here’s how:
- Open the Start menu and look for the search bar.
- Search for “disk defragmentation” in the search bar.
- Select “Defragment and Optimize Drives.”
- Choose the drive you want to optimize and pick “Optimize.”
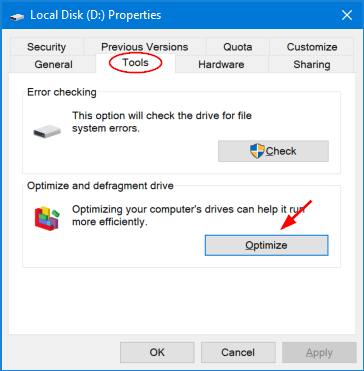
This is a handy integrated tool to improve the drive’s performance because it scans for fragmented files and defragments the drive in order to optimize it.
File system fragmentation occurs when a file system attempts to lay out the contents of files in a non-continuous manner to allow for in-place modification of files. File system defragmentation reduces the amount of fragmentation in a file system. The defrag tool physically organizes the storage device’s contents into as few as possible contiguous regions to accomplish this goal.
There are also free apps like Defraggler that are great of assistance when it comes to detecting defragmentation and fixing it. Still, some users might be reluctant to pay for additional software when the operating systems already have built-in options. A similar and equally useful alternative is MyDefrag.
Windows 11’s built-in tools for defragmentation and optimization allow you to optimize a SSD, but this should be handled automatically by Windows 11.
WMIC
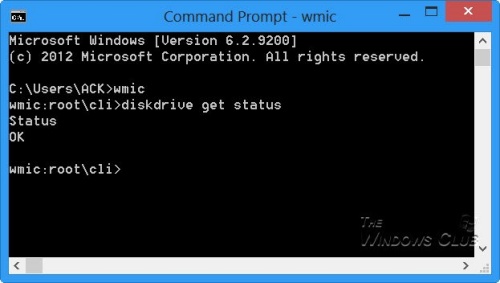
Checking the health of a hard disk is one of the many administrative tasks WMIC can assist you with. Hard disk self-monitoring, analysis, and reporting technology (or SMART) is used to check the status as well as provide a simple conclusion. Although it’s a basic command with limited details, Windows includes it by default as a quick feature.
Here’s how to do it:
- Open the Run dialog by pressing the Windows key + R together. You can type cmd and press “OK” to open the command prompt in Windows 7.
- Type in the command “wmic” and press “Enter.”
- When the interface pop-ups, type in the command “
diskdrive get status” and press “Enter.”
Windows CHKDSK Tool
To discover software bugs and bad segments, you can use the existing Windows CHKDSK tool to inspect your disk. You can also use it to check the health of your hard drive. It will detect and solve issues if it can, and it will inform you if there is a greater issue that it didn’t solve.
The steps to check your hard drive are:
- Open the Start menu and look for “Search.”
- Enter “cmd” into the “Search” field.
- Select “Run as administrator.”
- Type “
chkdsk” at the command line prompt and press “Enter” to begin the process.
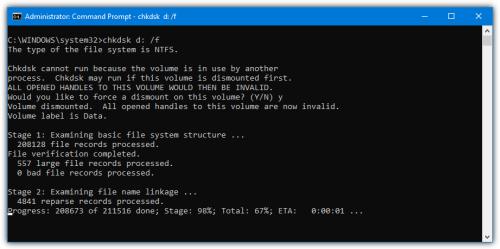
Alternatively, you can use the command chkdsk /f /r to fix bad segments and keep any readable data that may be left behind. Another way is to use chkdsk /f /r /x, which removes the drive from the computer before performing a check. Microsoft even provides a complete list of alternatives for CHKDSK, which can be used to check the health of a hard drive.
HDD Manufacturer’s Tools
You can monitor the health and performance of your hard drive for free from most major hard drive manufacturers. Knowing the manufacturer of your hard drive is the first step in determining which one to use. Here’s how to find out:
- Press the Win key and type “Device Manager.”
- Click on it when it comes up in the search results.
- Select the “Disk drives” option in Device Manager and write down the hard drive’s model number.
- Search the model number on Google to find the hard drive’s manufacturer.
- Search for the hard drive utility on the manufacturer’s support page. It’s important to note that each of these tools has diagnostic features that allow you to check the health of your hard drive.
It is possible to skip this section if you know the manufacturer of your hard drive. You just have to go to the manufacturer’s website and download the tool. From here, simply follow the on-screen instructions.
Keep Your Hard Drive Healthy
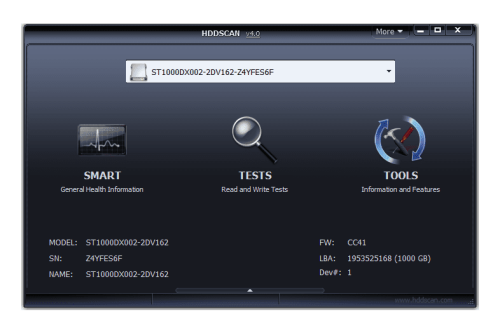
Besides the listed methods, you can also use a third-party apps to check the health of your hard drive. It’s worth taking the time to download one of them, as they will provide you with more information than default methods. These apps use the exact same “SMART” hard drive feature as WMIC to retrieve data. However, they offer far more information than simply displaying a positive or negative status.
Additionally, make regular backups to avoid the risk of dying hard drives. Windows’ built-in File History is the best option for saving a large quantity of data. If the latest backup has all your previous files, it’s possible to go back in time and recover previous versions of junk drives.


