How To Pin a Folder to the Start Menu
Windows allows its users to customize the Start menu in many different ways. Over the years, these options were expanded significantly.
Adding folders to the Start menu is a fairly simple feature that has been around for several OS generations now, and the option remains available in Windows 10. We’ll also cover adding folders to the Start menu in Windows 8 and Windows 7. Let’s dig in.
Windows 10
A pinned folder is a great way to keep important and frequently used stuff available at all times. Perhaps you need to quickly find specific files as you work, or maybe you just like keeping your personal files at hand.
Pinning folders to the Start menu is very easy in Windows 10. You can right-click the context menu in order to personalize the Start menu, or you can simply drag the folder there. Pinning a single file might require altering those tricky .reg files. On the other hand, adding a website shortcut requires the use of the Tools app. Let’s see how to pin a folder to the Start menu in Windows 10.
From the Context Menu
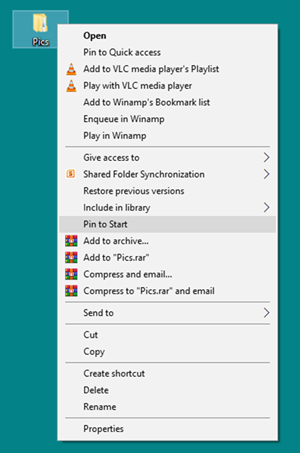
There are two ways to add a folder to your Start menu via the context menu. Here’s the first one.
- Browse for the folder you’d like to add to the Start menu.
- Once you find it, right-click on it.
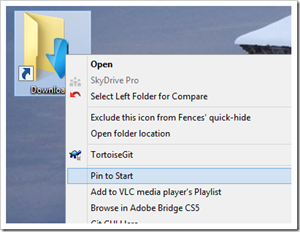
- Select the Pin to Start option from the drop-down menu.
Drag and Drop
Probably the easiest way to add a folder to the Start menu is by dragging and dropping. Here’s how to do it.
- Locate the folder you’d like to add to the Start menu.
- Once you’ve found it, click on it and keep holding.
- Drag the folder over the Start icon at the bottom-left corner of the screen.
The folder should appear on the right side of the menu, like in the previous case. Once it appears, you can select the size of the folder’s thumbnail by right-clicking on it.
Personalize Start Menu
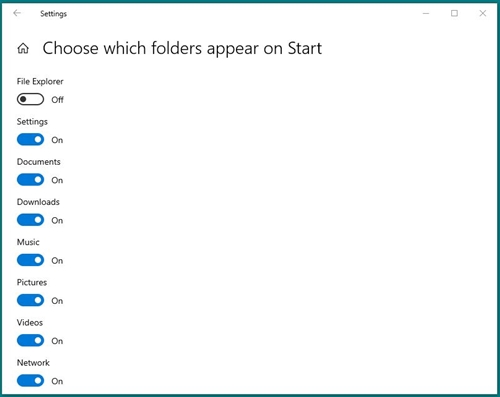
This method involves altering the Start menu settings and preferences. Have in mind that you can only add some default folders this way. For example, you can add Documents, Videos, Downloads, and similar folders. Folders you created personally are off limits. Here’s how it’s done.
- Right-click anywhere on the desktop.
- Select the Personalize option from the drop-down menu.
- When the Settings screen opens, select the Start option from the menu on the left side.
- There you will be able to choose the groups of items you want to see on the Start menu. You can include or exclude most used apps, recently added apps, suggestions, etc.
- However, if you click on the “Choose which folders appear on Start” link below the list, another list will appear.
- This list contains Personal folder, Network, Videos, Pictures, Music, Downloads, Documents, Settings, and File Explorer options. You can include or exclude each of them by clicking the on-off sliders below their names. Folders you include will appear on the left side of the Start menu.

Windows 8
Windows 8 is more oriented towards smartphone users and has the full-screen Start menu as its default setting. Despite its design that leans towards the mobile scene, you can use it in the same way you’d use the Windows 7 Start menu. This includes pinning folders to it. Let’s see how to add folders to the Start menu in Windows 8.
- Browse for the folder you’d like to add to the Start menu.
- Once you’ve found it, right-click on it.
- Select the Pin to Start option from the drop-down menu.

Similar to Windows 10, you can change the size of the pinned folder’s thumbnail. Just right-click on the thumbnail to choose the size.
Windows 7
Windows 7, though two generations old, still has a wide and dedicated fan base. It is the last iteration of Windows to feature the classic Start menu hidden behind the Windows logo icon at the bottom-right corner of the screen. In the following passages, we’ll explore two ways to pin a folder to the Start menu in Windows 7.
Drag & Drop
Once again, the simplest and the easiest way to get a folder on the Start menu is the drag & drop method.
- Find the folder you’d like to add to the Start menu.
- Click on it and hold the left mouse button down.
- Drag the folder across the screen and drop it onto the Windows logo icon at the bottom-left corner of the screen.

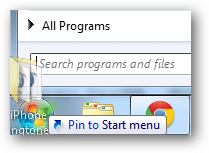
- If you hold the folder over the Windows logo icon for a second or two, a menu will pop up.
- Select the Pin to Start menu option.
The Reg File Route
Windows 7 context menus don’t have the Pin to Start option available by default, but Windows 7 does allow it. In order to enable this, you should make and execute a .reg file. The process is far simpler than it sounds, and it may be easier than dragging and dropping folders each time you want to pin them to the Start menu. Let’s see how to do it.
- Launch a basic text editor; Notepad and Notepad ++ will do.
- Write in the following text:
Windows Registry Editor Version 5.00
[HKEY_CLASSES_ROOT\Folder\ShellEx\ContextMenuHandlers\{a2a9545d-a0c2-32b4-9708-a0b2badd77c8}]

- Click on File and choose Save as.
- Find the location, name the file and save it as a normal text file – but make sure to end its name with .reg.
- Next, double-click on the file you just saved.
- Windows will display a Registry Editor notification informing you that you’re about to add your file to the registry.
- Select Yes.
- Click OK to confirm your choice.
Pin the Important Stuff
A pinned folder is just a click or two away, keeping the important and frequently used stuff at hand. What’s best, it is easy to add to the Start menu, regardless of the iteration of Windows you’re running on your computer.
How do you add folders to the Start Menu? Have we missed a method for any of the three operating systems? Tell us in the comments below.


