How to Record a Bounced Check in QuickBooks Online

If you deposit a check that you’ve received from a customer and they don’t have sufficient funds in their bank account, the check will be returned to your bank. This is called a bounced check.
It is really difficult to keep track of bounced checks on the books, so it’s always a better solution to record them using the QuickBooks software.
This article will walk you through the process of recording bounced checks in QuickBooks Online.
Why Is It Important to Record Bounced Checks in QuickBooks?
Bounced checks can not only impact your bank account, but also your A/R (accounts receivable) expenses and balance.
When a check is returned to your bank due to insufficient funds, the following will occur:
- The funds in your bank account will get reduced by the amount of the received bounced check.
- Since your customer didn’t have sufficient funds to make the payment, your A/R balance will increase.
- Your bank will charge you the NSF (non-sufficient funds) fee.
Therefore, if you want to reconcile your bank account, you must keep track of the additional fees you were charged, as well as the bounced check itself. You can easily do that by recording bounced checks through QuickBooks.
Record a Bounced Check in QuickBooks Online
The following sections will show you how to record a bounced check using QuickBooks Online. There are three major steps to this process:
- Record the Decrease in Your Bank Balance.
- Record the NSF fee.
- Bill your customer the NSF fee (optional).
We will review each of them in detail.
Record the Decrease in Your Bank Balance
To record the decrease in your bank balance, you’ll need to navigate to the Write Checks window. There, you’ll be able to see the amount that has been deducted from your bank account. That’s the amount you’ll need to record in QuickBooks.
Go to the QuickBooks’ homepage, click on the plus sign, which is found at the top. A dropdown menu containing several categories will appear.
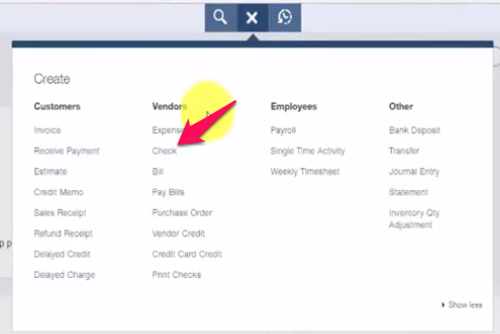
Select Check from the Vendor category. After you’ve done that, the Write Check window will appear. That’s where you’ll need to provide the appropriate information, including the following:
- Payment Date – enter the date when your check was returned.
- Bank Account – select the appropriate bank account where the check has been returned.
- Payee – select the customer whose check bounced.
- Account – select the appropriate A/R.
- Description – enter the information about the bounced check.
- Memo – enter additional information and the notes about the bounced check.
- Amount – enter the amount of the returned check. Do not enter the NSF fee.
- Check no – enter the non-sufficient funds fee.
- Save – save the information that you’ve entered and closed the window.

To finish the first step, select the Expense option from the Vendors category.
Record the NSF Fee
You’ll now have to record the NSF fee charged by your bank. The non-sufficient funds fee will be entered as an expense.
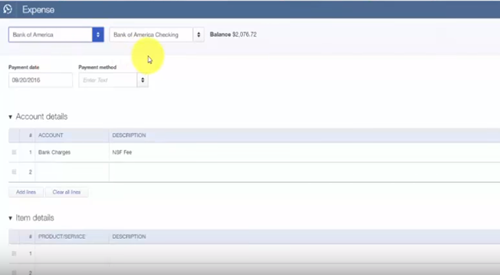
To do so, you’ll need to enter the appropriate information in the Expense window. Here’s what you have to fill in.
- Payee – select your bank.
- Bank Account – select the bank account where the check bounced.
- Account – select the account that you use to track bank fees.
- Ref no – Type “Bank NSF Fee” in the appropriate field.
- Description – Type “Bank NSF Fee” in the appropriate field.
- Amount – enter the amount of the NSF fee you’ve been charged.
- Save – save the information that you’ve entered and exited the window.

That’s all you need to do to record a bounced check. However, if you want to bill your customer for the non-sufficient fee, you’ll need to create an invoice. This is an optional step, so you can decide whether you want to do it or not.
How to Bill Your Customer the NSF Fee
From the homepage, click on the plus sign and select the Invoice option under the Customers category. That will open the Customers window in which you’ll be able to create an invoice.
To do so you’ll have to complete the form that you normally would if you were billing your customer. The only difference is that you’ll use the Customer NSF fee.
Here’s how to do it.
- Customer – select the customer whose check bounced.
- Invoice date – enter the date that you want to bill your customer for the NSF fee.
- Product/Service – To be able to track NSF fees, you’ll have to set up the Customer NSF fee service option. Select Add New.
Once you’ve selected the Add New option, you’ll have to fill the required fields.
Select Service in the Type section. In the Item Description field box, type Customer NSF Fee.
Finally, in the Income Account section, select Other Income. That completes the Product/Service step. The remaining information that you’ll have to enter includes:
- Description – describe what this fee is, so that your customer knows what they’re billed with.
- Amount – enter the amount of the NSF fee. You can add the inconvenience fee as well.
- Message – enter a message for your customer which they’ll be able to see on the invoice.
- Save – save the information that you’ve entered and close the window.
Keep Track of Your Bounced Checks with QuickBooks
It may seem a bit complicated, but recording bounced checks on QuickBooks is actually quite easy. With these instructions, you’ll be able to do it in a matter of minutes.
Did you find this tutorial helpful? Have you already recorded a bounced check through Quickbooks Online? Tell us in the comments below.








One thought on “How to Record a Bounced Check in QuickBooks Online”