How To Remove the Glare from Glasses in a Photo

One of the more difficult things to avoid when taking portrait photos is glare. It’s also one of the more difficult things to remove in post-production. Glare on eyeglasses is especially challenging since the eyes are such a sensitive area to retouch. Luckily, digital image editing software has come a long way, and there is software that makes glare removal easier.
Two pieces of software will be covered in this article that can help with removing glare. You’ll also learn some tips and tricks to avoid it in the first place. One of the applications, GIMP, is an image editing suite with a lot of power, so the things you learn here will transfer to other projects as well.
Avoid Glare
Even in a best-case scenario, removing glare is labor-intensive and difficult. It’s a time-consuming operation, which, for a professional, is not cost-effective at all. Even if you don’t engage in photography professionally, you should consider glare when taking pictures. Preventing the problem will save you a lot of time and effort.
Some basic things to keep in mind when taking a picture are the angle, height, and distance of the light source. To avoid glare on eyeglasses specifically, make sure you’re using a diffuse light source. That way, even if it does show up, it won’t be as noticeable. Also, use a light source that’s above the eye-line of your subject and offset.
If you’re working in a studio, a standard 3-point lighting setup will generally produce a glare-free photo. You can always use a small bright light such as your phone’s flashlight to test for the best placement of the light.
Removing Glare in PhotoWorks
The basic photo editing application, PhotoWorks, has an automated glare removal tool. It’s not exactly designed to remove glare from eyeglasses, but it might work on certain photos. The software has a 7-day free trial, after which you will have to purchase a license to continue using it. The seven days will be plenty of time to decide if it will work for you.
Download and install PhotoWorks and launch it. Then follow these steps:
- From the File menu, open the photo you want to work on.
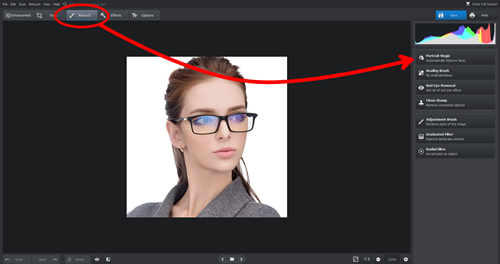
- Click on the Retouch button in the top bar.
- From the menu on the right, select Portrait Magic.

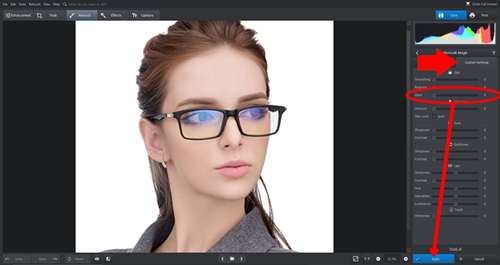
- Click on the Custom Settings tab, and use the Glare slider right below to apply as much or as little glare removal as you need.

- When you’re satisfied, click Apply and save your photo.
Now, remember, this function wasn’t designed to remove glare from glasses, but rather faces. If it works on one photo, it doesn’t mean it will work on other ones. If you want reliable outcomes, you will have to use more versatile image editing software, which is covered next.
GIMP
The open source image editor, GIMP, has been around for years, and the features it offers are extensive and ever-growing. It’s not quite as powerful as a professional tool like Photoshop, but it should be good enough to solve your glare problem.
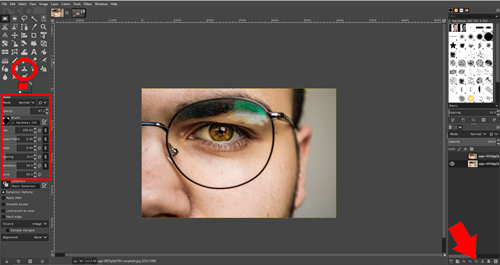
There are extremely involved ways to use masks and multiple layers to remove glare, but the easiest way is to use the Clone tool. This tool samples an area of a photo, and then “stamps” it wherever you need the sampled colors or textures. You can also use the Blur/Sharpen tool at your discretion.
Once you download and launch GIMP, open the image you want to work on. Duplicate the image using the Duplicate Layer button at the bottom of the layers window. Select the Stamp tool from the toolbox in the top-left, and then hold Ctrl and click an area that you want to stamp. Only work on one layer and use the other one if you need clone targets.

When you Ctrl + click, you’re sampling the area under the brush. Adjust your brush size as needed and play with hardness and opacity settings of the brush to avoid abrupt changes. Then, slowly work your way across the glare, sampling from the edges around it.
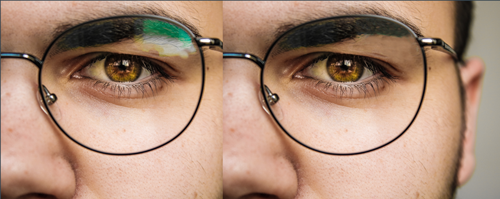
This will be more of an artistic reconstruction, so take your time and modify the settings often. Continue until you’re satisfied and then export the image in your desired format.

A Glaring Problem
Unfortunately, there isn’t a good point-and-click solution for removing glare from eyeglasses. The operations are just too complicated for an algorithm to deal with the nuance involved. There are some other options out there, but of the ones that were tested, these are the only ones that held up. Try the PhotoWorks software first. If it works, you’ll save yourself a lot of time. If it doesn’t, you’re stuck using GIMP, which takes a while but can produce great results when you master it.
Which of these two options worked better for you? Do you know of any other free software to remove glare? Let us know in the comments below.


One thought on “How To Remove the Glare from Glasses in a Photo”
Sunlich
I would suggest someone simply fix this problem, by just turning off the smartphone screen in the moment it takes the photograph…
Is there any camera app which does this .. the easier way than editing, except this editing article is useful for other photography related editing reasons.
The phones screen itself causing the Problem, has nobody developing these camera apps Realised this delicate Selfie ID problem and allied a fix such as simply turning off the phones screen as it takes the selfie?
It’s staggering how many problems are caused by technological evolution, which would otherwise make these processes much easier to accomplish, and no simple fixes are present.
You’d have to play around with it a bit, but I tried it for the first time and am quite pleased with the amount of glare/reflection that’s eliminated. (I just used a scrap of notebook paper as my ‘mask’.)