How to Send Data from NodeMCU to Google Sheets

Sending sensor data using NodeMCU firmware over the internet into a Google Sheets spreadsheet is very convenient. This can be done through a Google script and has the benefit of costing nothing, as opposed to many Cloud storage alternatives.
For the purpose of this article, we’ll show you a simple project for sending temperature readings using the ESP8266 and a DHT11 temp & humidity sensor.
Setup Your Google Sheet
First, you’ll want to create a new spreadsheet. Log into your Google account, go to My Drive, and open a blank spreadsheet.
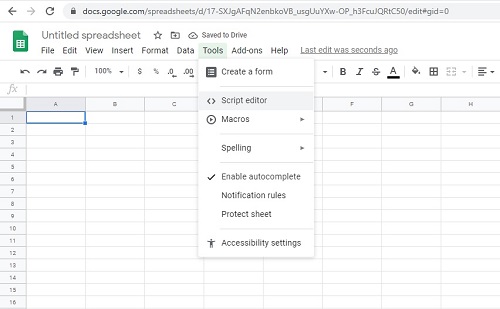
Copy the URL key for your spreadsheet. Give the spreadsheet an intuitive name. Go to the Script Editor, under the Tools menu.

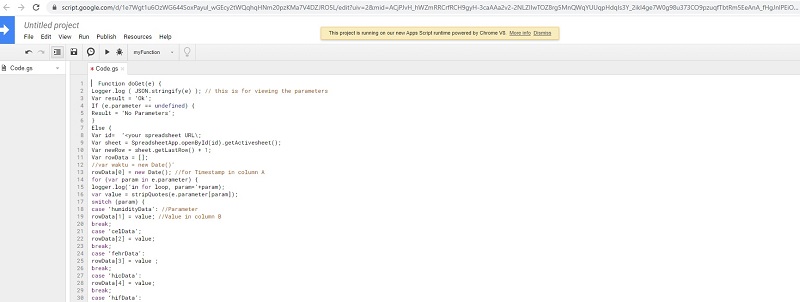
Give a name to your script (again, keep it intuitive, especially if you’re doing more than one project). Use the given script and copy paste it in the Google Script editor.

Under the spreadsheet ID line, paste the URL key from your saved spreadsheet.
Save the script and deploy it as an app. You’ll find this option under the Publish menu. Configure the deployment parameters to ensure that the spreadsheet will work correctly.
- Save the “Current web app URL”.
- Save the project version as new for all script revisions (this allows Google to update any revisions you may make in the future).
- For the Execute the app as field, add the following ling “me(your Gmail address)”.
- For the Who has access to the app field add the following line “anyone, even anonymous”.
Code for Setting Up the ESP8266 and DHT11 Sensor
This is what you should upload when connecting your ESP8266 to the DHT11 sensor:
#include “ESP8266WiFi.h”
#include “DHT.h”
#define DHTPIN 2 // what digital pin you’re connected to
//pin2 to D4 on esp board
// Remove the comment in the code for the DHT sensor type that you’re using.
#define DHTTYPE DHT11 // DHT 11
//#define DHTTYPE DHT21 // DHT 21
//#define DHTTYPE DHT22 // DHT 22
DHT dht(DHTPIN,DHTTYPE);
const char WEBSITE[] = “api.pushingbox.com”; //the PushingBox API server
const String devid = “<YOUR_Devid_HERE>”; //device ID from Pushingbox
const char* MY_SSID = “<YOUR_WIFI_NAME_HERE”;
const char* MY_PWD = “<YOUR_WIFI_PASSWORD_HERE>”;
void setup()
{
Serial.begin(115200);
dht.begin();
Serial.print(“Connecting to “+*MY_SSID);
WiFi.begin(MY_SSID, MY_PWD);
Serial.println(“going into wl connect”);
while (WiFi.status() != WL_CONNECTED) //not connected,..waiting to connect
{
delay(1000);
Serial.print(“.”);
}
Serial.println(“wl connected”);
Serial.println(“”);
Serial.println(“Credentials accepted! Connected to wifi\n “);
Serial.println(“”);
}
void loop()
{
//Allow more time to pass between readings
//google sheet populate, to avoid going over the number of free requests from PushingBox
delay(10000); //10 seconds, (sampling rate vs. service call quota)
float humidityData = dht.readHumidity();
// Read temperature as Celsius (the default)
float celData = dht.readTemperature();
// Read temperature as Fahrenheit (isFahrenheit = true)
float fehrData = dht.readTemperature(true);
// Check for failed reads exit early (to try again).
if (isnan(humidityData) || isnan(celData) || isnan(fehrData))
{
Serial.println(“Failed to read from DHT sensor!”);
return;
}
// Compute heat index in Celsius (isFahreheit = false)
float hicData = dht.computeHeatIndex(celData, humidityData, false);
// Compute heat index in Fahrenheit (the default)
float hifData = dht.computeHeatIndex(fehrData, humidityData);
//Print to Serial monitor or Terminal of your chocice at 115200 Baud
Serial.print(“Humidity: “);
Serial.print(humidityData);
Serial.print(” %\t”);
Serial.print(“Temperature in Cel: “);
Serial.print(celData);
Serial.print(” *C “);
Serial.print(“Temperature in Fehr: “);
Serial.print(fehrData);
Serial.print(” *F\t”);
Serial.print(“Heat index in Cel: “);
Serial.print(hicData);
Serial.print(” *C “);
Serial.print(“Heat index in Fehr: “);
Serial.print(hifData);
Serial.print(” *F\n”);
WiFiClient client; //Instantiate WiFi object
//Start or API service using our WiFi Client through PushingBox
if (client.connect(WEBSITE, 80))
{
client.print(“GET /pushingbox?devid=” + devid
+ “&humidityData=” + (String) humidityData
+ “&celData=” + (String) celData
+ “&fehrData=” + (String) fehrData
+ “&hicData=” + (String) hicData
+ “&hifData=” + (String) hifData
);
client.println(” HTTP/1.1″);
client.print(“Host: “);
client.println(WEBSITE);
client.println(“User-Agent: ESP8266/1.0”);
client.println(“Connection: close”);
client.println();
}
}
Example Google App Script Code
Here’s the code you need to create a readable script for your sensor data transfer.
GET Request query:
https://script.google.com/macros/s/<your gscriptID>/exec?celData=data_here
HumidityDat, celData,fehrData,hicData, hifData (GScript, PushingBox, and Arduino variables in the order you should write them)
Function doGet(e) {
Logger.log ( JSON.stringify(e) ); // this is for viewing the parameters
Var result = ‘Ok’;
If (e.parameter == undefined) {
Result = ‘No Parameters’;
}
Else {
Var id= ‘<your spreadsheet URL\;
Var sheet = SpreadsheetApp.openById(id).getActivesheet();
Var newRow = sheet.getLastRow() + 1;
Var rowData = [];
//var waktu = new Date()’
rowData[0] = new Date(); //for Timestamp in column A
for (var param in e.parameter) {
logger.log(‘in for loop, param=’+param);
var value = stripQuotes(e.parameter[param]);
switch (param) {
case ‘humidityData’: //Parameter
rowData[1] = value; //Value in column B
break;
case ‘celData’;
rowData[2] = value;
break;
case ‘fehrData’:
rowData[3] = value ;
break;
case ‘hicData’:
rowData[4] = value;
break;
case ‘hifData’:
rowData[5] = value;
break;
default:
result = “unsupported parameter”;
}
Logger.log(JSON.stringify(rowData));
Var newRange = sheet.getRange(newRow, 1, 1, rowData.length);
newRange.setValues([rowData]);
}
Return ContentService.createTextOutput(result);
}
Function stripQuotes( value ){
Return value.replace(/^[“’]|[‘|]$/g, “”);
}
Setup PushingBox
This service acts as a middleman between your DHT sensor data and Google Sheets. Using the PushingBox API, you can turn HTTP-transmitted data into encrypted HTTPS data that Google recognizes.
Note that PushingBox limits you to 1,000 requests per day. However, it cuts out a lot of the grunt work and expertise required in creating your own encryption algorithm that Google will respond to.
- Create a PushingBox account, if you don’t already have one.
- Use the Gmail address you’re also using for the NodeMCU sensor data project.
- Go to My Services.
- Add a new service from the Add a Service option.
- Scroll to the last option titled CustomURL, Set your own service!
- Fill in the fields requiring the name, URL, and Method.
- For the method, select GET.
- For the URL use the URL starting with “script.google.com…”, from the URL generated when you created the Google Scrip address.
- Submit the service and go to My Scenarios.
- Enter an intuitive name and hit the add button.
- Add an action when prompted on the screen.
- Configure the GET method by formatting the names for each variable. This step will differ depending on how many sensors you’re recording and what they are recording.
Configuring the Hardware
If you’re using a DHT sensor with your ESP8266, power the unit with 5v instead of 3.3v. A lower voltage may not give you correct readings.
Connect pins 2 and D4 on your ESP8266.
Configuring the Software
This setup works with Arduino IDE, preferably a version newer than 1.6.4. This also means that you need to download some libraries on your system.
The libraries can be found on the following links:
The next step involves uploading the Arduino sketch and configuring it for your project and your device. There are only three relevant fields that you have to format and customize for your project:
- Wi-Fi network.
- Wi-Fi password.
- PushingBox ID.
How Do You Approach NodeMCU Data Transfer?
There are more ways to do this and tons of sensor types you can use to transfer data using an ESP8266 with NodeMCU firmware directly to Google Sheets or other Cloud platforms.
Do you prefer writing your own scripts and code to personalize your projects or do you search online for verified scripts on github and other platforms and adapt from there? Let us know your favorite code and script sources as well as ESP8266 and sensors combinations, in the comments section below.


