Spellcheck Isn’t Working in Word – 5 Fixes

Where would we be without Microsoft Word’s Spellcheck feature? No matter the typos you make or the grammar you butcher, you can be sure that those handy red and blue squiggles have your back. It’s when they don’t appear that you begin to worry.
There are several reasons why Spellcheck has stopped working, and in this article we’ll run through 5 fixes to have you crossing your “t’s” and dotting your “i’s” again in no time.
Why Isn’t Spellcheck Behaving?
If Spellcheck suddenly stops working for you, or even if the problem has been around for a while, these are some of the major causes:
- Spellcheck has been deactivated somehow.
- Your current document or Spellcheck is set to a different language.
- In an existing document, Spellcheck exceptions may have already been added to certain sections or words.
- There could be a compatibility issue with the template you’re currently using, such as with the version, language or file extension.
- You’re using a custom dictionary.
You may notice something’s off when you scan the document and receive the all-clear, but you can still spot glaring issues. Most of the time, however, you’ll quickly notice that the recommended corrections you’re expecting aren’t there by the absence of any underlined words or phrases in your work.
5 Ways to Get Spellcheck Working Again
Now that you know the possible causes, let’s focus on the solutions. As with all troubleshooting, it’s a good idea to work from smallest to biggest in terms of possible fixes. The best way to start is with a restart of both Word and your PC, if possible. If the issue persists, try these possible fixes, one by one:
Enable Spellcheck
It can happen that Spellcheck has been deactivated – unintentionally or otherwise. Here’s how to check if it’s enabled:
- In Word, go to the “File” tab and select “Options” from the menu on the left.
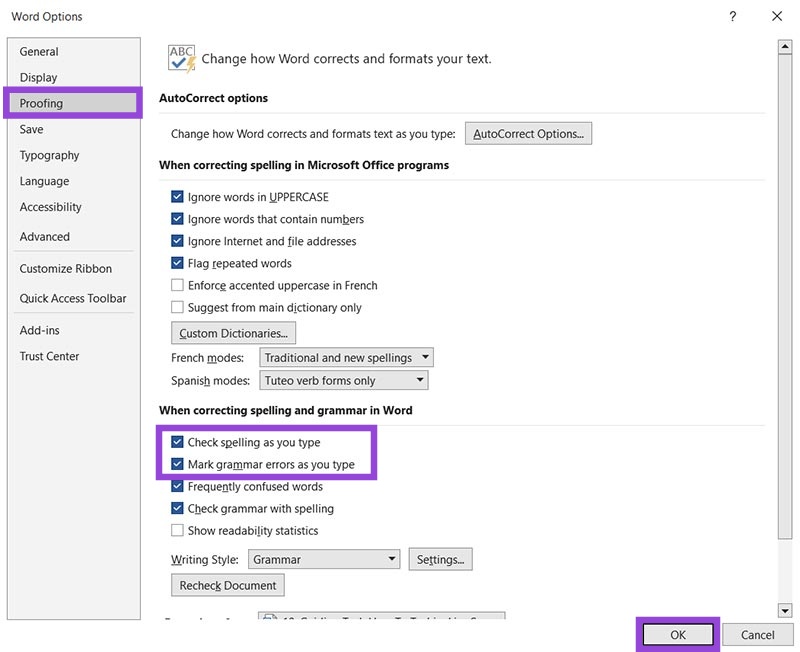
- The “Word Options” window will pop up. Select “Proofing” from the side menu.

- Scroll down to the “When correcting spelling and grammar in Word” section and ensure that the “Check spelling as you type” and “Mark grammar errors as you type” options are both checked. The other boxes are optional.
- Click “OK” to implement the changes.
You can also activate Spellcheck manually from the Tab menu in Word as follows:
- Navigate to the “Review” tab in the top ribbon.

- In the “Proofing” group, select “Spelling & Grammar.”
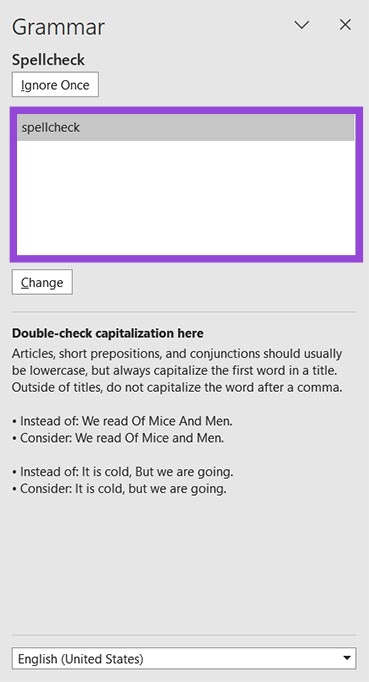
- A Spellcheck pane should open, from which you can begin checking your document manually.

Check Your Document and Proofing Language
Have you been typing in a document set to French without knowing it? Is your Spellcheck language set to Japanese? Working in several languages at once can cause issues with the Spellcheck. It’s a good idea to investigate the settings of both:
- Navigate to the “Review” tab and select “Language Preferences” by clicking on the “Language” option.

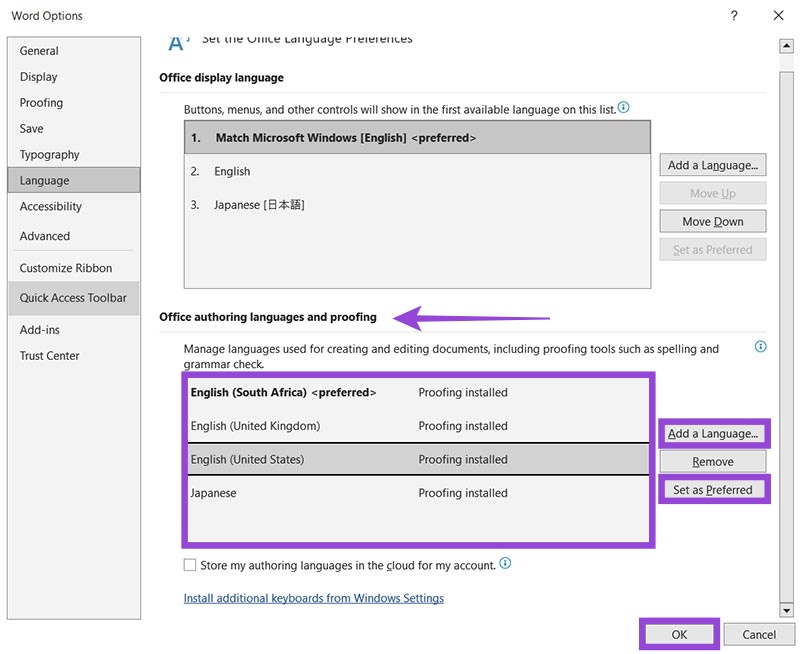
- Under “Office authoring languages and proofing,” you’ll see all currently installed proofing languages (and regional dialects).

- Hit “Add a Language” if you don’t see your desired language in the window. You can also click “Set as Preferred” to set Word’s default proofing language.
- Click “OK” when you’re done.
Your current document’s language is easily visible on Word’s Status Bar. To edit or change the language from there:
- Click on the language displayed in the Status Bar.

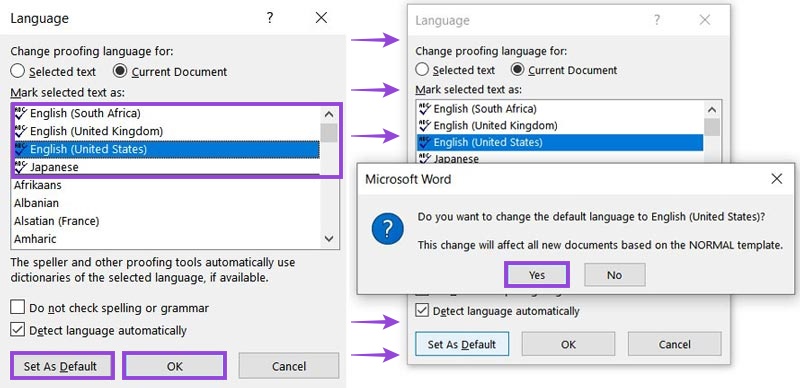
- The “Language” window will pop up. You’ll see your current preferred languages at the top of the box. Select your preferred language and hit “OK.”
- If you’d like Word to use a specific language for your current template, then click “Set as Default” and then “Yes” when prompted.

Check Your Dictionary Language
Your current dictionary language might also be the cause of Spellcheck not working. Using a custom dictionary can have the same effect. In the case of U.S. or U.K. English, using a different dictionary language means Spellcheck won’t pick up all spelling mistakes correctly. To check if this is the case:
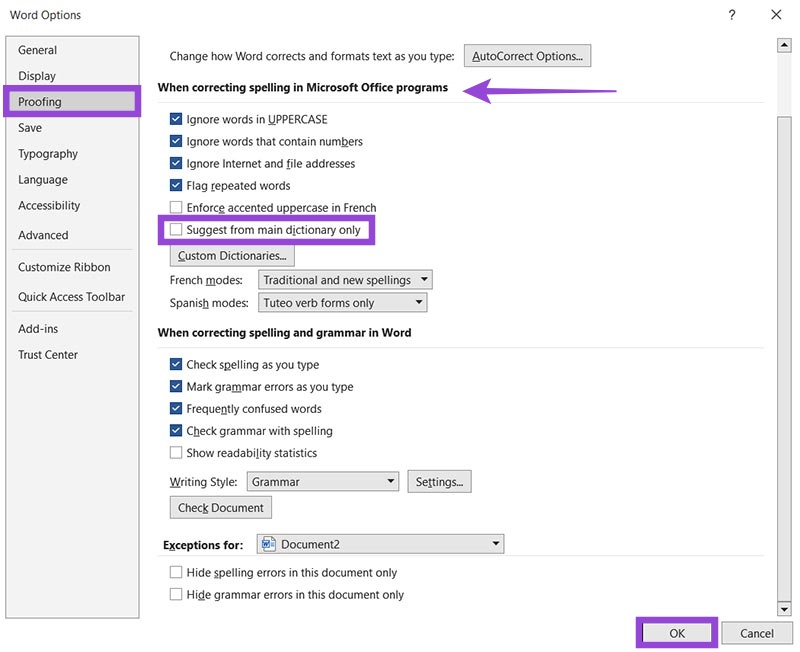
- Navigate to “Proofing” in Word’s options.

- Under “When correcting spelling in Microsoft Office programs,” check “Suggest from main dictionary only.”
- Click “OK” to save the changes.
Your language dictionary should now align with your currently selected proofing language.
Review Proofing Exceptions
Suppose a document has already been reviewed. A previous user may have added Spellcheck exceptions to the document, but it’s still showing errors because Word has been instructed to ignore them. Here’s how to change this:
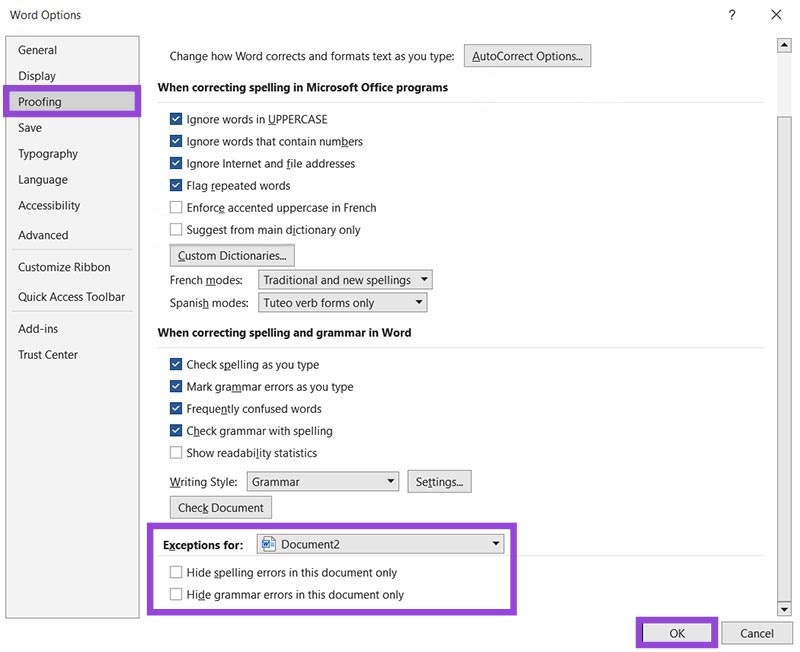
- Open up “Options” and navigate to “Proofing.”

- Scroll right down to “Exceptions for” and make sure that both boxes are unchecked.
- Click “OK’ to implement the changes.
Try Safe Mode
Perhaps an Add-in is throwing off your Spellcheck, or something else has gone wrong within Word itself. Restarting Word in Safe Mode is a great way to troubleshoot if this is the case. To do this:
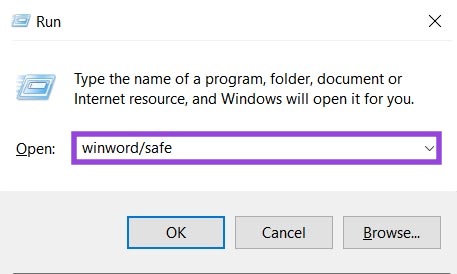
- Open the “Run” command (press Win + R on your keyboard).

- Type “winword/safe” and click “OK.”
- Word should start up in Safe Mode with templates and Add-ins disabled.
If Spellcheck now works, try restarting in Normal mode, and then disabling Add-ins one by one until the expected Spellcheck functionality is restored.


