How to Make a Private Server on TeamSpeak

Creating a private server is not that difficult, but with TeamSpeak 3, it does require a bit of programming. Nonetheless, you shouldn’t experience any problems if you follow this guide to the T.
The article also includes the method for the newest version of the platform, which is infinitely easier compared to the previous one. And since TeamSpeak is available on Windows and macOS, we’ll cover the steps for both operating systems.
Creating a Private TeamSpeak Server
It’s worth stressing that these are general guidelines for TeamSpeak server creation. You can set the server privacy and program in the access keys afterward. That doesn’t apply to the ServerAdmin privilege key that’s generated during the process.
As for the macOS section, you’ll need to use CentOS 7 or Ubuntu. For this article, we went for CentOS 7 because the process takes fewer actions, and you get the same results.
Windows
Step 1
Get the TeamSpeak server software for Windows and extract it on your computer.
Now, you need to extract the TS3 files and engage the ts3server.exe installer. There are a couple of permission windows. You need to allow the app to pass the firewall and accept the terms of service.
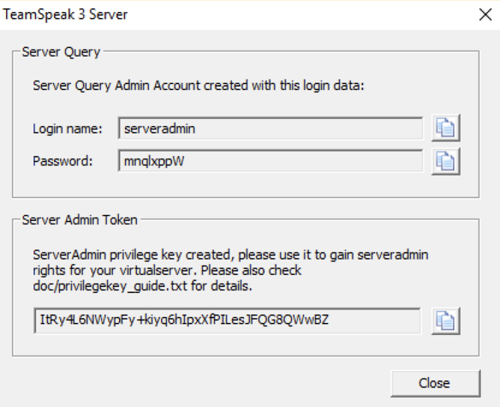
That out of the way, TeamSpeak 3 Server will give you the ServerAdmin privilege key.

Step 2
The installer does all the heavy lifting for you, and the final thing to do is to link to the TS3 server. For this step, you need to know the correct IP address to make the connection.
If you’re not 100% on the address, launch Command Prompt, then execute the ipconfig command. When you get the results, you’re looking for the value of the IPv4 Address.

The last thing to do is enter the ServerAdmin privilege key, and voila, your server is ready. Now you can type the server settings and set up the user password for private access.
macOS
The following sections assume that you have CentOS up and running on your Mac. The process begins with a system update, and you need to access your VPS through SSH. To do this, you use the yum -y update command.
Step 1
Start by generating a new system user for your TeamSpeak 3 server. The command is adduser teamspeak, and the action also sets the user’s home directory like this – /home/teamspeak.
You can access the directory with the cd /home/teamspeak command.
Step 2
Get the TeamSpeak 3 server software for Linux. To do it fast, take advantage of the wget command.
wget http://dl.4players.de/ts/releases/3.12.1/teamspeak3-server_linux_amd64-3.12.1.tar.bz2
Then extract the given archive:
tar xvf teamspeak3-server_linux_amd64-3.12.1.tar.bz2
You’ll find the extracted files in the teamspeak3-server_linux_amd64 folder.
Step 3
Now, you need to use a set of specific commands to move it all up one directory. The commands are as follows:
cd teamspeak3-server_linux_amd64 && mv * /home/teamspeak && cd .. && rm -rf teamspeak3-server_linux_amd64-3.12.1.tar.bz2
On a side note, this command also gets rid of the setup file you extracted. And if you’ve followed the instructions carefully, entering the Is command should present the CHANGELOG and LICENSE.

Step 4
It’s time to accept the license agreement, and it’s easiest to execute the given command.
touch /home/teamspeak/.ts3server_license_accepted
As a confirmation, you’ll get a .ts3server_license_accepted file. Then you’ll need to enable the server and start the boot.
The first command is:
sudo nano /lib/systemd/system/teamspeak.service
Then, there is a very straightforward script that performs the server start-up:
[Unit]
Description=TeamSpeak 3 Server
After=network.target
[Service]
WorkingDirectory=/home/teamspeak/
User=teamspeak
Group=teamspeak
Type=forking
ExecStart=/home/teamspeak/ts3server_startscript.sh start inifile=ts3server.ini
ExecStop=/home/teamspeak/ts3server_startscript.sh stop
PIDFile=/home/teamspeak/ts3server.pid
RestartSec=15
Restart=always
[Install]
WantedBy=multi-user.target
You need to save everything and enter two more commands to get the ball rolling.
systemctl enable teamspeak.service
systemctl start teamspeak.service
Expert Tip
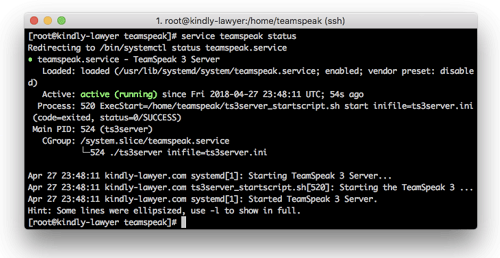
If you want a detailed report about your server, enter the service teamspeak status command.

Step 5
Now, you need to get a copy of the privileged key. Use the cat /home/teamspeak/logs/ts3server_* commandto find the key.
Congratulations! You’ve just created a Linux-based TeamSpeak server.
To use it, you need to create a new connection via the TeamSpeak client and enter the VPS IP address in the “Server Nickname or Address” bar.
The system will prompt you to enter the privileged key, and you’re good to go.
Creating a Server on New Team Speak
We’ll show you a method for creating a free server on the new TeamSpeak, but this doesn’t mean you can’t make it private. The limitation is in the number of users and some other features, not the actual functionality.
Click on the Settings icon in the search bar at the top left corner of the TeamSpeak window. You’ll find a “Create New Server” option at the bottom of the pane on the right. Click on it and choose the hosting provider – it can be TeamSpeak or Self Hosted.
Click the Get Started button, enter the name and password for your server, and click Create. If you don’t set the password, the server will be public, and you might use up all the free slots pretty fast.
Once the system generates the server, it appears under servers in the options menu on the left. To access all your servers, click on the corresponding icon.
Happy Gaming
Creating a server takes a few steps, but this is not something you can’t do on your own.
So tell us, have you tried to create a gamer-friendly server before? Did you find it more demanding than this? Share your experience with the rest of the TJ community in the comments section.


