Test The Strength Of Your Network With Flent
What Is Flent?
Flent stands for FLExible Network Tester, and it’s not much of a program in its own right. Instead, Flent is a wrapper that bundles multiple network testing applications, most notably Netperf, into once cohesive package that makes running the tests simpler and includes Matplotlib to create graphs and data visualizations automatically as you run your tests.
Flent is a complete toolkit for testing your network and diagnosing everything from simple inefficiency to serious connection issues. As yet another bonus, it’s free and open source.
Install Flent
Flent is only available for Mac and Linux. That doesn’t mean that you need to ditch Windows and convert your whole network to Linux. You just need to find some way to run it temporarily for your tests.
Ubuntu
Start by adding the Flent PPA.
$ sudo add-apt-repository ppa:tohojo/flent
$ sudo apt update
Then, install Flent.
$ sudo apt install flent
Debian
Flent is available in the official Debian repositories starting with Stretch. Just install it.
# apt install flent
Arch
Flent is available from the AUR. Go over to its page and grab what you need.
Gentoo
Add Flent to your ‘/etc/portage/package.accept_keywords’.
net-analyzer/flent ~amd64
Then, emerge it.
# emerge --ask flent
Everyone Else
Flent is a Python package. You should be able to get it installed using the pip Python package manager, if you have that installed. It’s available for just about every Linux distribution and Homebrew for Macs.
# pip install flent
Basic Setup
Now that you have Flent installed, you can start using it to perform some basic tests. Flent has both a command line and graphical version. Since you probably don’t want to memorize Flent’s commands, this guide will be working with the GUI one.
In order for Flent to work properly, you need a server to test against. That server needs to be running Netperf in server mode.. It’s best to set it up first, so you can do all of your testing together. Netperf is available in just about every Linux distribution’s repositories, so just install it with your package manager.
$ sudo apt install netperf
After you have it on the server, run Netperf in server mode.
$ sudo netserver &
You can leave the server alone for now. It will continue running Netperf in server mode in the background. You can do everything else from your client running Flent.
Running A Test
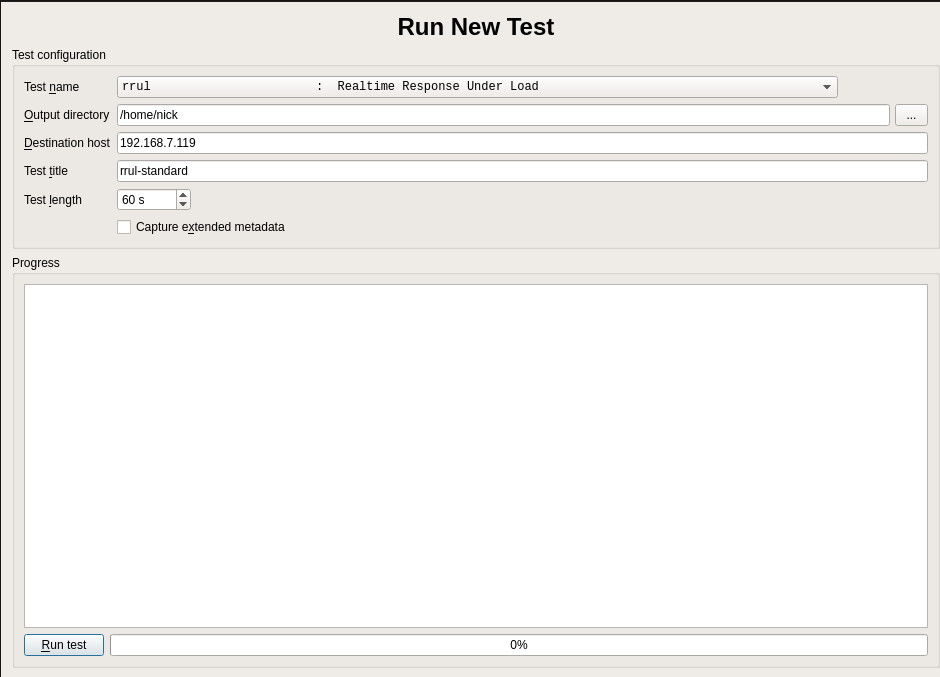
You can run tests to your server from Flent, now. Open the Flent GUI from your application launcher or by typing flent-gui in a terminal. The window that you’ll get is pretty plain to start with. Click on “File” in the upper left corner and select “Run new test” in the resulting menu.
The new window will let you select a test to run. First, use the “Test name” dropdown to select a test. For this first one, pick “rrul.” Enter in the IP of the computer you set up as the server, then name your test. The name will just help you identify the results that Flent saves. It uses a compressed form of JSON with the .gz extension. When everything looks good, click the “Run test” button at the bottom left of the window.
All of the tests take a bit of time to run, so be patient, and try not to do anything on the network with those two computers that might interfere with the connection. It will mess up your data.
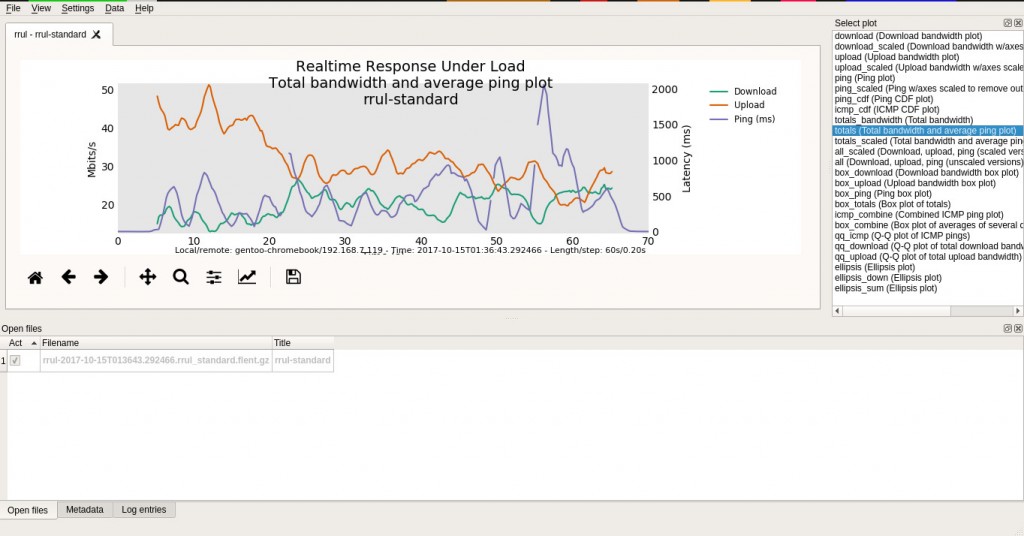
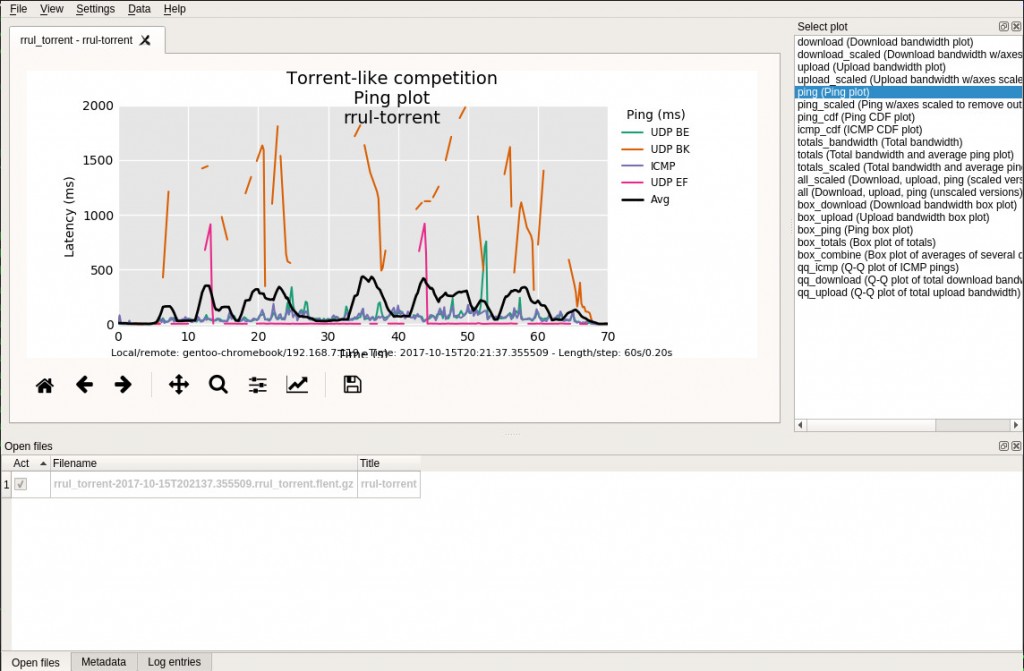
After the test completes, you’ll be able to see the relevant data presented in a series of charts on the main Flent window. The RRUL test will give you information on your total upload, download, and ping. The charts will all show you that same information, but they organize it differently, to help you notice any patterns. In the case of the example, a garbage router created loads of latency and produced some pretty broken results.
The Tests
Flent provides a wide variety of tests. Each one can stress your network in a different way. You don’t need to memorize them all, though. Most fall into one of four basic categories. Those categories test your network in different specific ways.
RRUL
RRUL stands for Realtime Response Under Load. That’s exactly what it aims to measure. The RRUL test tries to simulate a real network work load and capture the way the target machine responds under that load. RRUL was developed by the people at Bufferbloat.net to create network conditions where bufferbloat would come into play to help diagnose and remedy it.
Bufferbloat is a common problem in networking. It occurs when a router buffers too much data when transferring a large chunk of data or streaming. That extra buffer is both a weight on the router and it slows down the transfer. The stress of the RRUL test is designed to put a significant enough load on the router to trigger the buffer. If your network is experiencing a bufferbloat, the upload and download numbers will both begin to drop off and ping will increase as the test runs.
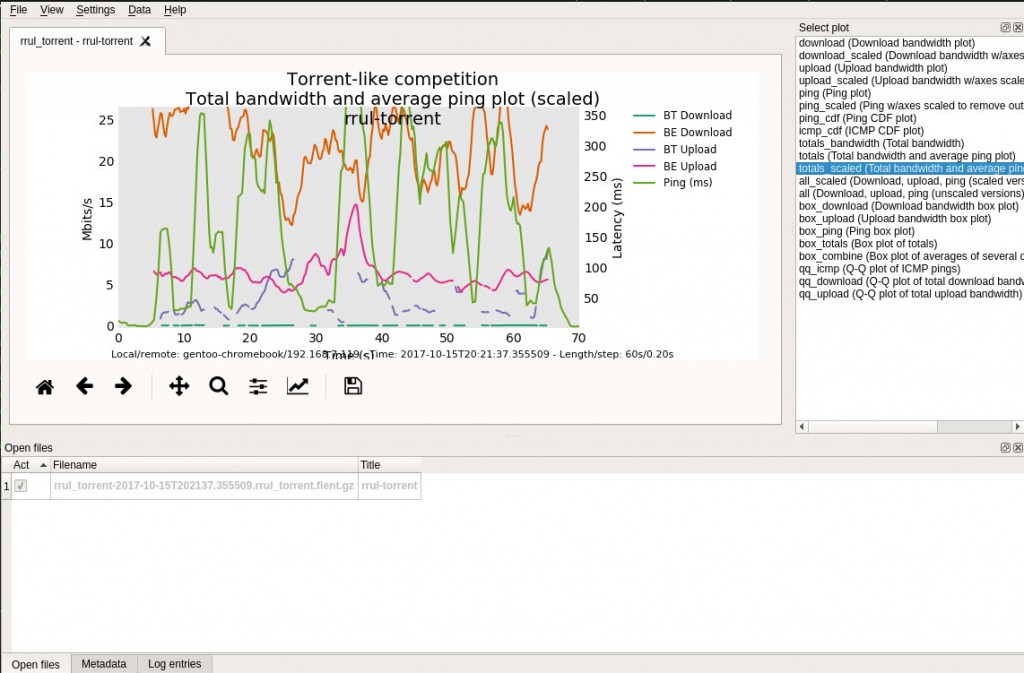
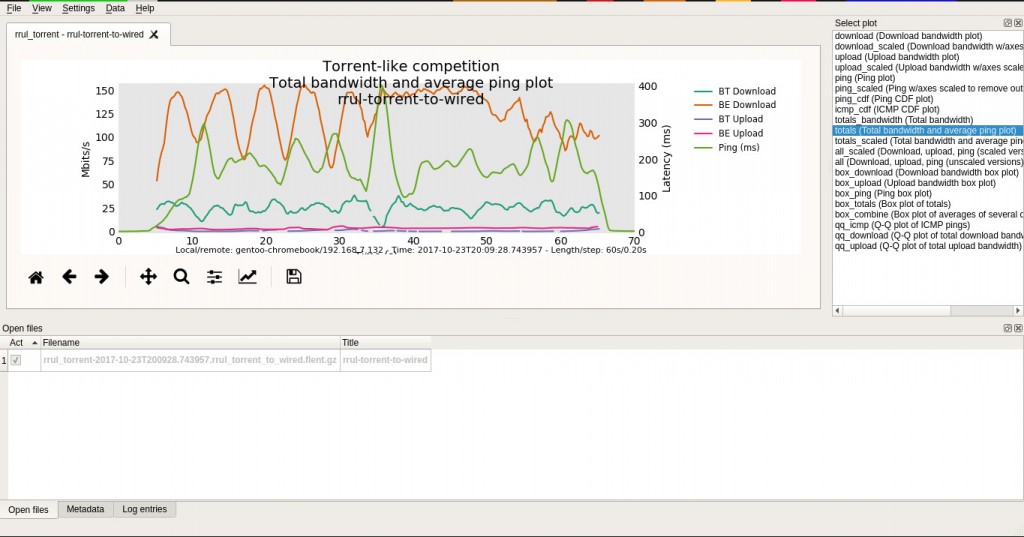
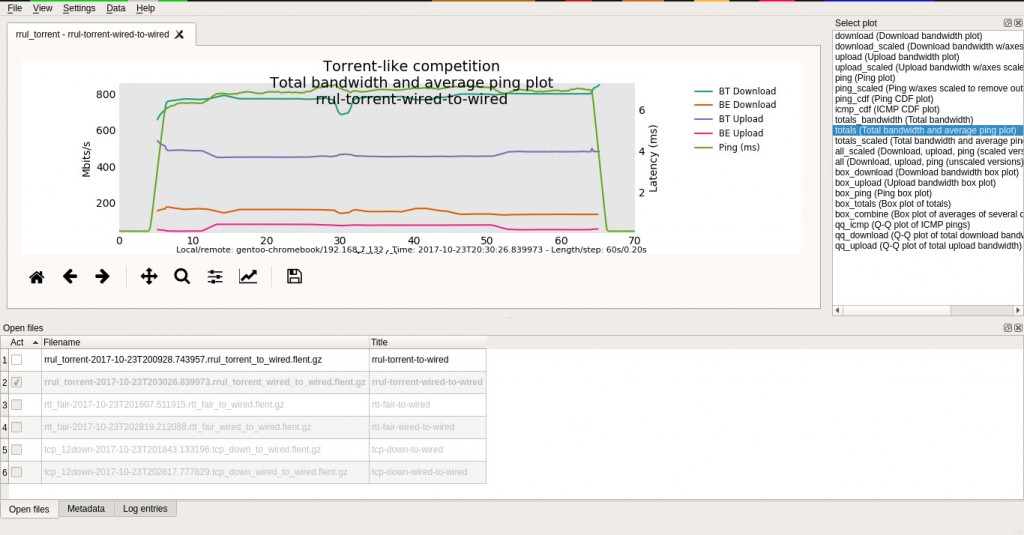
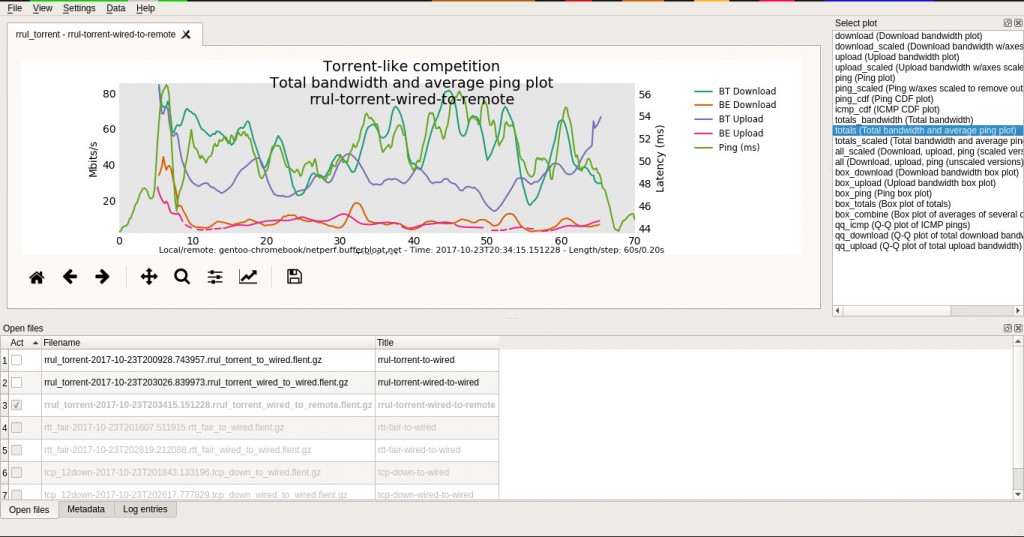
Try running the RRUL torrent test. It simulates a torrent download, which is obviously a very strenuous type of network activity and is still very much a real world scenario.
The above results are what you don’t want to see, loads of latency and dropped packets. That test was conducted between two wireless devices on a crowded network. Notice the change when the server is wired.
The difference is definitely noticeable. The connection isn’t perfect, but it becomes much more stable with one device being wired. What about both?
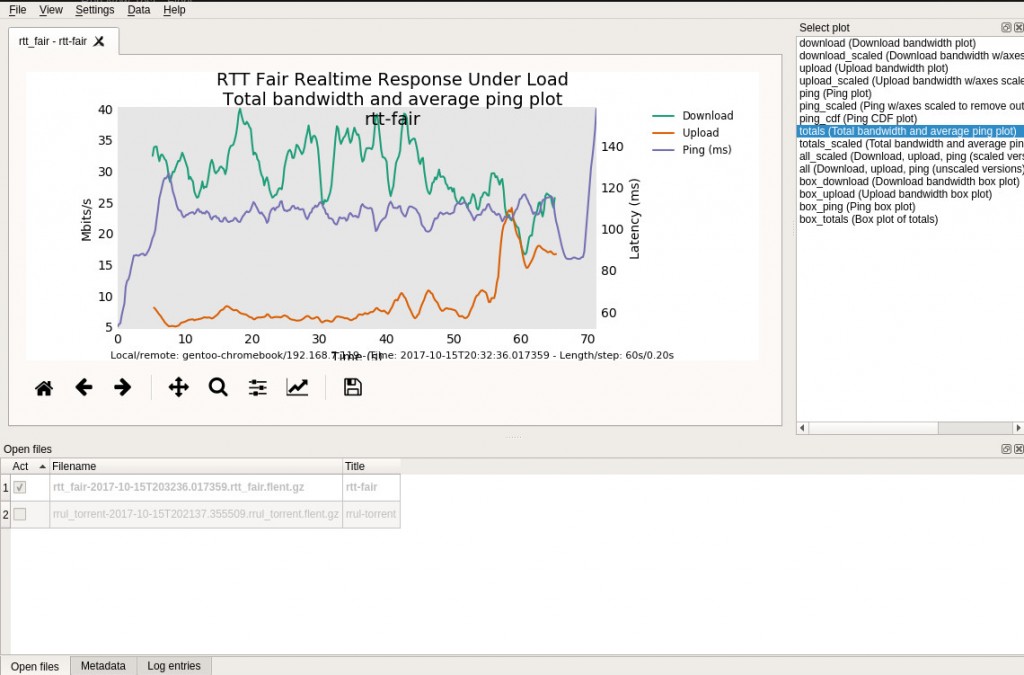
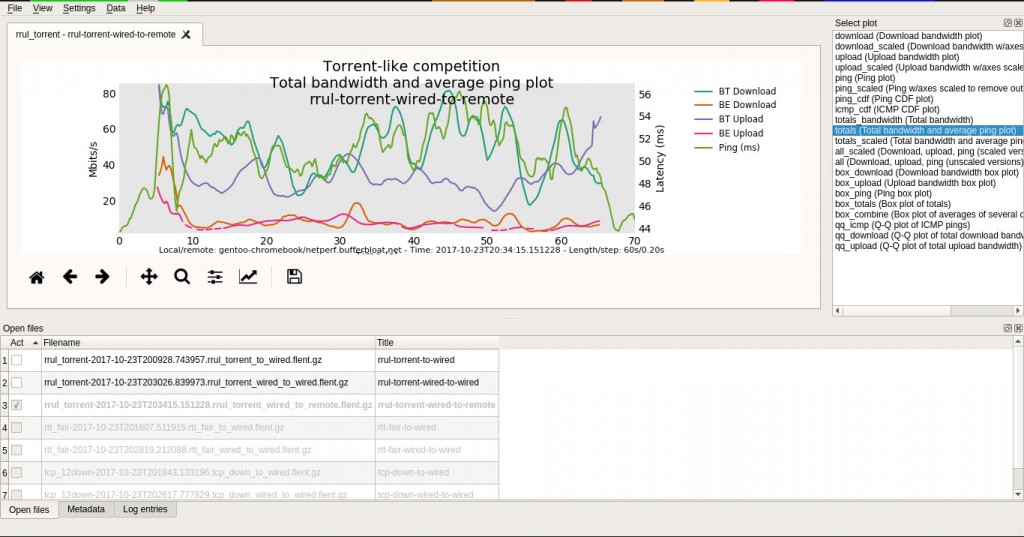
There’s much less variation in this test. That’s because there is no opportunity for interference or a lack in signal strength. Keep in mind that this is the same network as that disaster of a test from before. Clearly, there’s a problem with wireless connections. Finally, try testing to the remote server provided by Bufferbloat.net.
It’s not as clean as the local network, but it’s still not as messy as the wireless tests. This is the sort of thing you’d probably expect from a normal torrent download over the Internet.
RTT
The RTT, or Round Trip Transfer tests are actually a lot like the RRUL tests. They don’t rely on the target being under a load. Instead, they just measure the time it takes for a UDP request to complete the circuit and return to the client. They do include ping as well.
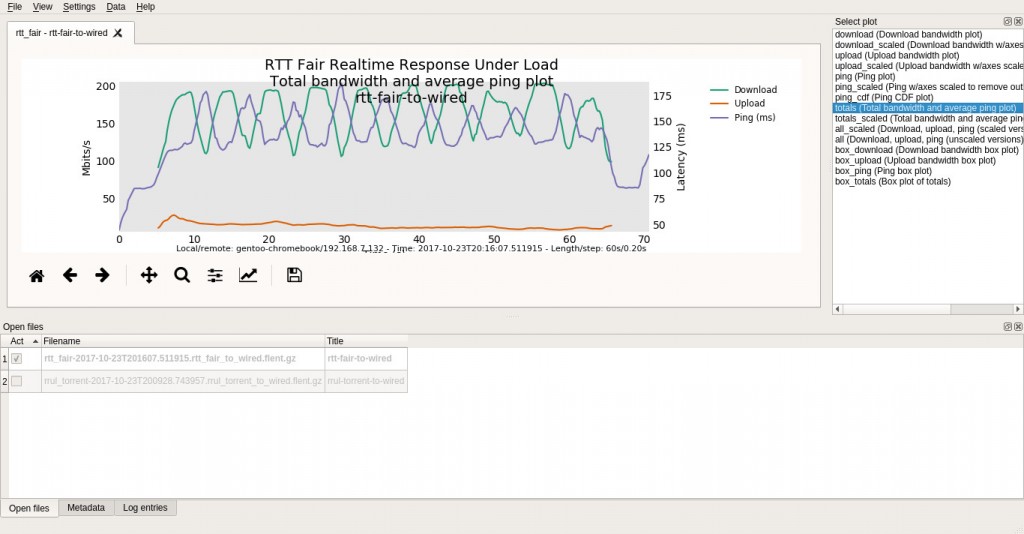
For a good RTT test, try running RTT Fair. You’ve already tried the RRUL to simulate a more realistic and challenging condition; why not more ideal circumstances? The RTT Fair test will help you see what a round trip under more controlled conditions looks like on your network. It’s considerably less chaotic. Could it be even less chaotic, though? These are the results with a wired server.
It’s almost a sin wave. Sure, it’s not ideal, but it is neater and considerably faster. With both machines wired, it gets even better.
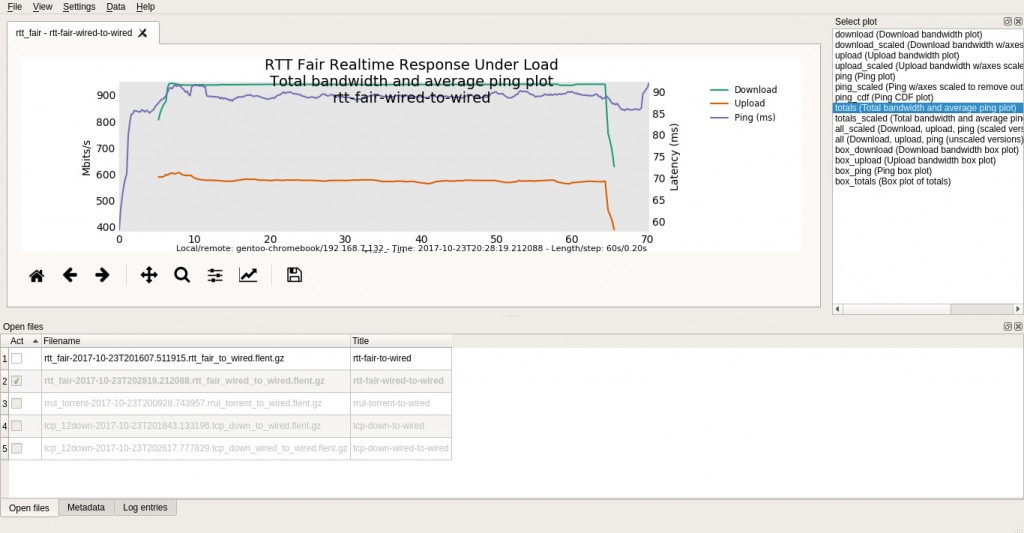
That’s a big difference from the 40Mb/s in the first test. Once again, take the test out to the Net.
It’s still better than that WiFi mess from before. Again, these results seem about right for a test like this, although more stability could be a goal.
TCP
The TCP tests are standard TCP. They measure basic TCP requests like you were visiting a website or checking your email. Chances are, these tests won’t put nearly as much stress on your network, but they may give you a better picture of what regular traffic looks like.
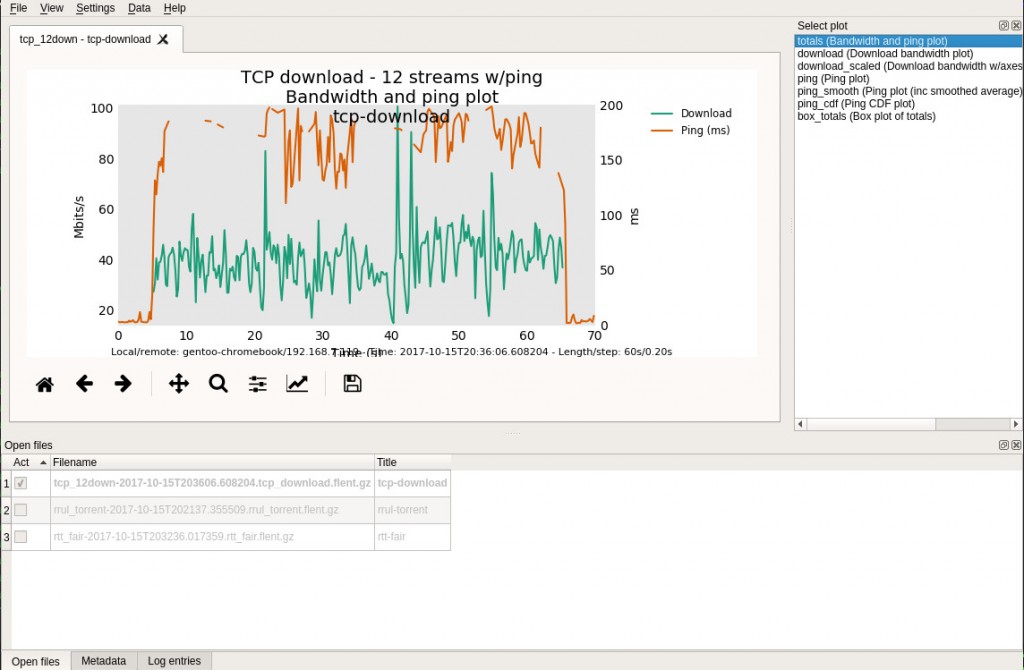
Try a more strenuous TCP test. The TCP download with 12 streams is a good one to simulate a more intense direct download. There’s a good chance that you’re going to see some serious latency, if you don’t have a great network. Maybe a wired server can improve things here too.
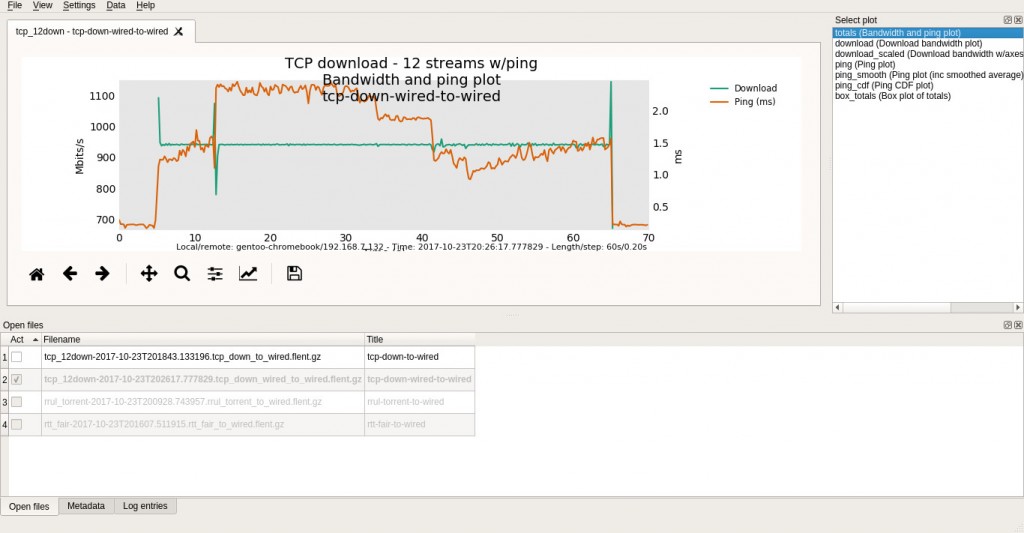
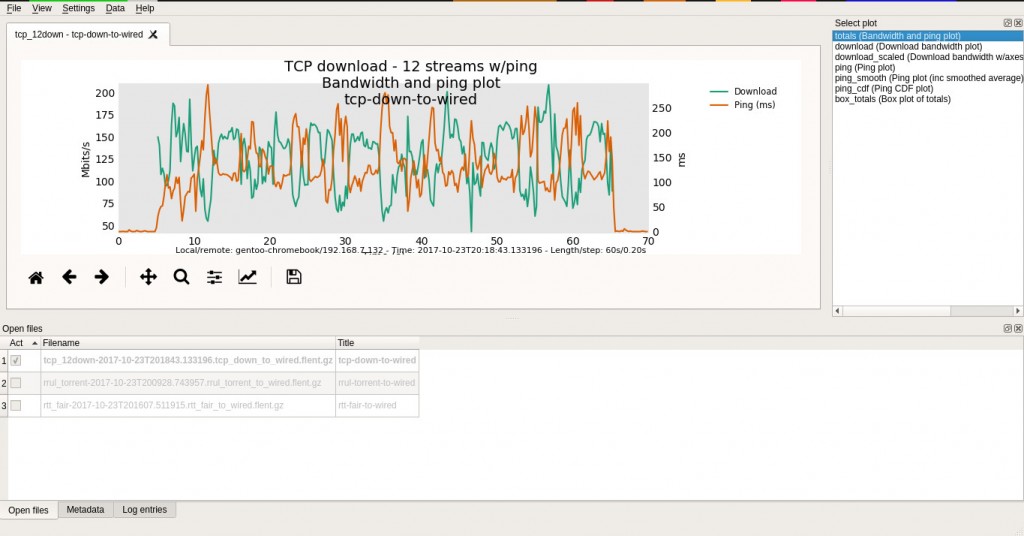 It’s somewhat more normalized, and there’s more bandwidth. That’s good. There’s even more improvement when the client is wired.
This actually approached a solid 1Gb/s. That’s pretty amazing, considering the WiFi results. Finally, take a look how it performed with the remote server.
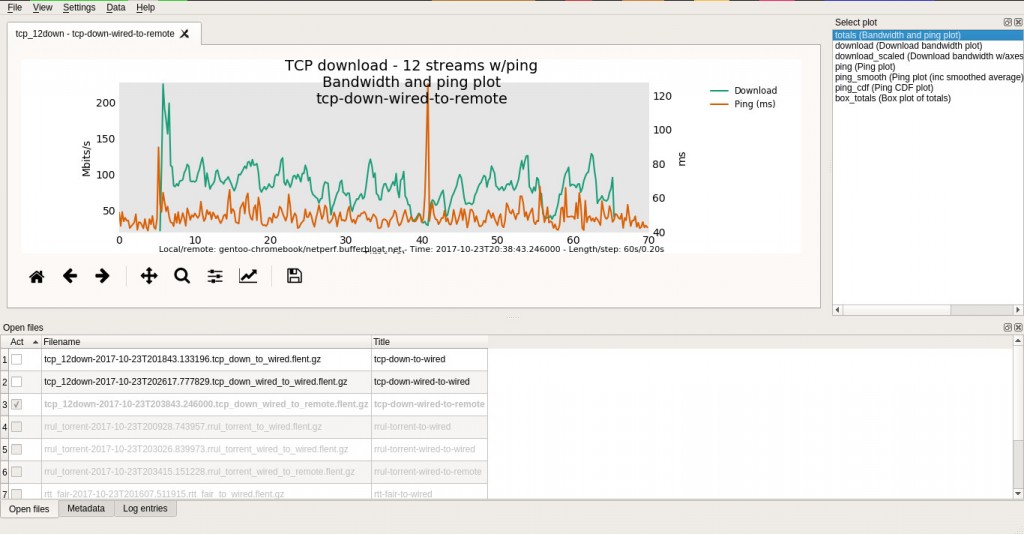
There’s more latency, but the speeds are still very respectable. Oh, and this was over a VPN too. Clearly, the issue is coming from inside the network.
UDP Flood
The UDP flood tests are actually RTT tests, but they send a deluge of UDP packets at the target machine at once. They don’t respond or adapt to the flow of traffic, just send. They can be useful for testing how the target machine will respond in the face of a bug or an attack.
Closing Thoughts
If you’re going to test your network, it’s best to test between different points in your network to help narrow down problem areas. The test network from this guide clearly has some problems with WiFi. Chances are, limited bandwidth and interference are both at play. It’s also good to have a clear picture of what types of problems you’re looking for. Design your tests around that.
You may have noticed that the network that pictured results are from isn’t all that great. It’s not. Actually, some of the garbage results that you saw are exactly what you need to look out for in your own network.




2 thoughts on “Test The Strength Of Your Network With Flent”