How to View the Email Header in Outlook

Few people realize that there are actually two types of headers in any email. Maybe two types is a stretch, but you could say that an email header has two sides to it. One is a simple version that everyone can read and understand, as it contains highly relevant information about the email, names, date, subject, etc.
The other side can be somewhat hard to make sense of if you don’t know a bit of code or if you’re unfamiliar with some programming terminology. Before diving into that aspect of email headers, here’s how you can display the header if you’re using Microsoft Outlook.
Outlook 2007
Not everyone bothers to upgrade or buy a newer Outlook license since old versions work just fine, even by today’s standards.

If you’re using the 2007 version, here’s how you can locate and see the email header:
- Open Outlook.
- Go to your message.
- Find the Message tab under Options.
- Click on the Dialog Box Launcher.
- Go under Message Options.
- Locate the Internet headers box.
In Outlook 2007, email headers will be displayed in the Internet headers dialogue box.
Outlook 2010, 2013, 2016
This is what you have to do in newer versions of Outlook:
- Open Outlook.
- Find an email and open it.
- Double click on an email in order to open it in a new tab.
- Click on File.
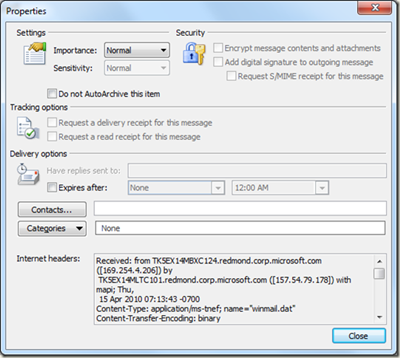
- Click Properties.
- Look at the bottom of the window for the Internet headers box.

Unlike with older versions of Outlook, the Internet headers box in 2010, 2013, and 2016 versions has text that can be copied. Triple click to select the entire text or right click and click the “Select all” option. You’ll then be able to paste the text wherever you want in order to read it more comfortably.
Office 365
For Office 365 suite users, the method of displaying email headers is the same as for those using Outlook 2010, 2013, and 2016.

You may also use the following method for Office 365.
- Log into your account.
- Go to your inbox.
- Open an email.
- Click the down arrow.
- Click on “View message details.”
The new window that opens should contain all the header information from that email.
Other Information Contained in Headers
Email headers contain a lot more information than simply the sender and the recipient’s information and date. This is just the basic header info which is, as you can see, always easy to check.
If you want to learn more about who sent you the email and how it got to you, you can check the full header of the email. Viewing the full header will also show you a complete list of IP addresses that the email went through before it reached you.
This is one of the easiest, but not foolproof, methods of detecting spam manually.
- Log into your account.
- Go to your inbox.
- Highlight an email message.
- Click on the three dots icon to open the action menu.
- Click on “View message source”.
This is basically the same as the Gmail’s “Show Original” function or Yahoo’s “Show Source.” The exact wording might differ between Outlook titles.
In most cases, this will open up a new dialog box with a wall of text, mostly containing code, but also other information that you can understand. Conducting a search within the text, via the Ctrl + F command, for the phrase “Received: from” will usually highlight all IP addresses from which the email was rerouted.
Under normal circumstances, there should be only one. If you see more, there’s a good chance that the email was sent through a proxy server. Note that using this method won’t guarantee that you can track down the original sender’s IP address.
Make Sense of Full Header Information with Third-Party Apps
There are various third-party apps that can simplify the full header information for you. However, a lot of them aren’t free. They way most of them work is, you copy the complete header, paste it into the app, then let it analyze the data.
The end result is usually a simplified version of the relevant information, such as sender IPs, countries the email passed through, times and dates, as well as whether or not some of those IPs or domain names are flagged as untrustworthy.
But again, even these apps may not be enough to track the original sender in some cases. If you’re dealing with spam sent by pros, tracking down the original source is next to impossible, even with top of the line consumer tracker programs.
How Often Do You Check the Legitimacy of Received Emails?
Most people have gotten pretty complacent when it comes to security. Many people expect the email service provider to automatically filter out the bad stuff, flag it, and put it in the bulk or spam folders.
In reality, there are many spam emails that can easily outmaneuver those filtering algorithms, so you never know when you may fall victim to a phishing attack. Do you make it a habit of checking email headers of inbox messages from new senders? If so, tell us whether you do it manually or if you rely on any third-party apps to make sense of the full email headers.


