How to View My iCloud Photos

By default, the photos on your iPhone get backed to iCloud. In fact, even if you delete some images they remain in the cloud for some time before being sent off to the digital oblivion. And of course, there is an option to manually add or remove photos.
Either way, previewing the iCloud photos is plain sailing, but you need to make sure your devices are set to allow iCloud access and syncing. The following sections provide a quick step-by-step guide on how to do it.
Before You Start
First, you need to make sure that iCloud Photo Library is enabled and this works for iPhones and iPads. The steps below apply to the iOS 12.4 and they are similar for older software versions. Here is what you need to do.
iPhone/iPad
Step 1
Launch the Settings app, then tap your name at the top of the screen, and select iCloud to access more options.
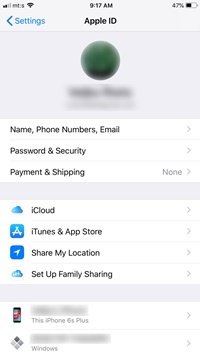
Note: Older iOS versions have a Photos & Camera tab. Tap that when you enter Settings and you’ll be taken to the corresponding set-up window.
Step 2
Under “Apps Using iCloud,” select Photos and toggle on the slider switches next to “iCloud Photos” and “Upload to My Photo Stream.” These options automatically upload the images to iCloud and you get a “My Photo Stream” album.
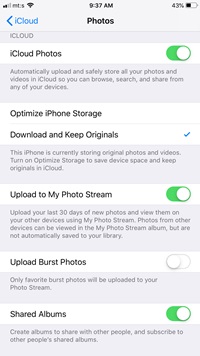
With “My Photo Stream” on, you can preview photos on other connected devices. The action works the other way around as well. For example, you can view the photos taken on your iPad within the iPhone’s “My Photo Stream” folder. Though, these images are not saved to the iPhone’s library.
Note: The actions described above assume you have both devices logged into the same Apple ID. Otherwise, toggle on the “Shared Albums” option and use that to send and receive iCloud images.
iMac/MacBook
Step 1
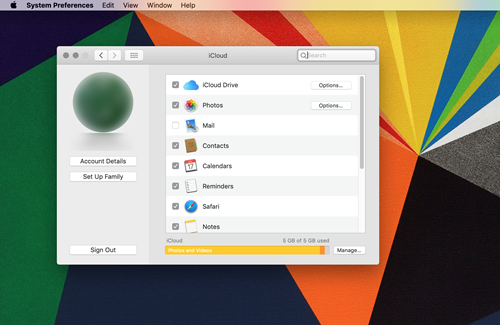
Click or tap System Preferences and select the iCloud menu, then sign in with your Apple ID.
Step 2
Click or tap on the box in front of iCloud Drive and Photos to activate them. Now, select the Options button next to Photos to access the drop-down menu.
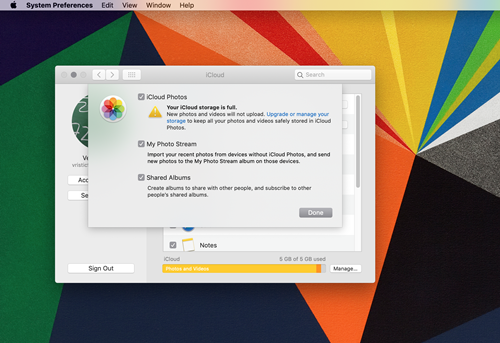
Make sure to check the box in front of “My Photo Stream.” This provides access to iCloud photos on other devices and automatically uploads new images to the stream folder. Again, feel free to check the “Shared Albums” option if you’d like to share the images with others.
This out of the way, iCloud Drive now shows up across your Apple devices and they have the same cloud folder. Just to remind you, iCloud Drive is an all-in-one file manager and an app to preview documents stored in the cloud.
Note: iCloud Drive appears inside the Files app on newer iOS versions.
How to Access iCloud Photos from a Browser
This method is great because it works on PS and Android tablets. Plus, there’s not much science to it. Launch your preferred browser, go to http://www.icloud.com, and log in with your Apple ID.

You will be able to preview all iCloud apps and you can click on Photos to see what’s synced to the cloud. There you get to browse, download, delete, or share your photos. Mind you, if you choose to delete a photo from iCloud, it will be removed from all of your devices.
One more thing, you can only share photos via email when you access iCloud from a browser.
iCloud Photo Downloads
A quick reminder – with “iCloud Photo Stream” on, the images you take or import end up in the “Photo Stream” and you can see them on all devices. For this to work, you need a Wi-Fi connection. To be exact, the photos are downloaded into the stream as soon as you connect to Wi-Fi.
As indicated, you download the photos via a browser. For the purposes of this article, we’ve used Safari but it works the same on other browsers. These are the necessary steps.
Step 1
Before you proceed, it’s best to set the download destination first. To keep photos separate, you can also choose “Ask for each download” and choose a different destination folder with every download.
Launch Safari or any other browser and hit Cmd +, to access Preferences. You can also do it from the drop-down menu in the menu bar, but it’s easier this way. Select the destination folder under “File Download Location” and you are good to go.
Step 2
Now, you can log into the iCloud and select the photos you want to download. To select multiple images, hold Cmd or Ctrl (on a PC) and click on every image you’d like to save. Once done, hit the download icon and you are good to go.
Important Note
This article assumes you have enough iCloud storage. You get 5GB for free by default and it quickly gets used up, especially if you upload photos and videos. Without the extra storage space, the photos you take won’t automatically upload to the cloud and this means “Photo Stream” won’t work. On the bright side, you will be able to preview all the photos until the moment your storage got full.
Where’s the Holiday Album
Come to think of it, setting up your iCloud albums and photos does take some work. But you need to do it only once and then you can enjoy your photos across multiple Apple devices.
How much iCloud space do your photos take? Do you delete or download them regularly? Give us your two cents in the comments below.


