How to Change Theme in Visual Studio

The first choice for many of today’s professionals, Microsoft’s integrated development environment is used to write programs, websites, apps, etc.
A hugely useful tool, Visual Studio offers a number of great features, as well as the chance to personalize and adjust your preferences. You can change different aspects of the environment, such as the theme, colors, or fonts.
If you’re new to using this tool and are wondering how to make these changes, this article will help you figure everything out.
How to Set the Theme
When you first start using Visual Studio, your theme is set to default, which is Blue. If you don’t find this suitable, you can change it to Dark or Light. Here’s how:
- Go to the menu bar. It’s on top of the screen and it contains different tabs, such as File, Edit, View, etc.
- Find Tools and select the tab.
- Choose Options from the drop-down menu. Note that this section allows you to customize the Visual Studio according to your liking with more possibilities than just changing the theme.
- Select Environment and then General to open the options page.
- Find Color theme option and set it to Dark or Light.
- Click OK to confirm your choice.
- The complete service will now appear in dark/light mode.
If you’re interested in more themes, you can find them in the Visual Studio Market Place. Choose the Visual Studio Color Theme Editor and download it to gain access to more themes in the Color theme menu. This feature also allows you to create your own themes.
If at some point you wish to switch back to the service’s default theme, you can easily do so by repeating the previously described steps and set the theme back to Blue.

How to Change Fonts and Colors
If you want to change fonts and colors of the text that appears in this tool, follow these steps:
- Choose Tools from the menu bar.
- Click on Options.
- Click on the Environment section.
- Select Fonts and Colors and make sure the tab on the right that says Show settings for is set to Environment Font.
- You will see a list of different fonts underneath, so extend the menu and pick a font that you like.
- You can also change the font size – select the Size menu and choose a size. Clicking on OK button will save your choices.
How to Change the Color of Your Text in the Text Editor
Another feature you can change is the color of the text you enter in this program. Do the following:
- Click on Tools in the menu bar.
- Choose Options from the drop-down list.
- Choose Environment and then Fonts and Colors.
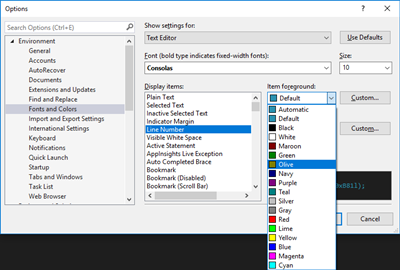
- On top of the screen, you’ll see the Show settings for: option. Choose Text Editor.
Note that this section also allows you to change the text font. The drop-down menu with different fonts is right under the Text Editor tab, so click on the arrow to extend the menu and choose a font you’d like to see in Visual Studio. - Back to changing the color: select Line Number under Display items section and go to Item foreground on the right.
- Click on the arrow to extend the list and chose a color.

- Before you confirm your choice and leave the window, remember that different computer languages can have specific fonts and colors for specific functions. Bear this in mind when choosing a new color or font for your text.
Dark vs. Light Theme – Which One’s Better?
There’s been a debate whether dark themes are now just a matter of trend or if it’s really better for your eyes (and battery) to switch to dark modes wherever possible.
The truth is – the dark theme can be better and put less strain on your eyes, but only if you’re a night owl who tends to work in low-light conditions.
If this isn’t the case, better stick to the light version to avoid potential eyesight troubles.
What theme do you use for your Visual Studio? Have you made more changes to personalize it? Share your experiences in the comments section below!


