How to Fix a Non-Working Webcam on Your HP Elitebook

It can be annoying enough if you’re planning to make a video call to your friend, and your webcam isn’t working. But what if you need to hold a Skype meeting, have an online job interview, or teach online?
If you can’t seem to get your webcam to work correctly, there may be several reasons behind it. Here are a couple of possible causes and solutions you can try out on your HP EliteBook.
For Windows 7 Users
If your HP EliteBook uses Windows 7 and has a built-in camera, here are the reasons why the cam might not be working.

1. Your Laptop Can’t Identify the Webcam
Laptops with built-in webcams come with pre-installed software that enables the cam to work. Here’s how to find the software in your laptop:
- Click on Start, go to the search field, and type in Device Manager.
- When the search results appear, click on Device Manager to open it.
- Double-click on Imaging devices and select the name of your webcam software.
- When it opens, you should see a video. If so, your cam is working, and there’s no need for any further steps.
If you can’t find the software, it doesn’t open, or you can’t see the video when it does, try restarting the computer and going through these steps again. If it’s still not working, move on to our next solution.
2. Video Is Not Showing in the Software
The reason why the video isn’t displaying on your EliteBook may be an outdated or missing driver. Here’s how to update or change a driver:
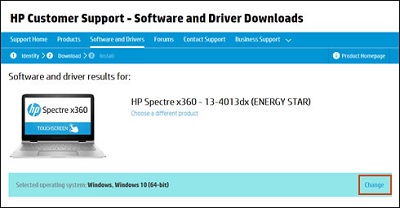
- Go to the official HP Software and Driver Downloads page to find a driver that needs replacing.
- Type in the serial number of your laptop and select Submit to continue.
- On the next page, your laptop’s details are displayed along with the OS you’re using.

- Find the webcam driver in the list of available drivers and download it to your laptop. Install it following the instructions from the webpage, and when you’re done, restart your laptop.
- Try opening the webcam software again to see if it’s working.
3. Webcam Isn’t Working After an Update
Your cam was working just fine until you had to install a Windows update. How do you solve this?
- Open the Device Manager on your laptop.
- Double-click on Imaging Devices, and you’ll see an expanded list of drivers available for your webcam.
- When you find a webcam driver on the list, right-click it and choose Update Driver Software. Follow the onscreen instructions.
- When it’s done, restart your laptop and try the software again.
If it’s still not working, go to Microsoft System Restore and switch back to the version you had before the update.
4. No Webcam in Device Manager
You open the Device Manager, but it doesn’t recognize your webcam software at all. Here’s what to do:
- Shut down your laptop, then disconnect it from the cord.
- Take out the battery. If it’s not removable, you can power reset it. If you don’t know how, check the official HP website for instructions.
- Press the power button, then hold it for about 10 seconds. After that, put the battery back and reconnect the laptop to power.
- Turn on the laptop and wait for Windows to start.
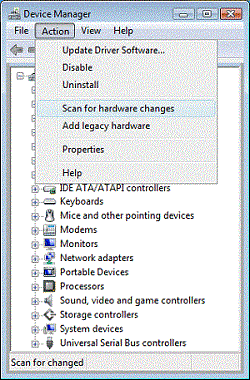
- Go to the Device Manager, and if you still can’t see Imagine devices in the list, click on Action, and choose Scan for hardware changes from the list.
- The Device Manager will recognize the webcam software after the scan.
For Windows 8 and 10 Users
If you’re using newer versions of Windows, such as 8 or 10, here’s the possible troubleshooting techniques you can try to get your webcam to work correctly.
1. Video Not Displaying in Software
Just like a Windows 7 user, you also have the option of updating or changing the webcam driver if your cam isn’t working. You can do so following the steps already described above.
What you can also do is ensure that you’ve selected the right software for your webcam. An issue can occur if there are several video input sources on your laptop. Your webcam software may be wrongly connected to another device or program.
- Open the webcam software you’d like to use.
- Open the properties and try to find a video source or caption.
- Your webcam will probably have some of these names: USB 2.0 Camera, USB Video Device, HP Pavilion Webcam, HP Webcam, or something similar.
2. No Webcam in the Device Manager
The instructions are the same as for Windows 7 users, but you only need to restart your laptop, without removing the battery. When you start Windows again, go to the Device Manager and select Scan for hardware changes. Your webcam should appear on the list after this scan.

3. Webcam Not Working After a Program Is Installed
Make sure you don’t install too many webcam drivers or programs. This may cause a conflict, so remember to use only one program at a time when operating your webcam. If you’re experiencing issues, in most cases, it’s enough to restart your laptop.
Note that you may also experience similar problems after a Windows update has been installed. You can solve it the same way described above for Windows 7 users.
Webcam Troubleshooting for Chatting Without Troubles
Most of these solutions aren’t too demanding, even if you’re not particularly tech-savvy. Often, it’s a temporary bug that can be fixed in minutes. Sometimes by simply restarting your laptop. If it’s something more complicated, follow our instructions and get ready to enjoy your video calls again.
Have you experienced issues with the webcam on your EliteBook? Share your fixes in the comments section below.


One thought on “How to Fix a Non-Working Webcam on Your HP Elitebook”