How to Change Your Background in Zoom

The fact that you can use a virtual background on Zoom is one of the coolest features of this communication app. Not that switching to a tropical background for your calls and conferences improves Zoom’s functionality. But it can surely make your user experience prettier.
So, why not add a fun flourish to your business meetings and online get-togethers with your family? This write-up provides you with a detailed guide on how to make the switch. Plus, there are additional tips regarding image requirements.
Things to Know
Aside from changing the default background, Zoom also allows you to personalize the background of the location, room, or floor. There’s also an option to schedule the display background and use a custom background on a particular device.
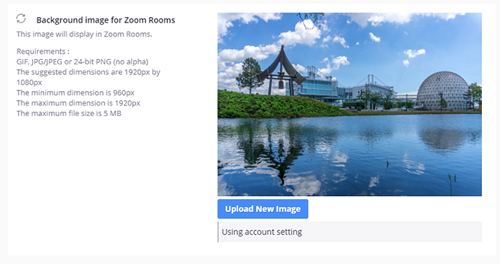
To do this, you need to be an account owner or administrator. The supported formats are JPG, GIF, JPEG, and 24-bit PNG. The recommended resolution is 1920 x 1080 at the 16:9 aspect ratio, and the image size shouldn’t exceed 5MB.
Changing the Background
The Zoom mobile app doesn’t allow you to change the background image. So the following guidelines will focus on the desktop app. Other than this limitation, the entire method is super straightforward.
Step 1
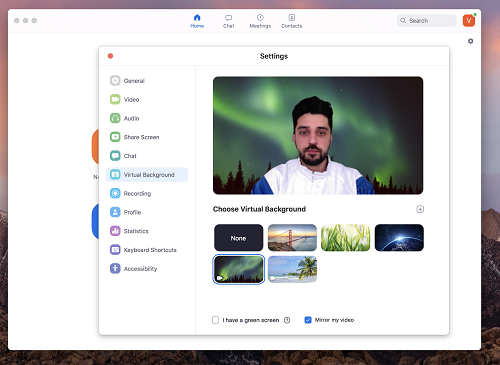
Launch the desktop app and click on the gear icon under your avatar to access the Settings menu.

Now, click on Virtual Background in the menu on the left and you’ll be presented with an assortment of default backgrounds.
Step 2
Click on the image you like and your background instantly changes. The important thing is that there are two types of Zoom backgrounds. You get to choose between HD video loops and regular images.
It’s worth noting that the video loops are subtle and attractive and won’t distract other participants in the meeting.
Important Notes
Besides the default images and videos, you can also upload your own. Unfortunately, Zoom currently doesn’t have a proprietary repository of stock images. But if you download an attractive video or image from a free stock website, it should work just fine.
Zoom also added a green screen option, which may prove invaluable for all of those who host webinars. To enable green screen, check the box in front of “I have a green screen”.
Changing the Background for Location, Room, and Floor
For this, you need to log into your profile via the Zoom web portal. Here are the necessary steps.
Step 1
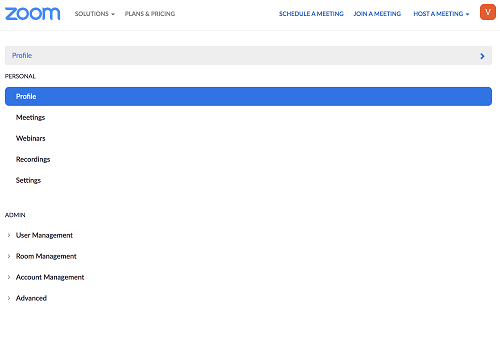
Once logged in, navigate to Room Management, click on it, then select Zoom Rooms. Depending on where you wish to make the change, you click on Edit next to the Location, Room, or Floor. For the purposes of this article, TechJunkie selected Room.
Step 2
When in the Room Setting menu, go to the Room Setup. You should be able to see the “Upload New Image” button at the bottom of the “Background image for Zoom Rooms” tab.

Those who decide to use their own image will be able to see the image preview in the same tab. And there’s also a “Using account settings” notification.
Step 3
After you select the image, hit open and it will become your Zoom background. If you change your mind at the last minute, click Reset or Delete and the app will restore the image to default.
Can You Disable Virtual Background?
The quick answer is yes, Zoom allows you to disable the background change for users. Again, you access this option via the Zoom web portal, but it’s kind of buried under different menus.
Anyway, click on “My Account” when you sign in, then click on the Profile tab to reveal more menus.

Now, select Settings under the Personal tab and make sure you’re in the Meeting menu in the next window. Scroll all the way down to the “In Meeting (Advanced)” tab, then scroll some more to find “Virtual background”.
You’re finally there, and the only thing you need to do is click the button next to “Virtual background”.
Digital Signage for Zoom Rooms
This option allows you to post a URL, images, or videos to be displayed when the room isn’t in a meeting. Here’s the navigation path to reach the option:
Zoom Rooms > Select location in the Room hierarchy > Choose Edit
Thereon, navigate to Content List and select “Add Content” to upload URLs or images. You can choose the content that’s already in your Library, select media from a local drive, or type a URL.
That out of the way, choose “Add Items” and hit “Save” to confirm. While you’re at it, you can change the “Display Period” and mute or unmute the content sound.
Zoom from a Beach
It would be wrong to assume that Zoom background and customizations are only for cosmetics. They can be used for professional purposes and significantly improve the user experience for webinars. Therefore, your job is to find a creative way to take advantage of the feature.
Did you know you could use video backgrounds on Zoom? How would you use the background for promotion? Share your preferences with the rest of the TechJunkie community in the comments section below.


One thought on “How to Change Your Background in Zoom”