How to Set Up a Meeting in Zoom

Want superior video and audio sharing? Maybe a tool for professional webinars you organize? If so, Zoom is one of the apps that might be right up your alley. But how do you set up a meeting?
The process isn’t rocket science, but there are certain things you should know to avoid any unnecessary trial and error. That being said, the Zoom UI and UX is friendly and intuitive, so you shouldn’t struggle to make it all happen.
Setting Up a Meeting
You can set up a meeting on a mobile device and on your desktop. There are some differences in the UI, so this guide will include both methods.
Desktop
Step 1
Open the Zoom app and sign into your profile. Then, click on the arrow down under the “New Meeting” thumbnail to choose your preferences.
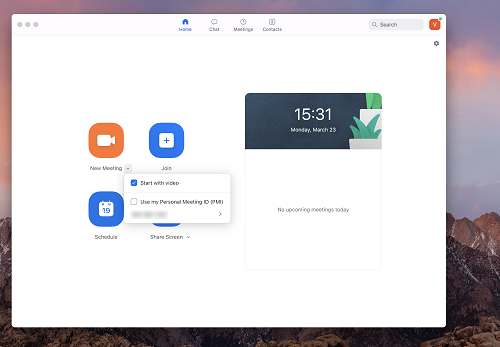
By default, the “Start with audio” option is checked and you can also select to use your Personal Meeting ID (PMI). Clicking on the arrow next to the number reveals more options for the meeting ID.
Step 2
That out of the way, you can click on the New Meeting thumbnail and your video feed should start instantly.
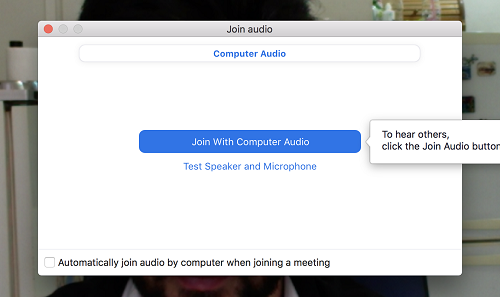
Another window pops up asking you to “Join with Computer Audio”. And this is also where you can test your microphone and speakers.
If you always want to join with audio, make sure to check the box in front of the given option. It’s located at the bottom of the pop-up window.
Step 3
Now, you need to invite other participants to the meeting. The Invite icon is at the bottom of the main Zoom window. Click on it and select the invitation type – Contacts or Email.
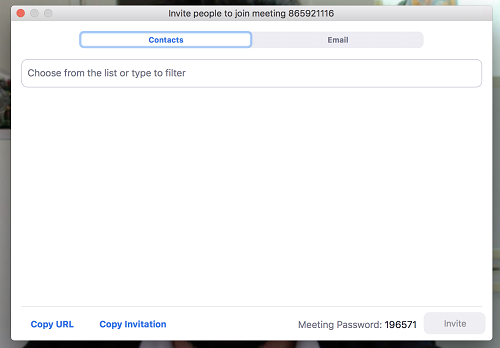
If you chose the first option, the app goes through the contacts on your computer to help you find the one that should join in. The email invitation is when a contact isn’t on your list. And this kind of invitation is generally more convenient.
Step 4
For the purposes of this article, TechJunkie went with the email invitation. No matter what you chose, the end-user gets the same message and meeting information.
So, click on the email client of your preference and the app will automatically open a new draft email. The great thing is that the body of the email gets populated with the relevant information by default.
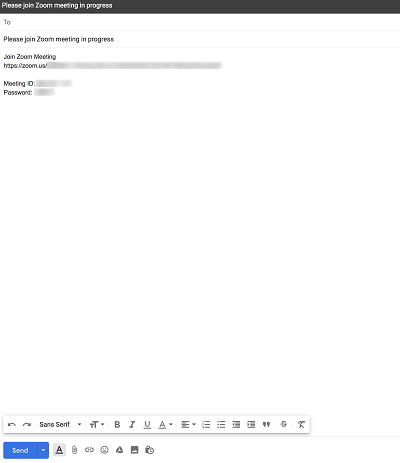
As indicated, the recipient gets a link to join the meeting and there’s also a Meeting ID and Password. Your only job is to choose the recipients and click Send.
Mobile App
Step 1
This step is pretty much the same as on the desktop app, albeit the UI is slightly different. Now, you tap on the “New Meeting” icon in the upper left corner of the screen.
If you want to disable the video, tap on the button next to “Video On”. And you can also choose to “Use Personal Meeting ID (PMI)”. Again, you tap on the icon next to it.
Step 2
Afterward, hit the “Start a Meeting” button in the middle of the screen and you’ll immediately enter the meeting window. To invite more people, tap the Participants icon at the bottom of the screen.
Now, tap the Invite button at the bottom of the screen. You have the option to send an email or text message, invite selected contacts, or just copy the meeting URL.
When setting up a meeting via a mobile device, it’s best to use the “Invite Contacts” option. This is the quickest way to ask multiple participants to join. But there is one potential snag.
The buttons in the Participants menu are very small and located at the bottom edge of the screen. Therefore, it’s not hard to miss them if you’re using the app for the first time.
A small but welcome change would be if Zoom added a larger plus icon on top of the window. And the rest of the actions could remain at the bottom.
Regardless, when you send out the invitation, you only need to wait for the people to come in.
Note: The cool thing is that you can go to the Zoom Save Driving mode in a single swipe. Just swipe to the right within the meeting window and you’re there. This action mutes the audio and stops the video.
Scheduling a Meeting
The sections above are great if you need to quickly set up an emergency meeting. For all other intentions and purposes, it’s best to schedule it.
To do so, you need to hit the Schedule button and fill out the form that pops up. The actions and requirements are exactly the same on mobile and desktop apps.
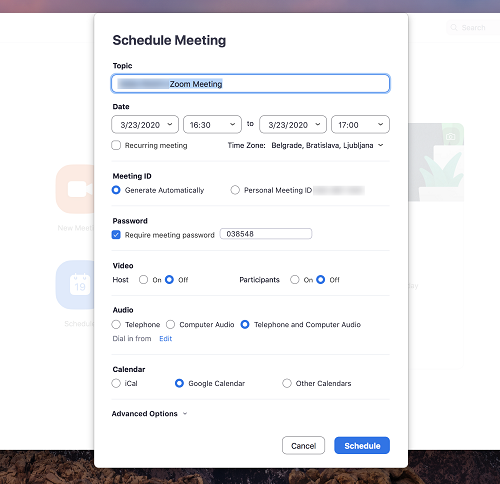
The important thing is not to rush through the form and make sure that all the details correlate with your meeting needs. And once you hit “Schedule”, you can add participants to the meeting.
Join a Zoom Meeting Now
Zoom meeting scheduling and set-up offers plenty of options. Yet the UI isn’t cumbersome and you don’t lack any features that might create user friction. Plus, there’s very little lag between clicking on Join and being inside the meeting.
How many participants do you invite to your Zoom meetings? Do you use the Zoom mobile or desktop app more often? Give us your two cents in the comments section below.


